Making replacement compound ...dial...angle divider...thingy?

chris.trotter

Registered
Registered
Joined
May 14, 2013
Messages
104
I don't even know what the term is to search for, so all I need here is a little "point me in the right direction". :)

On my old lathe (South Bend 22Y...it's super old) the compound feed's dial/angle markings have completely worn out, making tapers complete guesswork. In the event that nobody is interested in buying it (posted it for sale locally), I'm going to try repairing it. Could someone kindly point me in the direction of "making a new one"? I am guessing it's going to involve a rotary table/dividing head (which is ok, planned on getting one anyways - have some gears to cut, too).

To be clear, maybe what I'm actually asking is "how does one make a circular piece with accurate angle divisions"...?

Here's the piece I need to re-make. Or refresh. Probably cut down that round face to clear the markings, then re-cut them...? Is this going to be a disaster? Do I have alternatives if those numbers are illegible?
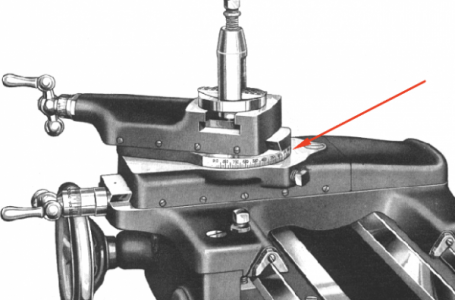
1542822832263.png
 
I would use a rotary table, after all they are defined by degrees. If you want a clean start, remove the old lines and numbers, and mark the numbers with a 1/16 stamp set. You don't have to mark all the numbers, just enough to know where your at....like the 3,6,9,12 on a clock.
 
Best to mark every 10 degrees as was originally done, and make every 5 line longer and every 10 line a bit longer yet. If you have a rotary table, it can be used to mill off the existing mess and also to do the re cutting of the lines; lay out 3 lines parallel to the bottom of the compound to shou the length of the new graduations, use a sharply angled tool to cut the graduations. Not knowing what equipment you have to work with, it is difficult to give further advise; I have done this job several times. Another worthwhile job in the same vein is to make larger dials for the compound and cross feed that can be graduated for higher visibility, direct reading (.001 on dial = .001 on diameter) for the cross feed and just larger with the same number of grads. on the compound for better visibility.
 
I have yet to actually get a rotary table, but seems like that's the bulk of the necessary equipment. Then using a properly ground HSS flycutter to do the actual cuts? I have a small benchtop mill, and this lathe. Was looking at getting one of those combo 6" rotary table/dividing plates/tailstock dealies off ebay, this: HV6-ROTARY-TABLE-TAILSTOCK-INDEXING-PLATES-SET

I'll look into larger dials - the ones on there are pretty readable, it's just the compound angle stuff that's mashed, guessing someone ran spinny things into it at some point.
 
I would not worry about where the spinny things eroded the compound, you rarely use that part of the markings, and I'd guess that you would have to remove too much of the diameter to achieve even minor cleanup on the whole surface; most used is the 12:00-3:00 part of the dial. I use a stationery tool to cut the graduations, like a threading tool, but a much more acute angle, perhaps 10 deg. included angle and crank the table or knee to make the cuts.
 
A rotary table would be the best approach. You will need to make sure that the center of rotation of the compound base is centered on the rotary table. The simplest way to do that will be to use the boss on the cross slide. Remove the top slide from the lathe and fasten it to the RT. Use an indicator to center the cross slide boss on the RT. Do this by rotating the RT table, not the mill spindle. It will be a trial and error process, measuring runout and tapping appropriately to adjust. Once centered, you can mount the compound base to the cross slide boss.

My preference would be to engrave the degree marks rather than cutting them. I would mount a custom shaped tool in the mill and drag the tool to cut the mark. The mill spindle will have to be locked to prevent rotation. This will give you the sharpest lines. Ano5ther approach would be to mount the RT vertically, and use a carbide engraving tool. They can be purchased with 15º angles and .010". The lines won't be quite as sharp but they should be usable.

Without a CNC mill, you will probably have to stamp the digits.
 
Hi Chris,

That scale you point at is called a protractor. It should be easy enough to re-scribe the lines, but the characters are going to be more difficult.

I have seen some software on the net, not that I can find it at the moment, that will allow you to print out a scale that can be used to replace or make a new one on paper or plastic that could be attached over or in place of the existing one.

I've used the software to make tuning dial scales in the past. In fact it can produce all sorts of different ones.

EDIT: Found it "https://www.blocklayer.com/hub-spokes.aspx"
 
Last edited:
On my old lathe (South Bend 22Y...it's super old) the compound feed's dial/angle markings have completely worn out, making tapers complete guesswork. In the event that nobody is interested in buying it (posted it for sale locally), I'm going to try repairing it. Could someone kindly point me in the direction of "making a new one"?

When I make tapers, I ignore the protractor on the lathe.
Instead, I chuk up a part with the desired taper I want and dial it in.
Then I put the DI in a holder on the compound and manipulate the compound until the DI does not waver when the DI is run over the part's taper.

In most cases, I don't even know the angles of the taper, but I have a male or female version of the taper to indicate and replicate.
 
Man, you guys always come through with options, thank you!! I think I'm going to take the 'try fixing it first' approach, thanks to your input. That rotary table set and a tenths DI are next on my list... :) (although first I'll do the math to ensure I can cut the gears on it - that it'll be large enough)
 
When I make tapers, I ignore the protractor on the lathe.
Instead, I chuk up a part with the desired taper I want and dial it in.
Then I put the DI in a holder on the compound and manipulate the compound until the DI does not waver when the DI is run over the part's taper.

In most cases, I don't even know the angles of the taper, but I have a male or female version of the taper to indicate and replicate.
I do the same for making morse tapper arbors etc works wel this method
 
Back
Top