Machining an arc on a rotary table

PHPaul

Registered
Registered
Joined
Dec 5, 2017
Messages
470
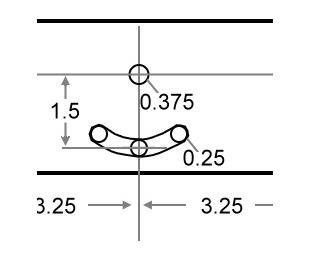
slot.jpg

I need to machine the arc shaped slot. I have a 3" rotary table. I'm assuming that the fixed hole needs to be aligned at the center of the table in order to machine the arc at a specific radius from the fixed hole, yes?

If so, it's going to take some creative clamping to fix the piece to the table. I'll only have one t-slot visible as the piece is 2.25 inches wide.

This is a practice setup, it'll be worse with the actual part as it's 3" wide.

Suggestions?
 
That's more-or-less the conclusion I"m coming to. Essentially, making the mounting surface of the table larger.

That would solve two problems: Making room to clamp the work piece where it needs to be, and allowing for a plunge cut without damaging the table. I was planning to space it up with parallels, but can't come up with a way to clamp it.

So, I need to make a piece to mount my piece on to make a piece. :p

Fortunately, I'm retired, it's raining, and I have nothing better to do than putter in the shop.
 
That would solve two problems: Making room to clamp the work piece where it needs to be, and allowing for a plunge cut without damaging the table.
The oversize top plate is the way to go. Consider making it thick enough to be sacrificial, and made of aluminum. Then you can just cut your work, allowing the cutter to protrude a few thousandths through the work into the plate. If and when the table becomes too scarred, just fly cut the plate top surface until it is cleaned up enough for more work. The setups will be more rigid when bolted solidly to the adapter plate.
 
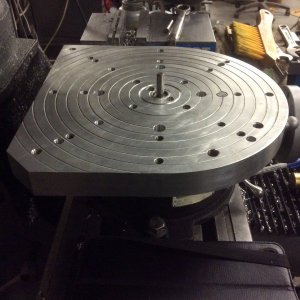
This is an 8” rt that got bigger, the dowel pin is used to center the table under the spindle also to center a 3-4 jaw chuck on the table. Not sure of your machine , a 1/2” 6x6” aluminum plate should work with threaded holes in it to mount hold down clamps .
170C215A-35C4-48E7-9214-901124212A42.jpeg
 
I'm working on a 6x6x1/4 piece of mild steel as that's what I have on hand at the moment. I've drilled and countersunk holes to line up with the slots in the table.

Conveniently enough, 1/4" square nuts work for tee nuts, 1/4-20 flat head phillips machine screws cut off to clamp it down.

Now I need to think about a pattern for hold-down holes. I'll drill and tap them to match my 7/16th clamping set.

Pix later, we're getting rain of near-biblical proportions at the moment.
 
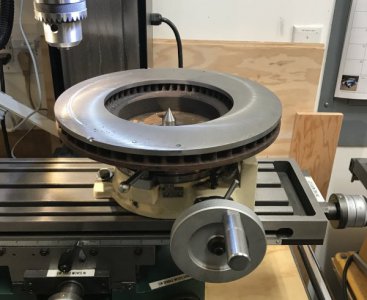
You could also bolt a disc brake rotor to the rotary table. This allows clamping around the edges. Since the rotor is sacrificial you could drill and tap it. The rigidity of this setup is not as good as an adapter plate, though so take it slow. The advantage is that old brake rotors are free at the local repair shop.

IMG_1599.JPG
 
Almost all of the rotary table projects I've done have involved an intermediate plate. In my case it's a 6x6 piece of 1/2" aluminum with countered holes to bolt it down to the table with t-nuts, and lots of tapped holes left over from various projects.

I like the brake disk idea, though.
 
The 6x6 plate worked okay as a "proof of concept". I learned three things.

1. I need to machine a center pin (probably several in various diameters) to ensure repeatability.
2. Phillips head machine screws countersunk flush make for easy mounting but are difficult, if not impossible to get tight enough to stay tight.
3. 1/4-20 square nuts worked in a pinch, but I need to make some actual t-nuts to fit the slots on the table.

The intermediate plate got loose halfway through machining the slot and reproducing the setup after tightening the screws didn't work very well. I probably could have gotten close enough if I had fussed with it long enough, but it was just a test piece that didn't matter anyway and by that time I'd figured out what needed to be done on the actual piece.

The disc brake idea is cool, but a little overwhelming for my iddy-biddy 3" table...:D

I need to scrounge up a piece of 1/2" aluminum to make Part Deux so I can counter-sink some hex-head bolts for hold-downs.
 
Impact driver for the Phillips might help you out!
The 6x6 plate worked okay as a "proof of concept". I learned three things.

1. I need to machine a center pin (probably several in various diameters) to ensure repeatability.
2. Phillips head machine screws countersunk flush make for easy mounting but are difficult, if not impossible to get tight enough to stay tight.
3. 1/4-20 square nuts worked in a pinch, but I need to make some actual t-nuts to fit the slots on the table.

The intermediate plate got loose halfway through machining the slot and reproducing the setup after tightening the screws didn't work very well. I probably could have gotten close enough if I had fussed with it long enough, but it was just a test piece that didn't matter anyway and by that time I'd figured out what needed to be done on the actual piece.

The disc brake idea is cool, but a little overwhelming for my iddy-biddy 3" table...:D

I need to scrounge up a piece of 1/2" aluminum to make Part Deux so I can counter-sink some hex-head bolts for hold-downs.

Sent from my SAMSUNG-SM-G900A using Tapatalk
 
Back
Top