Looking For Some Harder To Find Parts: Atlas 12"

ZZYL-Vulcan

Registered
Registered
Joined
Nov 6, 2015
Messages
24
Hi,
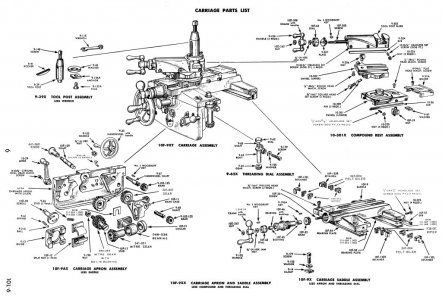
So in this rebuild process I have discovered there were a couple missing parts. One is the shim in the Apron (pat 10F-85). The lathe worked fine when I took it apart, but there is no shim, and the parts diagram calls for one. Any guidance on that subject? Also I am trying to find a part number for the screws that hold the rack on the bed. I broke on during disassembly and don't see a part number on the exploded diagram. Also, What does the plunger in the apron do exactly? The spacer near the top of the plunger is missing, I have already odered a replacement, but I don't understand the operation of that spring, spacer, and plunger. I've gathered the plunger contacts the split nut scroll, but to what end? I would be grateful for any help!

Regards,

Vulcan
 
The shim looks like it would be .002 or .003 and can still be bought from Sears:
http://www.searspartsdirect.com/part-number/711-005/0009/101.html
http://www.searspartsdirect.com/part-number/711-006/0009/101.html

If you have the model number, you may be able to find the screws by searching the site:
http://www.searspartsdirect.com/model-part/10128990/0247/0728000/00023736/00004.html

You might also try Clausing Industrial: http://vintagemachinery.org/pubs/51/3400.pdf

It looks like they have a lot of the Atlas parts, but I am not sure from your description what screws you are talking about exactly.

image.jpg
 
Vulcan,

What model is your lathe? Judging by your use of part number 10F-85 and your mention of the plunger and spacer, I would assume 101.07403, 27430 or 27440. It will maybe reduce the possibility of confusion if you refer to them as Craftsman 12" which partially differentiates them from the later 1/2" bed 12" machines. In any case, I have been told that the plunger, spring and spacer were an interlock to prevent simultaneous engagement of the carriage feed and the cross feed. They were either never used on the Atlas 10F or were dropped after 1957. And were not used on the 1/2" bed machines. Personally, I would not bother to install them. Atlas may have been forced by Sears to add them. The person who did the forcing either died, retired or got fired. And when Atlas redesigned the 12", they were not included. They aren't necessary.

The screws that attach the rack to the bed are #8-32 x 1/2" Fillister Head Machine Screws.

The part number of Shim 10F-85 was changed by Clausing to 711-005 (0.002"), 711-006 (0.003") and 711-046 (0.010"). This is a select upon assembly item and it is possible that your machine did not need any. It isn't clear whether the shims were for lead screw alignment or miter gear running clearance.To check, assemble, install and adjust the saddle without the apron. Install the miter gears, bearing and collar on the apron and check that the gears turn freely without cogging. If not, add shims. Hang the apron on the carriage and slide the carriage down near the tailstock end. Install the lead screw but don't tighten the screws attaching the right lead screw bearing to the bed. Push the lead screw against the bed and confirm that doing so doesn't put it in a bind in the miter gear.
 
The 1975 manual for the Atlas 12": http://wiki.hive13.org/images/b/be/Atlas_Lathe_12_3996_manual.pdf

They always list two sizes for the shim. Is this for manufacturing variations in the other parts, or a suggestion for replacement of worn parts? I noticed that Clausing sells these same shims in several other thicknesses which would make me think they compensate for wear. Does everything still snug up without using them? Would they have served the purpose of reducing noise/vibration?
 
Last edited:
This is a select upon assembly item and it is possible that your machine did not need any. It isn't clear whether the shims were for lead screw alignment or miter gear running clearance.

I missed this the first go round. That pretty much answers my questions.
 
The earliest dated manuals generally list all shims with a 10-, 10D- or 10F- single part number and don't list thickness or thicknesses. Presumably if you needed a certain thickness, you were expected to know to add that information when the order was placed. Most of the later manuals use the Clausing part numbers beginning with 711- and list two thicknesses, 0.002" and 0.003". This allows 0.001" increments from 0.002" and up, albeit possibly with a bunch of shims. Only one manual that I've found so far listed an 0.010" shim for the miter gear bearing on the apron. With the exception of the babbit spindle bearing shims, no instructions on how to select the shims have turned up. The carriage hold-down plate shims are fairly obvious. The more I think about it, the more inclined I am to think that the apron miter gear carrier and bearing shims are to adjust gear mesh for manufacturing tolerances.
 
Yes, I agree with you wa5cab. While I am not as knowledgeable about the subject, intuition is telling me it must have been something to do with tolerances.
 
Hey I wanted to take the opportunity to thank you guys for all the help. Fast and very useful info you provided.

As far as the shim goes, I am going to skip it. It wasn't on the machine, the lathe ran great prior to disassembly, if its an as needed part I wont sweat it. In regards to the plunger, I am going to run with it only because I already ordered the replacement spacer. When I was inspecting the back of the apron, I had guessed that the plunger might not be necessary, I'm glad my suspicions were validated.

Beyond that, thanks for the link to Sears Parts Direct and Clausing Industrial. Those ought to be very useful. This machine is in good shape for its age (its a 101.0743 since someone asked). Despite its relatively good condition, I have noticed some of the smaller screws and bolts have deteriorated. 60+ years has made the steel brittle and prone to easy breakage. This is compounded by the standard screw slot used to extract these parts. Most of the gib screws and rack screws fit this description. Not the end of the world by any stretch of the imagination. I've tried to use OEM replacement parts, and haven't had to resort to parts from the hardware store. (And of course once I'm back up and running I can make my own...)
 
Back
Top