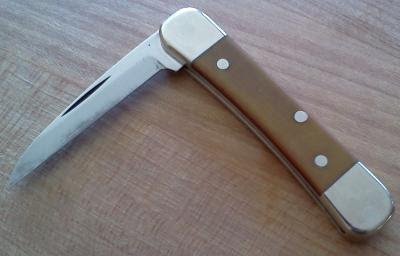
My dad is a hard man to shop for, and as Fathers day and his birthday were coming up, 3 months ago I decided to use some of these fancy machines I have managed to collect to make him something unique. Inspired by John Grimsmo, I settled on a pocket knife (that'll be easy..). Well, I finally finished (only a month late), and my dad loved it. I figured some folks on here would be interested in the process, so here we go.
I started with some rough sketches, and a lot of research. I was going to make a classic pocket knife, a slip joint folder. The blade was going to be D-2 tool steel, the liner and bolster nickel-silver, and the handle stabilized liquidambar wood. I decided on a wharncliffe blade shape because I like the simple geometry.
After I had some sketches, I drew the blade and handle up in CAD, and from there coded up a program to shape the blade bevel and cut the outline (I don't have a CAM package, so I am still coding all my CNC programs by hand). Here is my first attempt in aluminum.

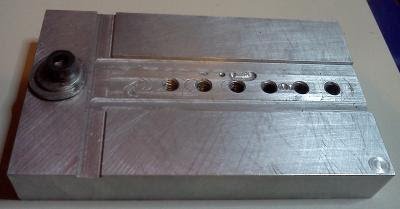
This one uses a 1/8" square end mill. Material is aluminum. I ended up mocking just about everything up in aluminum first because it is cheap, and I was less likely to break tools. I could also run much faster, which made prototyping much faster. The first pass was just a test, I cut both sides of the bevel on the same side of the material. The profile did not cut all the way through the aluminum either. I was holding the blank in a set of soft jaws, I would need something better to hold the tool steel for the blade, as it was going to be much thinner (1/16"). This is what I came up with:
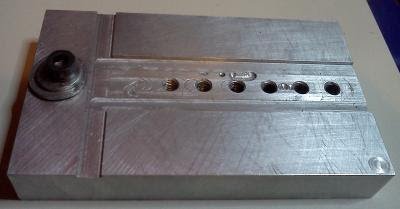
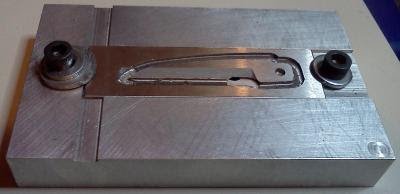
And here it is holding a partially machined blank
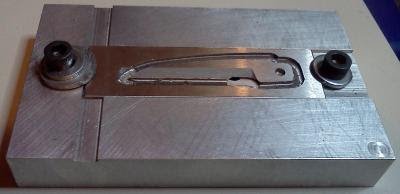
The jig is a piece of 3/4" MIC6 aluminum tooling plate I picked up as a scrap from a local metal supplier (they are amazing). The slot is just the right height, and just the right width to fit the 1x0.0625" flatstock I chose for the blade and backspring. There is an edge on the left side to locate one edge so I could flip the part about the x axis to machine both sides of the bevel. 6mm hex head bolts and washers hold the material in place. In the future it may help to have additional clamping in the middle, but since I was taking light cuts with a small end mill, the setup was ridgid enough.
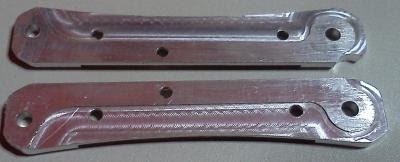
The next stop was to test out the code for the handles. Here is a pic of the "inside" of the handle.

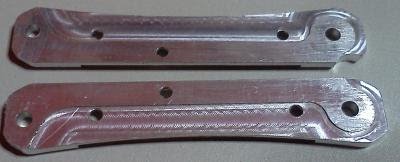
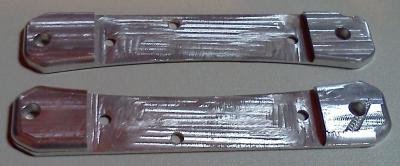
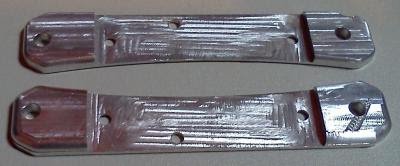
You can see the outline cut, the holes for the pins are drilled, and the relief for the blade is machined. The relieve allows the blade to fold in without rubbing. After this step, the part is flipped over and grasped in a pair of custom machined soft jaws that have a matching profile. This grips the part quite securely. Once in the jaws, I face down the excess material, cut the pocket for the inlay material, and run a corner rounding endmill around the edge. Here are some sample handles in aluminum again, inside and outside.
Along the way I made up some blades from O-1 tool steel as tests as it is both cheaper and easier to machine than D-2, and frankly, at that point machining D-2 still intimidated me a little. Here is my first working prototype.


The handle material is still aluminum here. The backspring and blade are O-1 steel, hardened and tempered. I was able to verify fit (actually, I was able to verify there were still problems, and adjust). Everything fit well enough to actually work, and the prototype snaps open with a satisfying "snik". The backspring tension was very nice, strong enough to keep the blade in position, but not so high as to make it a chore to open. There is no nail nick in the blade yet, as I was rushing ahead, and hadn't really figured out how I was going to cut the nick anyway.
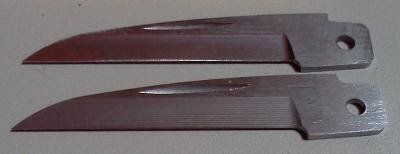
Full speed ahead. More fine tuning, and the purchase of the 3/16" 4flute carbide ball end mills allowed me to get the blade code to the point where I was very satisfied. Here are to test blades cut from O-1.
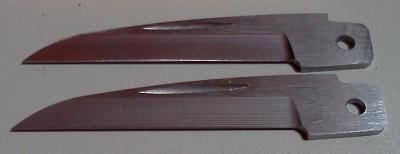
The bevels on these were cut with a ball end mill and a 1.5 thousandths stepover. Tool marks are visible, but you can barely feel them. They went down very quickly with some 150 grid wet dry sandpaper. I ended up cutting the nail nicks with a fly cutter, which worked better than I could have hoped.
Time passes, I bite the bullet and machine the real handles out of my nickel silver bar that is just large enough for a single set of handles. This goes off without a hitch, and the stuff looks AMAZING. I also say "what the hell", and go for the the D-2, cutting the blade and the backspring. Everything goes better than expected. The blade and backspring are hardened, then tempered, and then tempered again, and then the backspring goes back in and gets tempered a 3rd time.
Lots of sanding, sanding sanding. My original idea about using wood for the inlay meets with disaster, wet-sanding softens and warps it, which I only realize after I finish putting in the first set of pins and peening them. An hour of drilling out pins and I am searching for a new material for the inlay. My mind wanders to some material I got from my dad, some linen-phenolic laminate which would be perfect.
Inlay is glued with JB weld this time, and I make sure the pocket in the nickel silver is good and roughed up. Sanding sanding sanding. Pins for the inlay are in. More sanding.
I assemble the thing for the first time. Damn that looks good.

But something still isn't right. The backspring is binding. Push out the pins and make some adjustments. She's back together again, action is good. I hold my breath and set the pins. Action is still good. Sanding sanding sanding. Once the sanding is done, polishing with some green compound, and it's looking amazing.
Scrub down with soap and water, then a couple blasts of WD-40 to clean out any grit. Put an edge on and a little lube in the right places, and she is done.
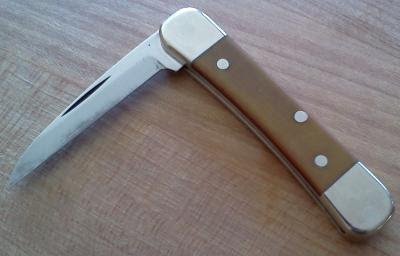


 hew:
hew:
All told, I spent way longer than I figured, and picked up a kiln on the way. After all the prototyping, the final knife only took me about two weeks, which ins't bad. I have a lot of material left, so I am toying with making another for myself. Maybe in a couple weeks when I forget how much sanding I had to do...







I started with some rough sketches, and a lot of research. I was going to make a classic pocket knife, a slip joint folder. The blade was going to be D-2 tool steel, the liner and bolster nickel-silver, and the handle stabilized liquidambar wood. I decided on a wharncliffe blade shape because I like the simple geometry.
After I had some sketches, I drew the blade and handle up in CAD, and from there coded up a program to shape the blade bevel and cut the outline (I don't have a CAM package, so I am still coding all my CNC programs by hand). Here is my first attempt in aluminum.

This one uses a 1/8" square end mill. Material is aluminum. I ended up mocking just about everything up in aluminum first because it is cheap, and I was less likely to break tools. I could also run much faster, which made prototyping much faster. The first pass was just a test, I cut both sides of the bevel on the same side of the material. The profile did not cut all the way through the aluminum either. I was holding the blank in a set of soft jaws, I would need something better to hold the tool steel for the blade, as it was going to be much thinner (1/16"). This is what I came up with:

And here it is holding a partially machined blank

The jig is a piece of 3/4" MIC6 aluminum tooling plate I picked up as a scrap from a local metal supplier (they are amazing). The slot is just the right height, and just the right width to fit the 1x0.0625" flatstock I chose for the blade and backspring. There is an edge on the left side to locate one edge so I could flip the part about the x axis to machine both sides of the bevel. 6mm hex head bolts and washers hold the material in place. In the future it may help to have additional clamping in the middle, but since I was taking light cuts with a small end mill, the setup was ridgid enough.
The next stop was to test out the code for the handles. Here is a pic of the "inside" of the handle.

You can see the outline cut, the holes for the pins are drilled, and the relief for the blade is machined. The relieve allows the blade to fold in without rubbing. After this step, the part is flipped over and grasped in a pair of custom machined soft jaws that have a matching profile. This grips the part quite securely. Once in the jaws, I face down the excess material, cut the pocket for the inlay material, and run a corner rounding endmill around the edge. Here are some sample handles in aluminum again, inside and outside.


Along the way I made up some blades from O-1 tool steel as tests as it is both cheaper and easier to machine than D-2, and frankly, at that point machining D-2 still intimidated me a little. Here is my first working prototype.


The handle material is still aluminum here. The backspring and blade are O-1 steel, hardened and tempered. I was able to verify fit (actually, I was able to verify there were still problems, and adjust). Everything fit well enough to actually work, and the prototype snaps open with a satisfying "snik". The backspring tension was very nice, strong enough to keep the blade in position, but not so high as to make it a chore to open. There is no nail nick in the blade yet, as I was rushing ahead, and hadn't really figured out how I was going to cut the nick anyway.
Full speed ahead. More fine tuning, and the purchase of the 3/16" 4flute carbide ball end mills allowed me to get the blade code to the point where I was very satisfied. Here are to test blades cut from O-1.

The bevels on these were cut with a ball end mill and a 1.5 thousandths stepover. Tool marks are visible, but you can barely feel them. They went down very quickly with some 150 grid wet dry sandpaper. I ended up cutting the nail nicks with a fly cutter, which worked better than I could have hoped.
Time passes, I bite the bullet and machine the real handles out of my nickel silver bar that is just large enough for a single set of handles. This goes off without a hitch, and the stuff looks AMAZING. I also say "what the hell", and go for the the D-2, cutting the blade and the backspring. Everything goes better than expected. The blade and backspring are hardened, then tempered, and then tempered again, and then the backspring goes back in and gets tempered a 3rd time.
Lots of sanding, sanding sanding. My original idea about using wood for the inlay meets with disaster, wet-sanding softens and warps it, which I only realize after I finish putting in the first set of pins and peening them. An hour of drilling out pins and I am searching for a new material for the inlay. My mind wanders to some material I got from my dad, some linen-phenolic laminate which would be perfect.
Inlay is glued with JB weld this time, and I make sure the pocket in the nickel silver is good and roughed up. Sanding sanding sanding. Pins for the inlay are in. More sanding.
I assemble the thing for the first time. Damn that looks good.

But something still isn't right. The backspring is binding. Push out the pins and make some adjustments. She's back together again, action is good. I hold my breath and set the pins. Action is still good. Sanding sanding sanding. Once the sanding is done, polishing with some green compound, and it's looking amazing.
Scrub down with soap and water, then a couple blasts of WD-40 to clean out any grit. Put an edge on and a little lube in the right places, and she is done.


All told, I spent way longer than I figured, and picked up a kiln on the way. After all the prototyping, the final knife only took me about two weeks, which ins't bad. I have a lot of material left, so I am toying with making another for myself. Maybe in a couple weeks when I forget how much sanding I had to do...


