Installation of iGaging DRO on a Mini-Mill

jimwill48

Registered
Registered
Joined
Apr 11, 2013
Messages
2
Can any of you who has installed the iGaging DRO's on a Mini-Mill post photos of the the installation. Such as the mounting points and how it was done. As a side question has anyone mounted these on a Mini-Lathe (7x12")?

Thanks...Jam
 
I have some generic Chinese DRO's installed on mine, but the mechanical mounting is identical to these. If I have time I will take some pics over the weekend and post them. I kind of figured it out as I went, so there are probably better/easier ways to do it.

Allen
 
This thread shows a couple pics of how I mounted mine on a HF mini-mill:
http://www.hobby-machinist.com/showthread.php/10343-Inexpensive-3-axis-DRO?highlight=igaging

I formed chip guards for x/y out of .040" PETG plastic, thin Lexan will also work. BTW, the stainless bars that carry the readers can be cut to length with no bad results. Still like mine, but I need to mount the readouts in a panel and label them.

Now if they would just make a round one for my rotary table . . . . . .:roflmao:

Tom
 
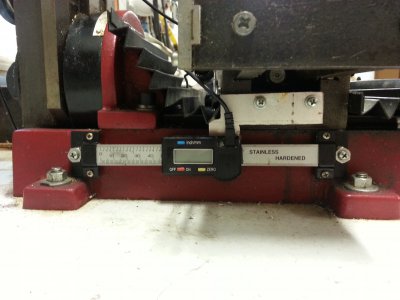
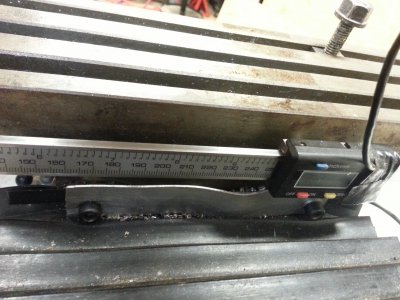
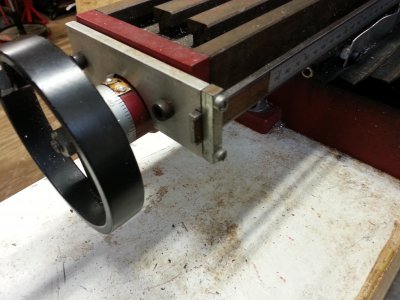
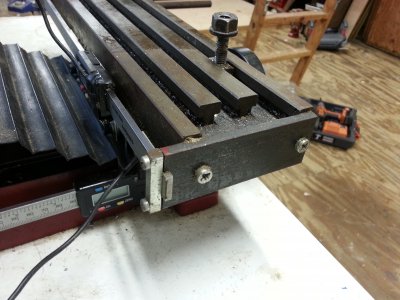
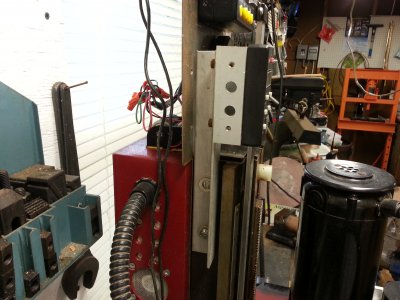
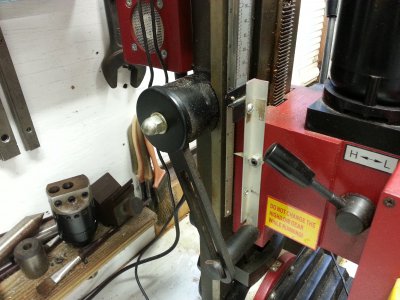
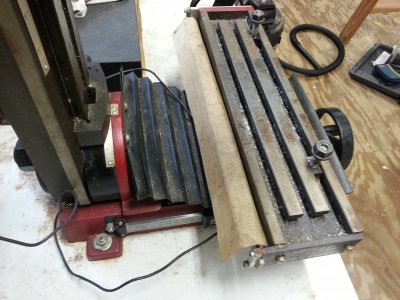
Here are the pics I took of my installation. The Y axis is probably self explanatory as the bar end brackets are bolted through holes drilled and tapped into the base and the readout uses a thin piece of plate bolted between the readout and the slide. For the X axis, my gauge was longer than the table, so I used a piece of 1/4" plate bolted to each end of the table and cut a slot the width of the bar but not quite as deep. Then I drilled and tapped the sides and drilled corresponding holes in some 1/4" keystock and bolted it over the slots. Since the bar is just a hair thicker than the slots, it is held firm when you tighten the bolts down. I spaced the slots just far enough off the back of the table to allow room for the readout. This readout also uses a piece of thin aluminum plate, which attaches to the table using the bolts which hold the chip guard.

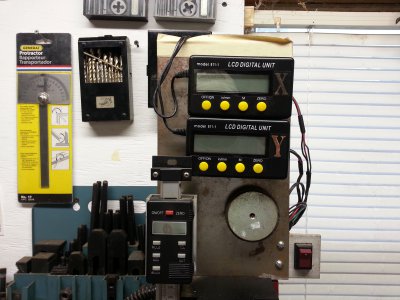
As for the Z axis, I drilled and tapped a couple of holes in the vertical column and bolted a piece of aluminum angle, which attaches to a spacer (piece of square al tube). The readout is bolted to the front side of the spacer. The bar is attached at the bottom bracket to another piece of aluminum angle which is attached to the head of the mill using the existing spring assist and scale pointer bolts. The top of the Z axis just free floats. I also attached a pic of my remote display readouts for the X and Y axes.

Hope that helps. I will gladly give you more detail on anything if you need it.

Allen

- - - Updated - - -

I also forgot to mention that I use a piece of folder over cardboard to keep the swarf out of the X axis readout as you can see in the pic. It's not as fancy as the clear plastic one shown previously, but it works just fine :)

20130727_123845.jpg 20130727_124021.jpg 20130727_124046.jpg 20130727_124112.jpg 20130727_124429.jpg 20130727_124447.jpg 20130727_124509.jpg 20130727_124607.jpg
 
Back
Top