- Joined
- Feb 1, 2015
- Messages
- 9,995
Yesterday, the wife asked me "did we have a toffee hammer?" "What's a toffee hammer", I asked. "To break up toffee." she said and proceeded to Google it to show me what they looked like. They are diminutive hammers that are often packaged with British toffee and used to break the large sheets into bit sized pieces. "No, we don't, I replied" although I do have some smaller hammers that I'm sure would do the job.
The wife then proceeded to order one. The first choice was $32 plus S&H. "Ridiculous!" I said. She then selected one for $18 plus S&H and placed an order. Subsequently, she realized that it was coming from the UK and wouldn't arrive in time for Bonfire Night on Nov. 5th and cancelled.
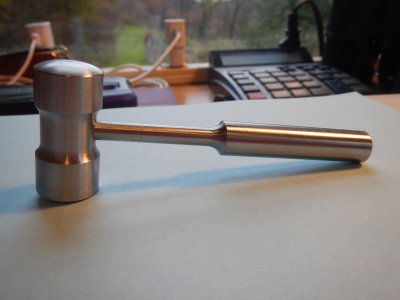
"I can make a toffee hammer.", told her and went down into the shop to look for some material. After scrounging around for some stainless, I settled for some 1" o.d. 300 series for the head and some 1/2" o.d. 300 series for the handle. The design that I had in mind was a scaled down version of a rounding hammer used by blacksmiths and farriers It is a double ended hammer with a flat face on one end and a domed face on the other end.
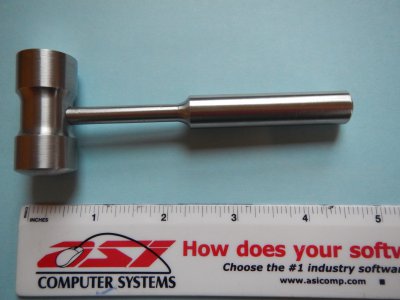
Normally, I will make a SolidWorks model for any machining project but for this one, I decided to wing it. My target for the head was 3/4" diameter by about 1.5" long. The handle would be made from 1/2" stock, necked down to 1/4" to fit the head. I turned the head stock down to .8" in diameter and necked down the central portion to ....what looked right. The length was not critical and I left it at 1.7". I cut a slight dome on one face by eye. The head was sanded with 400 wet or dry for a satin finish
The next step was to bore the hole for the handle. I mounted the head in my machine vise and used my edge finder to find the center of the head. Then I used a 1/4" carbide end mill to spot face the cylindrical surface and drilled a #33 pilot hole .6" deep. This was followed by a #19 drill. Nothing special about the drill sizes; I just grabbed what was handy. I finished the hole with a 1/4" carbide router bit as my last carbide end mill was getting dull and the stainless was showing signs of work hardening. Checking with pin gages, the hole measured out at .4982" with a no go for the .4992" pin.
Next, it was back to the lathe to make the handle. I turned about .7" if the end of the 1/2" stock down to .4995" and then proceeded to reduce the diameter with the 400 grit paper, checking the fit with the socket in the head. I ended up with the shaft diameter at .4992. Then I extended the 1/4" section to about 2", ending in a fillet to the 1/2" diameter. The 1/2" diameter was turned to .475" to clean up the surface and the handle was parted off for a total length of 4.2". The end was domed slightly and the handle was then treated with the 400 grit paper for the satin finish, being careful not to touch the precision fit at the end. Final assembly was accomplished with a small Nylon faced hammer. Aside from the interference fit, there were no critical dimensions. It was more about what was aesthetically pleasing. The finished hammer weighs in at 150g.


