Ideas on making a punch and die

Maplehead

Registered
Registered
Joined
Feb 20, 2017
Messages
437
Hi All
I'm thinking about making a couple punch and die sets for my two different pickup covers.
Currently, I just drill through the .020" nickel silver sheet but it leaves a rough result on the visible top side that I need to file down. Plus, I'm always looking to make processes more efficient as each cover requires 18 holes to be drilled. So I'm wondering if I can use mild steel rod to make my own punches and some mild steel plate for the dies.
Do you think the mild steel would easily punch through the .020" nickel silver plate?
I would make two punch sizes; 3/32" and 7/32". The punches would have threaded ends opposite the working end so that I could screw them into a steel plate with all 18 punches needed for a one-punch-and-done operation. Obviously the die underneath would have the 18 corresponding die holes. One challenge I see would be getting the mechanical alignment but I'm sure that's not too big a deal.
Lastly, is the working end of a punch flat or at an angle like a shear?
Any and all help and advice is greatly appreciated.
(pictured are two reject covers)
 

Attachments

  • 4EC4B80F-8598-404F-A0C7-E9AFE33E495F.jpeg
    4EC4B80F-8598-404F-A0C7-E9AFE33E495F.jpeg
    153 KB · Views: 18
Mild steel would not serve well or last long. the degree of accuracy for alignment needs to be quite close, screwing the punches in will not work because the alignment needs to be near perfect, as the clearance should be only 10% of the thickness of the stock to ensure clean cuts. Punches can be flat, but are sometimes made with a double angle to decrease pressure. Both the punches and dies need to be tool steel and hardened.
 
Mild steel would not serve well or last long. the degree of accuracy for alignment needs to be quite close, screwing the punches in will not work because the alignment needs to be near perfect, as the clearance should be only 10% of the thickness of the stock to ensure clean cuts. Punches can be flat, but are sometimes made with a double angle to decrease pressure. Both the punches and dies need to be tool steel and hardened.
What if I just used a small block of MDF underneath, with no die holes, instead of a real die with holes? Would that eliminate the alignment accuracy issue? Or would the MDF not be solid enough and cause more plastic deforming?
 
Also, I would consider tool steel but I've never worked with it other than grinding. I guess I could glue them into holes rather than thread them as I can't imagine I could even thread tool steel. Plus you say the threading would make slight accuracy issues.
 
I once made a die set for punching holes in brass shim stock, using CRS and having dowel pins in reamed holes for alignment and reamed holes for the punches (different diameters of holes to punch) I used a dowel pin for the punch with the end ground with a double angle, only a few degrees. This worked OK for brass shim stock, but .020 thick nickel silver may be different.
 
How many of these things are you making ? I would just make up a hardened drill jig and drill the holes out . :dunno:
 
+1 to John's comment above. Your plan would make the job go quickly, but how many are you making?

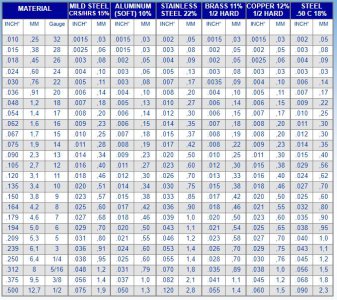
If I was going to make hundreds of them, I'd make the die out of tool steel and drill & ream the holes. Your hole sizes are determined by the punch diameter, not the die hole size. For punching steel, the general clearance is 15% of the material thickness (chart is below). In your case, that's 15% of 0.020" or 0.003" over your 3/32" and 7/32" holes. For the punches, I'd use a CRS punch holding plate and knock in drilled/reamed holes at the punch diameter (over-size by 0.001" ream). Drill/tap some set screws to hold the punches for removal. Make your punches from 3/32" and 7/32" drill rod (harden them and temper).

You'll need to make/buy what I think is called a "die shoe" to align the die plate and the punch plate. Here's a thread of something I made. It was a forming die set with a shop-made die shoe. Yes, it's a lot of work. You'll also need a shop press to push the punches through the die.


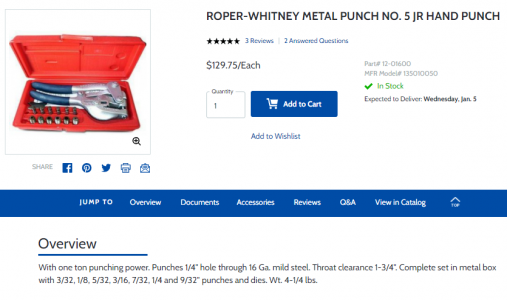
If you're making a few dozen of them, I'd go with a Roper Whitney #5 junior handheld. The ad below is for a new one off the web but I've bought 4 or 5 of them used off eBay for under $40 including the punches and dies. The 3/32" and 7/32" are standard punches/dies.

Make a hole template from a block of CRS about 1/2" thick and drill in your hole(s) pattern. You could get fancy and mill the profile of your part in the bottom of the template, or shape the finished part based on the hole locations (easier) after the holes are knocked in. Clamp the template block to the stock and use an appropriate-sized transfer punch to knock in the hole locations. Once the centers are pricked, knock them in with the RW #5. NOTE: The hole sizes in your template don't need to match your holes sizes, just the transfer punch size. For example, use an 1/8" drill for the template holes and use an 1/8" transfer punch.

Below is a thread where I made a punch template from CRS to locate something like 17 holes in a part. In my case, I screwed the part to the template and directly knocked in the holes (didn't need to use a transfer punch). In this case, the template holes must match the punched hole size.


The simplest/quickest way is mmcmdl's idea above. Same concept as my punch template, but make it from tool steel. Flame harden it and leave it full hard. Clamp the template to your work and drill away. There's a string below where I made one, it's the 4th or 5th post down in the string. I used tool steel and left it full hard.


In general, punching thin metal does a better job than drilling. If you drill, you'll likely need to clean up back-side burrs. Punching should leave the hole pretty clean on the back side as long as your punch/die clearance isn't too large.


Bruce


RW #5 punch/die
1641313475649.png
Clearance chart for die's depending on material and stock thickness
Die punch clearance chart.JPG

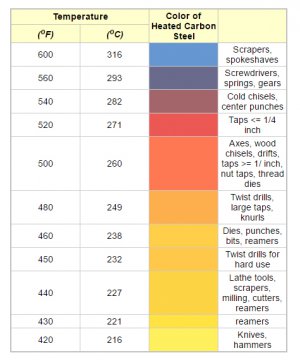
Temper color chart for hardened steel. Draw punches back to straw or ~460 F
temper colors.jpg
 
Last edited:
Bruce beat me to it. A Whitney punch is a seriously handy tool to have in the shop!
 
+1 to John's comment above. Your plan would make the job go quickly, but how many are you making?

If I was going to make hundreds of them, I'd make the die out of tool steel and drill & ream the holes. Your hole sizes are determined by the punch diameter, not the die hole size. For punching steel, the general clearance is 15% of the material thickness (chart is below). In your case, that's 15% of 0.020" or 0.003" over your 3/32" and 7/32" holes. For the punches, I'd use a CRS punch holding plate and knock in drilled/reamed holes at the punch diameter (over-size by 0.001" ream). Drill/tap some set screws to hold the punches for removal. Make your punches from 3/32" and 7/32" drill rod (harden them and temper).

You'll need to make/buy what I think is called a "die shoe" to align the die plate and the punch plate. Here's a thread of something I made. It was a forming die set with a shop-made die shoe. Yes, it's a lot of work. You'll also need a shop press to push the punches through the die.


If you're making a few dozen of them, I'd go with a Roper Whitney #5 junior handheld. The ad below is for a new one off the web but I've bought 4 or 5 of them used off eBay for under $40 including the punches and dies. The 3/32" and 7/32" are standard punches/dies.

Make a hole template from a block of CRS about 1/2" thick and drill in your hole(s) pattern. You could get fancy and mill the profile of your part in the bottom of the template, or shape the finished part based on the hole locations (easier) after the holes are knocked in. Clamp the template block to the stock and use an appropriate-sized transfer punch to knock in the hole locations. Once the centers are pricked, knock them in with the RW #5. NOTE: The hole sizes in your template don't need to match your holes sizes, just the transfer punch size. For example, use an 1/8" drill for the template holes and use an 1/8" transfer punch.

Below is a thread where I made a punch template from CRS to locate something like 17 holes in a part. I'm my case, I screwed the part to the template and directly knocked in the holes (didn't need to use a transfer punch). In this case, the template holes must match the punched hole size.


The simplest/quickest way is mmcmdl's idea above. Same concept as my punch template, but make it from tool steel. Flame harden it and leave it full hard. Clamp the template to your work and drill away. There's a string below where I made one, it's the 4th or 5th post down in the string. I used tool steel and left it full hard.


In general, punching thin metal does a better job than drilling. If you drill, you'll likely need to clean up back-side burrs. Punching should leave the hole pretty clean on the back side as long as your punch/die clearance isn't too large.


Bruce


RW #5 punch/die
View attachment 390854
Clearance chart for die's depending on material and stock thickness
View attachment 390855

Temper color chart for hardened steel. Draw punches back to straw or ~460 F
View attachment 390856
That's a lot to digest but thank you.
It sounds like a fun project down the road but for making only four a month I'm thinking it's way overkill. Maybe the Roper hand punch is the way to go. I don't know what a hardened drill jig is.
 
Make up a jig and install the appropriate drill bushings . I would use a carbide circuit board drill and drill the holes slowly . Yes , you may have a small burr on the bottom of the part but easy to deburr by hand with a sharp spotting drill . No-one sees the bottom anyways I assume ?
 
Back
Top