- Joined
- Feb 1, 2015
- Messages
- 9,995
Last Friday, I was moving some brush with the front end loader when there was a loud bang and the bucket tilt was unresponsive. I have three ft. forks on the bucket and I expect that the additional leverage caused the break, I suspended the bucket with a chain and drove back to the barn.
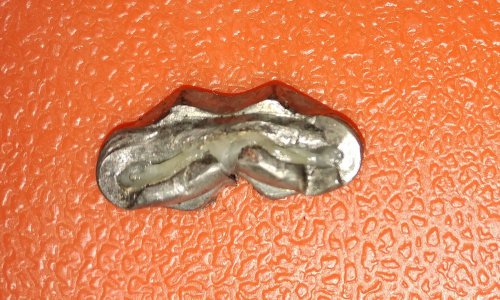
The next day, I started the autopsy. When I disconnected one of the tilt cylinders, the shaft fell out of the cylinder. The retaining nut had sheared, separating the shaft from the piston. With a little fiddling, I managed to pull the piston from the cylinder and the retaining nut, looking like a pretzel, fell out.
 A 5/8"-18 Nylon lock nut pretzel
The threads on the shaft were damaged but looked repairable but the piston was trashed from acting as an anvil for the nut crushing process. Fortunately, the urethane seals looked to be undamaged. An O ring for the shaft seal was also trashed from the process of removing the piston.
I found a source for cylinder parts and a new piston kit was available for $50 plus S&H and tax but hey, I have a lathe, right? I had a 6-1/2' length of 2-1/4" aluminum round for material. I reverse engineered the piston and modeled it in SolidWorks. With a drawing in hand, it was down to the shop. Because the stock was too large for my 602 bore, I decided to use my four jaw chuck as the jaws have a longer grip than my three jaw chuck. I dialed in the stock, although I really didn't have to as most of the work could be done as a first op and I center drilled so I could use the tailstock center for increased rigidity.
After a quick face of the far end. I turned the stock down to a 1.737" diameter. I used a round insert which gave me an excellent finish. The two seal grooves are .272" wide by .245" deep and a good surface finish is required to provide a good pressure seal. I elected to grind a 1/4" HSS bit as a form tool. The first groove was problematic as the is essentially a very large cutoff tool and the problems with chatter rose their ugly head. By varying the lathe speed, I was able to work around the resonance and achieve a respectable surface finish. For the second groove, I used a parting tool to rough out the feature, leaving a few thousandths for cleanup with my HSS tool.
The next step was to remove the center and drill and bore the 5/8" hole and the .844" x .109 counter bore for the O ring seal. Following that, I parted off the part leaving about .020" for face cleanup. Rather than remount in the four jaw, I elected to use my three jaw chuck as concentricity isn't a concern for the facing operation. In addition to facing, I chamfered the outside edges and broke the inner edges on the seal grooves to make seal installation easier and reduce the possibility of seal damage.

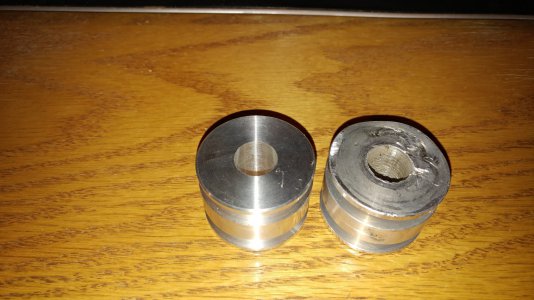
The new piston along side the damaged OEM piston.
The seals were installed on the piston and tomorrow, I will be picking up a new O ring and retaining nut. It will be my first trip to the DIY since 3/14/20. The original nut was a low profile nylon lock nut and had only about three threads of engagement. I will replace it with a grade 8 standard nut which will triple the number of threads in engagement. After that, I will flush out any remnants of the old nut from the cylinder and reassemble it, ready to put back into service.

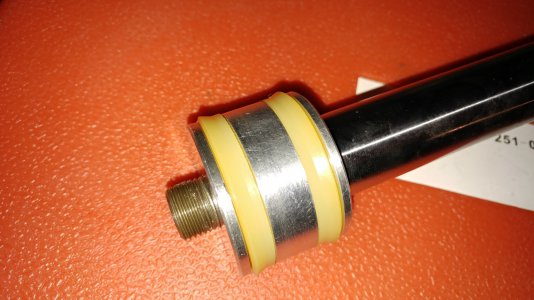
The new piston, seals installed, awaiting the O ring shaft seal and retaining nut
All in a day's work. Or two or three.
Note: due to a computer glitch, the original post was erroneouslky posted before completion. The above text is the replacement.
The next day, I started the autopsy. When I disconnected one of the tilt cylinders, the shaft fell out of the cylinder. The retaining nut had sheared, separating the shaft from the piston. With a little fiddling, I managed to pull the piston from the cylinder and the retaining nut, looking like a pretzel, fell out.
 A 5/8"-18 Nylon lock nut pretzel
The threads on the shaft were damaged but looked repairable but the piston was trashed from acting as an anvil for the nut crushing process. Fortunately, the urethane seals looked to be undamaged. An O ring for the shaft seal was also trashed from the process of removing the piston.
I found a source for cylinder parts and a new piston kit was available for $50 plus S&H and tax but hey, I have a lathe, right? I had a 6-1/2' length of 2-1/4" aluminum round for material. I reverse engineered the piston and modeled it in SolidWorks. With a drawing in hand, it was down to the shop. Because the stock was too large for my 602 bore, I decided to use my four jaw chuck as the jaws have a longer grip than my three jaw chuck. I dialed in the stock, although I really didn't have to as most of the work could be done as a first op and I center drilled so I could use the tailstock center for increased rigidity.
After a quick face of the far end. I turned the stock down to a 1.737" diameter. I used a round insert which gave me an excellent finish. The two seal grooves are .272" wide by .245" deep and a good surface finish is required to provide a good pressure seal. I elected to grind a 1/4" HSS bit as a form tool. The first groove was problematic as the is essentially a very large cutoff tool and the problems with chatter rose their ugly head. By varying the lathe speed, I was able to work around the resonance and achieve a respectable surface finish. For the second groove, I used a parting tool to rough out the feature, leaving a few thousandths for cleanup with my HSS tool.
The next step was to remove the center and drill and bore the 5/8" hole and the .844" x .109 counter bore for the O ring seal. Following that, I parted off the part leaving about .020" for face cleanup. Rather than remount in the four jaw, I elected to use my three jaw chuck as concentricity isn't a concern for the facing operation. In addition to facing, I chamfered the outside edges and broke the inner edges on the seal grooves to make seal installation easier and reduce the possibility of seal damage.

The new piston along side the damaged OEM piston.
The seals were installed on the piston and tomorrow, I will be picking up a new O ring and retaining nut. It will be my first trip to the DIY since 3/14/20. The original nut was a low profile nylon lock nut and had only about three threads of engagement. I will replace it with a grade 8 standard nut which will triple the number of threads in engagement. After that, I will flush out any remnants of the old nut from the cylinder and reassemble it, ready to put back into service.

The new piston, seals installed, awaiting the O ring shaft seal and retaining nut
All in a day's work. Or two or three.
Note: due to a computer glitch, the original post was erroneouslky posted before completion. The above text is the replacement.
Last edited:
