How should I make this longish screw?

WobblyHand

H-M Supporter - Diamond Member
H-M Lifetime Diamond Member
Joined
Dec 18, 2019
Messages
7,430
Have a piece that I want to make for a diamond dresser for my carbide grinder. It's about 6 inches long. But there are long sections that are around 1/4" diameter. I don't have an ER40 chuck yet for my lathe, so choking up on the rod and then pulling it outwards after machining isn't an easy option. However, I do have a 4 Jaw chuck for this lathe. Base stock is 1" diameter 12L14.

What would you recommend as an order of operations? The rod is about 12" long, so there's plenty for the chuck to hold onto. Planning to use a live center. Was thinking of sequentially turning it, to minimize deflection. Here's notionally what I am thinking of doing. Was hoping not to move the rod at all for this.

1. Start with turning down for the threads and some of the gutter
2. Single point the threads (1/4"-40)
3. Lengthen the gutter and turn the shank prior to the locating ring
4. Turn the locating ring diameter from the thread side of the ring to the edge of the knob (16.3 mm OD)
5. Turn the the 12.75 mm long section to 6.3 mm
6. Finish the knob, turn to diameter and knurl

Is this sensible? Or do you recommend a different approach? Thanks. Rather not have to do this 3 times! For context, the screw will be used in this assembly.
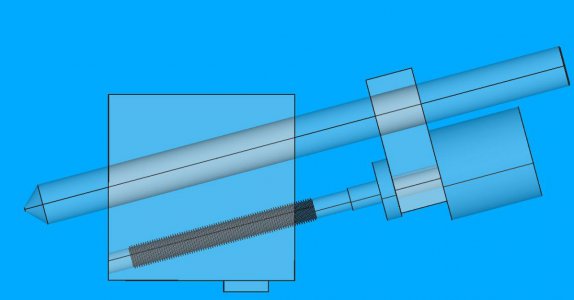
seethruassembly.jpg

Thanks for any and all suggestions!
 

Attachments

  • techdraw_dresser_screw.pdf
    233.4 KB · Views: 19
Get yourself a Norbide stick ! ;) That seems like quite a bit of work to dress a wheel . Silican Carbide wheels are constantly breaking down when grinding carbide , need something quick and dirty to re-dress .

For the screw , use all thread to start off with .
 
I don't think he's looking for the finish on the wheel that the Norbide stick is capable of....
 
Get yourself a Norbide stick ! ;) That seems like quite a bit of work to dress a wheel .
We don't do things the easy way here... I've learned that from HM!

Besides, have all the materials, and would love to make this. This is my first 3D CAD design, so want to see it through completion. Only way to learn is to design and implement, so I know what not to design next time.
 
I don't think he's looking for the finish on the wheel that the Norbide stick is capable of....
The tool that I'm using is a diamond point. Wasn't planning to make the toolbit, but needed to include it in the drawing to prevent interference, and to prevent it from hitting the table. I wanted to have a reasonably precise way to locate the point referenced to the table slot.

Why is the norbide stick better than a diamond point?
 
Geesh, ask a question on how to machine something, and get what seems to be avoidance of machining. Thought this was the beginner machining section. Or perhaps, the joke has gone over my head...

If you are implying that my design will be hard to machine, please say this clearly. Us beginners may not recognize this. If it is a difficult design, then perhaps one could offer a suggestion to make it less difficult. That way it can be a learning experience. Like: don't do X, because it makes it really hard to machine! Or suggest, why don't you do Y, it will make it a lot easier to machine?

For what it is worth, my design is based on a commercial stone dresser, for a Rockwell carbide grinder. I designed it from a couple of pictures. Had to learn FreeCAD to even draw it. (That was hard for me to learn.) The Rockwell screw seemed to be one piece, and similar. As always, constructive criticism of the design or machining advice is welcome.

It's hard to swallow spending $80 on a small hard stone that I have to machine a fixture to hold it, when I have a design that could do the same thing (perhaps more slowly) with the materials I already have. However, it was good to learn of this Norbide stuff, thanks for letting me know.

Is the machining methodology (approach) sound? If not, what would you change? Appreciate there's lots of ways to make things, some better than others. I'd still like to make this somehow. That's why these questions are posted in the beginner section, so both myself and others can learn good practices in both design and machining.
 
I've brought a rule of thumb from wood turning to my metal turning. All the large diameters are turned while the stick is fairly rigid. Then the progressively smaller diameters until finished, supporting the slender cuts if needed.

DanK
 
One thought - you really don’t need much adjustment range on the screw-block interface, because it’s for fine motion only. The yoke can slide on the diamond-tool shaft for coarse adjustment. I’d think 1/4” is about all you will ever turn the adjuster. Really much less than that. So there’s no need for the threads to be more than say 3/4” deep in the block (though make the hole through) and about 1/2” on the end of the adjuster. That will make it a lot easier to make.

Also - Composite construction, where you would put a piece of threaded rod in a custom nut, is often a very useful way of making things, to eliminate the need to remove a lot of material.
 
I'm just speaking from the experience I have learned over the years . For bench grinders there are many ways to dress the wheels . Diamonds , star wheel dressers , Aluminum oxide sticks , Norbide sticks are a few . All work ok . The use of a Norbide stick does not need a holder , and it allows for forming on the wheels to form your tools . The SC wheels ( green ) break down so quickly grinding carbide it wouldn't pay me to dress them with a diamond set up such as the one posted . I'm sure it will work just fine , but this is not for me on a bench grinder . YMMV .
 
Were I doing your project, I'd opt for a 1/4 40 die for the threads. Yes, expense, but a quarter inch shaft, 4" long is going to flex as you thread it, cutting less deep in the middle of the cut. Perhaps not enough to worry about, but with a die you would know the thread was good.

Honest, straight forward comment. From a seasoned warrior in these battles.
 
Back
Top