Horizontal attachment

MattM

Active User
H-M Lifetime Diamond Member
Joined
Aug 5, 2012
Messages
621
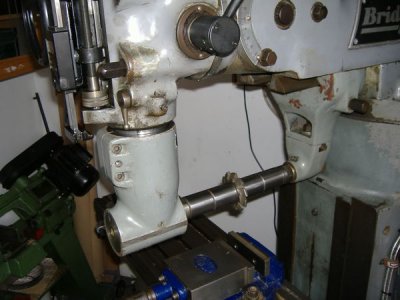
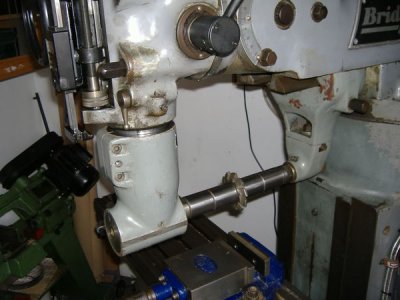
Finally got around to trying to use the Bridgeport horizontal milling attachment that came with the 1943 J head I bought about a year ago.

Does this attachment require a different (longer) drawbar?

It sure seems to but none was in the plethora of tools and attachments that came with the old beast. Guess I'll have to make one? Shouldn't be too hard even for an amateur amateur like me but I don't want to do it if not necessary.

Please advise.
 
I don't know what the thread is on a BP, but I've had good results making drawbars out of Grade 8 threaded rod. I use two nuts - one loose and one pinned at the end of the bar. You can cut it somewhat longer than you need since the loose nut is the one that tightens everything. The pinned nut is for screwing the rod into whatever you're holding.

If the hole that the drawbar runs through is a fair bit larger than the threaded rod, you can make a T-washer to keep it centred.

Can you post some pics? I've never seen a horizontal attachment for a BP.

This explains it better than I ever could:

There are a couple of milled flats on either side of the R-8 arbor hole, running parallel to the arbor hole axis from end to end. Use these flats to indicate the head into squareness (or parallelism, however you want to think of it) to the table travels.

There are both clamp screws and jack screws on the split clamp at the "insert-quill" end of the head. Lower the quill a few inches, make sure the split clamp is open (loose), and insert the quill into the right-angle head. There may be a shoulder that stops the insertion at some fixed point. Lightly clamp the split clamp to quill, and screw the drawbar in from the top of the head.

Now indicate the housing flats in the way you want, tighten the split clamp, and you are ready for attaching arbor and spacers, cutters, rotisserie chicken, what-have-you. If you are using a long arbor and the end support that mounts under the ram (for REAL horizontal mill setup), re-indicate along the length of the arbor to assure correct alignment to table axes. More reference length, better accuracy and measurement resolution. Remember that you are also in control of Z-position of the right angle head at the quill, and if you use a second arbor support, the arbor needs to be parallel in Z-plane as well.

Guess I'll be making a longer DB.
 
Last edited by a moderator:
That looks pretty cool. There are times when a horizontal mill is useful.
 
Stock drawbar works. Need to put a collet( bolt in collect with hex head) in the right angle head to hold/turn attachment to line up keyway so draw bar can reach the right angle attachment. Use table to support rt< and quill to slide to final seating then tighten drawbar, algin the rt< and clamp DO NOT forget to loosen set screw spreader before clamping.


Then use a deep well socket and short extension to reach down to draw bar hex
 
Last edited:
My horizontal attachment came with and extension for the draw bar. Made as one piece it is basically a socket with extension that has a 3/4 bolt on the top for you usual wrench.
Hope that describes it well enough.

Tim


DSCF0734.jpg
 
Last edited by a moderator:
My horizontal attachment came with and extension for the draw bar. Made as one piece it is basically a socket with extension that has a 3/4 bolt on the top for you usual wrench.
Hope that describes it well enough.

Tim


DSCF0734.jpg

Made a longer drawbar out of all-thread, a washer, and two nuts. Works perfectly.

Any tricks to lining up the horizontal head with the spindle? Seems to take a lot of "fiddling" to get it to finally line up and slip on.
 
Back
Top