Homemade Base and Shaving Pan

Kroll

Active User
H-M Supporter Gold Member
Joined
Dec 23, 2012
Messages
1,307
Guys while restoring my Sears lathe I got to a point and notice I had nothing to set it on.I wanted to get the bed mounted then put it back togeather and not have to deal w/trying to move it or load it on something later.So I put the lathe on hold and started on th base w/lower shelf for some added weight and made a pan for the shavings thats 48" long which is just short of the footing on tail stock end.First pic is just cut to size and marks layed out where I want to put the bends.

Took it to work today and using the sheet metal brake put me some 45* for the sides and front,the back is straight 4" high

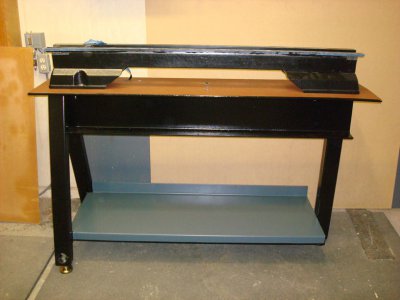
The base I made out of 8"I beam and the three legs out of 2"x3"x1/8 tubing,the lower shelf has 2"x1" tubing to help w/bracing and support.

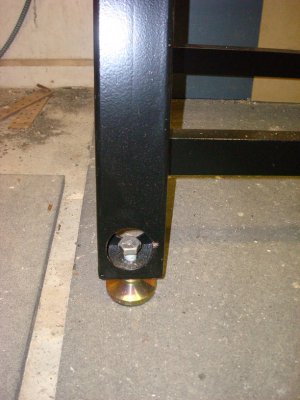
Its going to seat in place,and the three legs will have leveling rubber pads to help me get it perfect.Any ideals,its never to late and thanks for looking----kroll
 
Looks like a nice job on the stand. However, I hate to say this but I think that you made the shaving pan too short. A couple of months ago, a guy in the UK with a 3996 sans cabinet said that he had despaired of finding an original cabinet and had decided to build one. And asked for dimensions off of mine. I took dimensions and entered them into a TIF scan of the cabinet exploded view page from the manual, making a dimensioned isometric drawing of all of the parts. The drip pan is 60-1/2" long, not counting the 45 deg. sides and ends. So it extends out to the left slightly beyond the gear train. From which grease does drip. Atlas sold a drip pan for the bench models that was similar but had a cutout at the left rear to allow for the countershaft mount. I know a dealer who has or had one of those. I saw a photo of it but can't recall whether it was on eBay or on his site. And don't recall what he was asking for it.

On my 3996, I actually made (had a machine shop make) a back splash shield panel that is attached to the rear and right end 45's and to the headstock. It comes up to about the height of the headstock cover. With it installed, the machine looks pretty much like most of the 12" or 14" lathes you will see in the catalogs today.

Robert D.
 
Here's the pic that I wanted to be the first to see,I did something wrong.

Robert your right it is short,I just made it as wide as what the metal I had.I just did not see a reason to run it all the way to the end of the lathe,figure most of the oil and shavings would be around the chuck.I did see one on ebay for 160.00 and it was 16"x54" I think.Guys thanks for the comments,just wanted to share today's adventures---kroll
 
OK. Then be sure that you shim the headstock end foot with a piece of sheetmetal the same thickness as what's under the tailstock end foot. Or get 8 of the rubber grommets shown on the factory drawings so that the feet float instead of being twisted at both ends

Also, what I had actually intended to mention first - mount a 3/8" or 1/2" NPT coupling (bung) at the right front corner of the pan. You can plug it but it'll be there if you wanted to wash off the pan or if you add a coolant system. Turn a short pilot on the end of the coupling and do the welding or brazing on the outside (bottom) so that the inside (top) is smooth.

Robert D.
 
Thanks Robert,about using shims.I do have a shim kit that will let me shim down to .002.But I did not know about the rubber grommets which will allow alittle give and maybe won't rattle.On my Powermatic 90 lathe there is grommets under it.Todays plan is to pick up the mounting pads,touch up the paint job that I scratch up while fitting the shelf,and maybe setting it in place.---kroll
 
Kroll,

You're welcome. But I have a correction. There are four bushings used, not eight (I just glanced at the drawing the other day and mistook a flat washer for a second bushing). The pan has 7/16" dia. holes in it. The stack of parts from top down is 5/16" cap screw, 5/16" USS flat washer, bed mounting foot, 7/16" USS flat washer, pan, grommet, stand or bench, 5/16" lock washer, 5/16" hex nut. Fine tuning leveling shims go between the foot and the 7/16" flat washer. The bushings have 7/16" dia. shoulders about 1/8" long. Part number 049-031. Still in stock earlier this year.

Robert D.
 
Re: Homemade Base and Shaving Pan(Progress Report)

Guys,I got the base set in place on top of a 1"thick rubber mat from Tractor Supply.I installed leveling feet that I pick up from Grainger,spent a good part of an hr setting it upjust using my 2'level(no machinist level).I did go ahead and layout the 3 holes that will hold down the lathe to my 1/2 thick top plate drill and tap and I be dang it work.Once my grommets come in which will be 1/2 thick,I will have to layout for the holes in my chip pan to lineup with the holes on the headstock end.The chip pan is 48" long which means I will have to make some 16ga shims for the tailstock end to get it level.As you can see in the pic I installed a lower metal shelf for setting my CL's finds which are the Kennedy tool boxes.I'm not crazy having to bend over but I figure the added weight will help.Anyway open for suggestions,not to late to add or take away something-----kroll

DSC01837.JPG DSC01838.JPG
 
Kroll, I think you've done a fine job of building the stand and pan. I especially like the three legged concept for leveling - it won't rock.

Tom
 
Looking good. Nice build.
On my old lathe I made another pan to fit into my drip/catch pan.Makes it easy to take out and clean.No hands under the ways trying to clean out sharp swarf.I clean it out every time I cut a different material.
I also keep a row of 5 gallon buckets to sort the chips between jobs. Brass in one Al in another ect.
Turned in one bucket of brass and two Al last year and got over 100.00$.
************Just Saying*************Gator**************:eek:uch:
 
Back
Top