- Joined
- Nov 23, 2014
- Messages
- 2,632
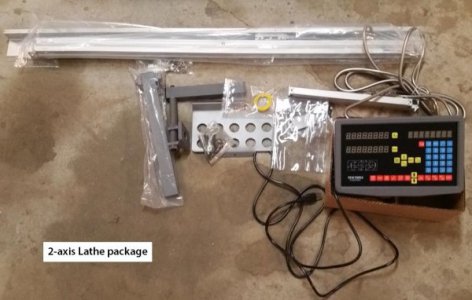
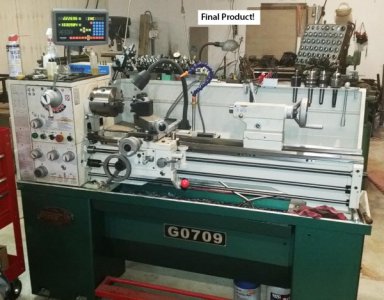
Absolutely LOVE the 4-axis DRO on my Mill, figured it was time to put one on my Grizzly G0709 14” x 40” lathe. Many options out there for DRO’s, I chose TPACTools.com. I paid a little more than I could have from some of the eBay overseas vendors ($375 delivered), but went with Tom for a few reasons; absolutely no issues with my Mill DRO from TPAC, he’s been around for 5+ years, he’s a quick responder to emails/calls, absolutely no negative stories about his sales/service.
I believe the DRO is an mTech/SINO unit as are the 5 micron scales. That gives a resolution of 0.0002”. Sure, 1 micron scales have 5 times the resolution, but for my use it’s getting into the emperor’s new clothes realm of resolution.
As an aside, I’m glad someone explained the axes on this site or I’d have gotten the scales reversed on the readout. Z-axis is the axis in line with the machine’s axis of rotation. On a lathe that’s the longitudinal feed. I would have gone with the cross feed being the Y-axis and the longitudinal being the X-axis which would be the same as my mill. Correct axes are X for the cross feed and Z for the longitudinal.
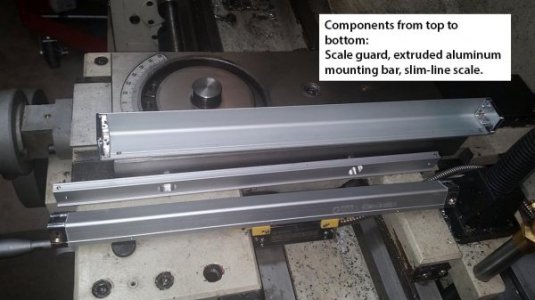
Installing the X-axis cross feed was pretty straight forward. The kit came with an aluminum extrusion which is screwed to the cross slide. The scale screws to the aluminum extrusion, the read head is screwed to the saddle. The glass scale is a low profile scale, takes up less space.
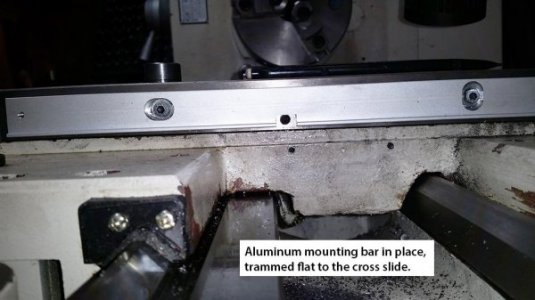
I roughly positioned the base extrusion so with the scale and scale guard installed the front edge of the scale guard was flush with the front edge of the cross slide. The aluminum base was roughly positioned vertically with a number of parallels. It was clamped in place and the fore/aft mounting slot transfer punched to the cross slide. I drilled/tapped the hole and loose mounted the aluminum bar to the cross slide. The aluminum bar was trammed parallel to the cross slide and the vertical mounting slot transfer punched. Obviously not too critical a position here since the aluminum bar has a vertical slot. That hole was drilled/tapped, aluminum bar mounted and trammed to the cross slide again.
On the plus side with the TPAC Tools kit (and maybe others?), the aluminum extrusion has a ledge on the bottom that the scale can rest on. For grins and giggles I set the scale on the aluminum bar and loose tightened the mounting screws to the aluminum bar. Pushed down on the scale and tightened the screws. I checked the tram on the scale and it was dead on. Loosened the screws, giggled the scale around and retightened the screws and checked tram again – dead on. Being an anal engineer by trade, I repeated the process 6 times and had perfect tram every time. Why go through that step? The aluminum bar for mounting the scale covers up the set screw that locks the cross slide gib in place. I milled an access slot through the bar so with the scale removed the set screw is accessible. If I ever need to adjust the gib, I’ll removed the two read head screws, the two scale screws, do the gib adjustment and reinstall the scale. Naturally, I’d check tram again but frankly would be surprised if it wasn’t dead on.
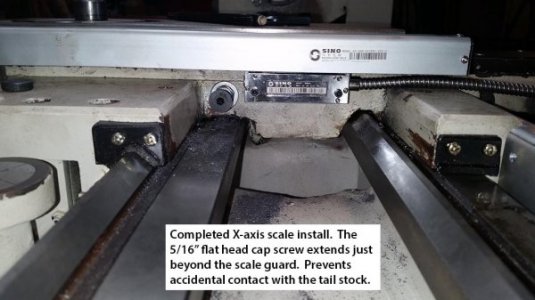
Next step for the X scale was to mount the read head to the saddle. I left the shipping protective blocks in place and transfer punched holes through the head directly to the saddle. The read head has a gap to the saddle which was measured with shims. An aluminum spacer block was cut to fill the gap. I put a very thin film of J-B Weld on the back side of the aluminum spacer block prior to screwing down the read head to take up the gap between the aluminum and the rough cast surface of the saddle.
By the way, this is not the preferred method for mounting the read head. In my haste to mount the scale, I passed over a pre-drilled/milled aluminum block that comes with the kit. This block screws to the read head and is then screwed to the saddle. This gives some adjustability up/down if needed which my installation method did not. The aluminum mounting block would need to be shimmed to fill the gap between its back side and the saddle. Regardless, my mount works for me.
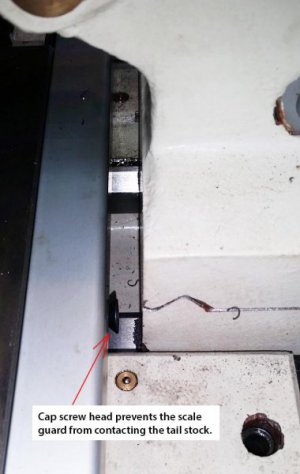
One last “belt and suspensors” addition was a 5/16”-18 tapped hole next to the read head for a positive stop to protect against inadvertent contact between the tail stock and the scale guard. Nothing fancy here, a flat head bolt and a jam nut Loctited in place. The scale guard alone should do the job, but I prefer the belt and suspenders approach.
I haven’t checked the travel of the X-axis with gauge blocks yet, but did compare the scale to the micrometer dial on the cross feed. Over 6” of travel they differ by 0.001”. The DRO has a compensation feature so any error measured with gauge blocks can be removed.
On to the Z-axis. OK, getting long-winded here so I’ll gloss over my “first” installation of the Z-axis scale. Yup, gotta love doing things twice . . . Another case of screwing up, learning from the mistake and doing a better job the second time around . . .
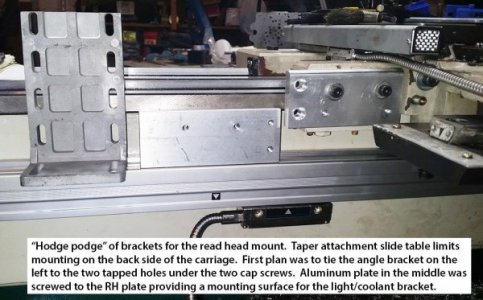
The G0709 has a bracket mounting the work light and coolant hose on the saddle. My first thought was to put an aluminum bar under that bracket and tie an angle bracket to it and the read head. Problem is, my lathe has a taper attachment. Real estate is at a premium as there is limited space between the back of the saddle and the slide table of the taper attachment.
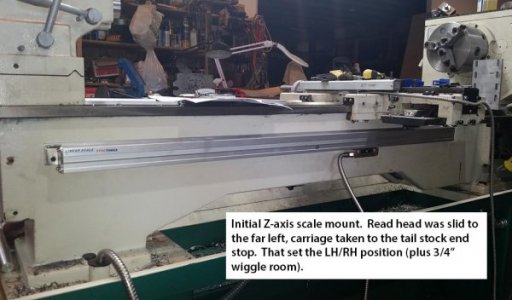
I started by cranking the lathe carriage to the tail stock end limit of travel. On the G0709 that’s the collar on the forward/reverse lever against the casting supporting the lead screw, feed rod and switch rod. Then slid the scale read head to its far limit of travel and pencil marked the position (plus ¾” for some wiggle room). I just guessed at a height figuring the closer the scale is to the carriage the better for read errors through flexing or whatever.
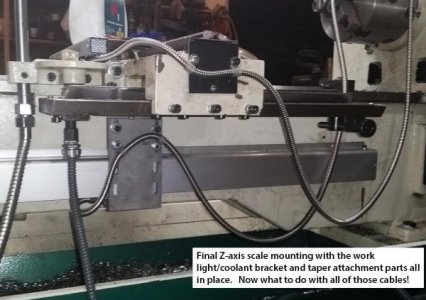
Like the X axis, the Z scale is screwed to an aluminum bar which in turn is screwed to the lathe bed. I drilled/tapped the hole for the side to side slot first and loose screwed the scale and aluminum bar to the bed. Measured the gap between the bottom of the bed to the top of the scale and set the head stock end of the scale to the same position. Marked the up/down slot with a pencil, then drilled/tapped a hole in the middle of the slot. Lastly, loose attached the aluminum bar/scale to the bed and trammed it in.
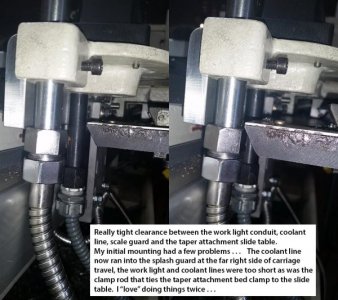
My first mount for the read head was an aluminum bar bolted to the light/coolant bracket holes on the saddle. Holes were drilled/tapped for an angle bracket to run between that bar and the read head. The aluminum bar extended beyond the saddle so a second bar of aluminum could be attached to the first bar. This second piece would be the mounting surface for the light/coolant bracket. Best laid plans . . .
It all worked, but caused some unforeseen problems. First, the carriage travel to the right originally was limited by the carriage forward/reverse collar bottoming out on the RH feed rod casting. Now the limit was the coolant pipe running into the splash gauge. No big deal, lost about 1 ½” of RH side travel. Second problem was the bed clamp rod on the taper attachment was now about 4” too short to utilize the full 12” travel of the taper attachment. Again, not a big deal, it’s a simple ~1/2” round rod with a flat and cross hole on one end. Problem 3 is now the coolant hose wouldn’t reach the tool holder. OK, add 6” of hose. Problem 4, now the work light was short of getting over the tool holder . . .
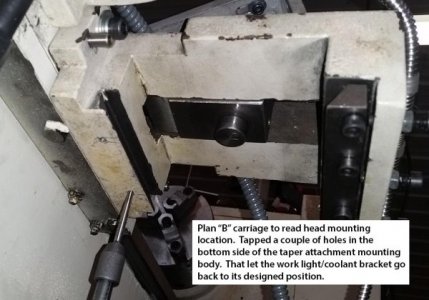
OK, time to walk away from the job. I hate creating a problem and then jury-rigging solutions for the original problem. Took a few days off and went back to the lathe. Now for plan B . . .
I scrapped the original Z axis mounting scheme. The light/coolant bracket wants to be in its designed location on the saddle. So, back it went. Height of the scale on the bed was now set by the bottom end of that hardware, instead of my initial guess for height. The taper attachment body bracket is a nice heavy casting. New mounting place for a bracket to drop down to the read head is on the bottom of this bracket.
Second mounting of the Z-axis scale is a complete success! I’m a REAL newbie on the DRO use on the lathe; don’t know how useful a lot of the typical mill features will be. But it’s a really nice on the Z-axis to have instant really accurate carriage placement. My past method was a 2” indicator with a magnetic base on the lathe bed.
Bruce
