Grinding flycutter bit

Metal

Registered
Registered
Joined
Sep 30, 2015
Messages
233
Hey folks, I've been trying to grind my first flycutter bit for aluminium, with some success, but I can't seem to get it quite right.

As far as I understand, I should be trying to get as much rake as possible in every direction to get it as sharp as possible, and then slightly round the part that touches the metal so that the cuts are more shallow and not so jagged, is that right?
 
A HSS flycutter bit is basically just a left hand turning tool with a bigger nose radius. There are all sorts of theories on how the tool should be shaped; I'll give you my view on it and the other guys can wade in.
  • Shape: I prefer a roughing tool shape but with a shallower side cutting edge angle of about 25-30 degrees. The reason for this is to add mass/strength to handle the interrupted cuts the tool experiences.
  • Relief angles: I prefer a side and end relief angles of 15 degrees; this reduces the cutting forces the tool produces, and I use this for flycutting all materials. If you find the tip is breaking down too fast (I never did), you can reduce the end relief to 12 degrees to add more mass behind the tip.
  • Rake angles: This is where you can alter a tool for different materials if you like. Aluminum tools can use more side and back rake, while these angles for steel are shallower. I did this for awhile and found that I could get away with one tool for everything I flycut by using 15 degrees of side rake and 18 degrees of back rake. The reason back rake is greater than side rake here is to focus the cutting forces at the tip of the tool to improve finishes while also aiding in chip flow. A tool ground with these rake angles will really fling chips so be warned - they are hot.
  • Nose radius: I use a simple 1/32" nose radius. I've seen flycutters with huge nose radii, where the whole front of the tool is one large radius. This practice amounts to using a form tool and cutting forces are high; it works for shallow finish cuts but is not good for stock removal. In contrast, I prefer a smaller nose radius and I rely on my relief and rake angles to reduce cutting forces so the tool moves through the material efficiently. I found that the increased back rake + 1/32" nose radius is enough to give me a nice finish.
  • Honing: do it. Keep your tool very sharp.
Hope this is all clear.

Mike could you post a picture?
 
Funny, I just watched a video about 4 days ago on youtube about flycutters. It was by Toms Techniques and was called "Use of a fly cutter on the milling machine".
There was a segment in the video showing him grinding the bit that was 8 minutes long or so. Not sure if it will help or not but might be worth a look.
He also has pdf drawings of flycutter bits with dimensions for different materials on his website that may be helpful.
 
Sorry to disappoint but I don't have one anymore - I use inserted carbide tools nowadays. I just have my notes from the days when I used to grind them. [Edit: reading my post above, it looks like I actively use them so my apologies for that.]

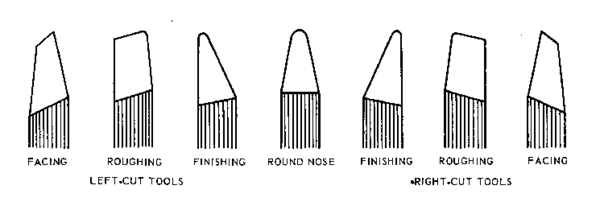
Its just a LH roughing tool. Look at this image:
cuttools.gif
The second one from the left is the profile I used but with the tool angles as stated above. I used to have a dozen of these in the drawer but I found that a carbide tool will work almost as well and last much longer.

Consider that a flycutter has a large radius; that tool tip is "flying"! Where our mills and lathes normally cannot run fast enough to use carbide effectively, they can with a flycutter. I experimented with LH brazed carbide turning tools (with a more generous nose radius honed on it) vs HSS and by cranking up the speed I was able to get almost as nice a finish as the HSS tool, albeit with a slower feed rate. I was not able to get as deep a cut with the brazed carbide as I could with HSS because I was using a little Sherline mill at the time so it took a little longer but the carbide tool was adequate.

Nowadays, I use Sherline's inserted carbide flycutter (essentially a single insert face mill) on my Sherline mill and a Tormach Superfly tool on my larger mill/drill. Although I am an advocate for using HSS for turning on a lathe, I have come to rely on inserted carbide tools for flycutting and boring because I get nearly the same results. These carbide tools also last longer provided I can crank up the speed. Let me be clear that a sharp HSS tool will give you a much better finish than any of these carbide tools so there are trade offs for choosing carbide.
 
Last edited:
Yeah I'm just looking to be able to take slight scoonches off of materials so they are nice and flat and preferably shiny. I'll grind up that profile and give it a shot
 
Well I roughly followed the profile in post 2, and ended up with a scratchy, clouded mirror.

Since I've trammed the head like a few ten thou out of square so only one side cuts and was still getting cuts occasionally on the back side, I think that the only thing preventing a good mirror finish is flex somewhere which I will have to take a look at.
But much better than it was with my hokey profile!
 
Back
Top