- Joined
- Feb 2, 2013
- Messages
- 3,916
i have a growing collection of junk art abominations in front of my house.
this is an addition to the clan
i got into some fun on Sunday, so much so that it extended into Monday evening.
The fun, being the creation of a junk art lobster, just for fun!
the fun started off innocently enough, search for a clip art image and copy it with a twist or 2.
i gathered some materials: but needed more than i gathered-
here is a list of what was actually used
16- 2-1/2" square cut nails
a 3/8"x1"x6" piece of rusted unknownium steel
2- 3/8"-16 heavy hex nut
2- 3/8"-16 square nut
1 3/8"-16 x 6" all-thread stud
1 piece of 6" x 14" 18 ga galvanized sheet metal
12 - 1/8" pop rivet
2 antique tractor wrenches
red paint
white paint
the first order of operation was to assess the finished size of the project
i wanted the finished size to be around a foot long, so i took basic measurements of the clip art image
i scaled up the drawing measurements by a factor of 2.4,
to give me a sense of scale for the components i was to create by hand.
the second order was to create the crustacean's exoskeleton.
i started with the tail.
this was accomplished by cutting 5, 2" wide strips from the 18ga sheetmetal
i made a paper template of the shape i wished to use for the articulating segments and transferred the outline to the strips
i drilled 2- 1/8"holes in each strip
i cut the sheetmetal to the outlines and formed the shape over a 4" section of pipe i had lying around
i outlined and cut the tail from the 18ga sheet
i pop riveted the tail section together
i bent the section of sheet metal, that would become lobster on the 4" pipe
after making the 4" radius in the parts, i decided that a 2.5" radius would be suited to the scale i was looking for.
i bent the pieces by hand at this point, they bent easily.
after bending the parts to satisfaction,
i pop riveted the tail section to the head
the third order was to make the legs
the legs were 2.5" square cut nails brazed together at obtuse angles
the forth order was to figure a way to attach the legs and claws to the sheetmetal exoskeleton
my solution was to use a piece of steel standing on edge.
i'd braze the legs to the "backbone" and crossdrill the backbone to accept a 3/8" stud (the stud will attach the claws)
the fifth operation was to fit the body to the backbone
i laid out and made relief cuts into the body of the exoskeleton
i set the finished height of the backbone and fitted the exo to the backbone
the sixth order was to add the claws
i had a couple antique tractor wrenches that were dying to be claws on something, this was the something!
i had some square nuts that were a perfect fit in the tractor wrenches, so they became the shoulders for the claws
i added a 3/8 all-thread stud and added the claws to the body
i snapped a couple pictures for posterity
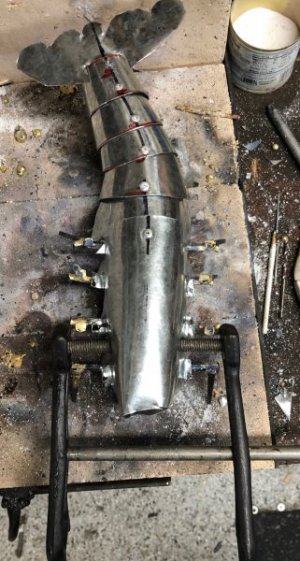
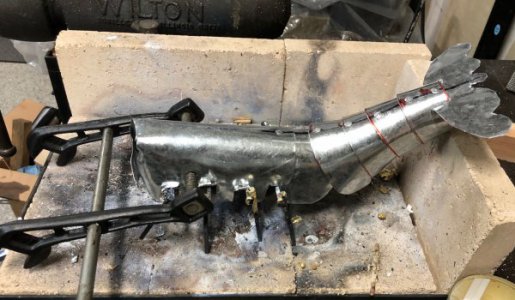
the seventh order was making the eyes
i welded 2- 3/8" heavy hex nuts together and gently fused them together and then to the head with a stick welder with 1/8" E6010
at that time i set the height i wanted the claws and tack welded the all-thread to the backbone in the hole drilled earlier
i also tack welded the shoulder joint for the claws
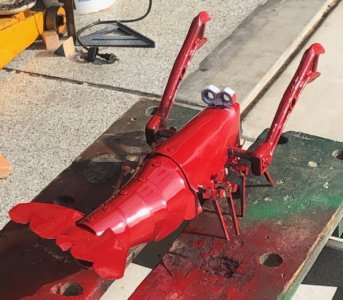
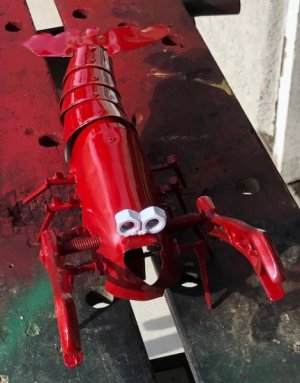
i shot a coat of red on him
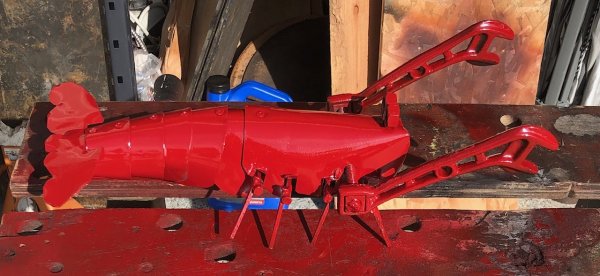
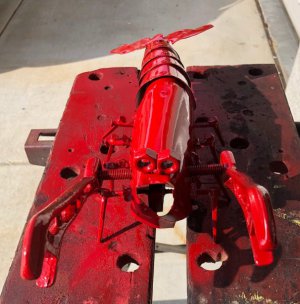
then i painted the eyes!
May I introduce you to Gideon,
the junk art lobster!
as always thanks for reading!
this is an addition to the clan

i got into some fun on Sunday, so much so that it extended into Monday evening.
The fun, being the creation of a junk art lobster, just for fun!
the fun started off innocently enough, search for a clip art image and copy it with a twist or 2.
i gathered some materials: but needed more than i gathered-
here is a list of what was actually used
16- 2-1/2" square cut nails
a 3/8"x1"x6" piece of rusted unknownium steel
2- 3/8"-16 heavy hex nut
2- 3/8"-16 square nut
1 3/8"-16 x 6" all-thread stud
1 piece of 6" x 14" 18 ga galvanized sheet metal
12 - 1/8" pop rivet
2 antique tractor wrenches
red paint
white paint
the first order of operation was to assess the finished size of the project
i wanted the finished size to be around a foot long, so i took basic measurements of the clip art image
i scaled up the drawing measurements by a factor of 2.4,
to give me a sense of scale for the components i was to create by hand.
the second order was to create the crustacean's exoskeleton.
i started with the tail.
this was accomplished by cutting 5, 2" wide strips from the 18ga sheetmetal
i made a paper template of the shape i wished to use for the articulating segments and transferred the outline to the strips
i drilled 2- 1/8"holes in each strip
i cut the sheetmetal to the outlines and formed the shape over a 4" section of pipe i had lying around
i outlined and cut the tail from the 18ga sheet
i pop riveted the tail section together
i bent the section of sheet metal, that would become lobster on the 4" pipe
after making the 4" radius in the parts, i decided that a 2.5" radius would be suited to the scale i was looking for.
i bent the pieces by hand at this point, they bent easily.
after bending the parts to satisfaction,
i pop riveted the tail section to the head
the third order was to make the legs
the legs were 2.5" square cut nails brazed together at obtuse angles
the forth order was to figure a way to attach the legs and claws to the sheetmetal exoskeleton
my solution was to use a piece of steel standing on edge.
i'd braze the legs to the "backbone" and crossdrill the backbone to accept a 3/8" stud (the stud will attach the claws)
the fifth operation was to fit the body to the backbone
i laid out and made relief cuts into the body of the exoskeleton
i set the finished height of the backbone and fitted the exo to the backbone
the sixth order was to add the claws
i had a couple antique tractor wrenches that were dying to be claws on something, this was the something!
i had some square nuts that were a perfect fit in the tractor wrenches, so they became the shoulders for the claws
i added a 3/8 all-thread stud and added the claws to the body
i snapped a couple pictures for posterity


the seventh order was making the eyes
i welded 2- 3/8" heavy hex nuts together and gently fused them together and then to the head with a stick welder with 1/8" E6010
at that time i set the height i wanted the claws and tack welded the all-thread to the backbone in the hole drilled earlier
i also tack welded the shoulder joint for the claws
i shot a coat of red on him


then i painted the eyes!
May I introduce you to Gideon,
the junk art lobster!


as always thanks for reading!
Last edited:
