Hi All, I am new to this site. I have a Craftex CT129 (pretty much identical to the G0704 machines). I am very much still learning. I have a question about what others may have been experiencing in terms of table accuracy. I put a 0.01mm accuracy dial indicator on (I have done from the spindle and from the base to rule out some movement) and run the table full Y direction and the table is very good. Much less than 0.01mm deviation over the whole Y travel. When I do the X axis however I see 0.09mm to 0.1mm different from left to right. That is some 3.5-4 thousandths over the maximum travel over the 11 or so inches of travel. I checked the gibs and everything to make sure it was not looseness or something. It is a very consistent and gradual increase from 0.0 mm on the left (bed all the way to the right) to 0.09-0.10mm on the right (bed all the way to the left). I measured the bed to way thickness on each end of the table and the difference is pretty much what I measure with the indicator. So it seems the bed is not ground to all that accurate a tolerance. I suspect i pretty much have to live with it and have been working around it (shimming vice with a bit aluminum foil and shimming parts I put right on bed as required). I was just curious what others are seeing with their small mills. Is this within an expected tolerance or is it way the heck out. Thank you.
-
Welcome back Guest! Did you know you can mentor other members here at H-M? If not, please check out our Relaunch of Hobby Machinist Mentoring Program!
You are using an out of date browser. It may not display this or other websites correctly.
You should upgrade or use an alternative browser.
You should upgrade or use an alternative browser.
- Joined
- Feb 1, 2015
- Messages
- 9,993
I had the same concerns regarding my Tormach 770. I tightened my x axis gib and cut the deviation to less than half. My conclusion was that most of the deviation was caused by gravity pulling the overhanging table down and lifting the opposite side and, to a certain extent also flexing the table. Unfortunately, the ways on a CNC have to be loose enough to permit free movement so I have to be careful to not over tighten the gib. I suspect that the gib may have some problems as well. I'm not convinced that the gib was properly scraped to begin with. I had talked with Tormach about getting a replacement so that I won't sacrifice the current one in an attempt to make it better.
To differentiate between flexing and/or lifting and a non flat surface, I would suggest that the table be centered over the saddle to balance any effects of gravity and to lessen any flexing. Then blue a straight edge and transfer to the table. Any dips or high spots should easily show up. I've got Dykem HiSpot on its way.
Another way would be to place a surface plate on the table, using a three point suspension. Adjust the plate so that it is parallel to the table by using shims at the suspension points. Then sweep the table as you did previously. Although the table may flex, the surface plate will remain flat.There will be some effect from the additional weight but any non-linearity over the sweep would indicate a lifting and/or flexing of the table.
The graph of my table sweep is below. The vertical axis is the table elevation relative to the elevation at the home position. The horizontal axis is the position on the x axis relative to the home position. Each of the graphed lines represents different positions on the y axis relative to the home position. The dashed lines are measurements before x axis gib adjustment and the solid lines are after gib adjustment. The y axis gib was not adjusted.
Adjustment of dovetail ways on a CNC is critical. Over-tightening will increase the drive force required and increase lost motion due to flexing of the various drive components. Under-tightening will cause lash in the perpendicular axis as well as the possibility of lifting. .001" of play in the gib can cause .003" of vertical movement for a 60º dovetail. Tormach recommends backing off the gib adjustment and adjusting a small amount at a time while measuring backlash/lost motion. The correct adjustment is just before the point where measured lost motion starts to increase. I measure the amount of torque required to rotate the lead screw. I devised a micro torque-ometer using a shaft, a pulley, and a sensitive scale. http://www.hobby-machinist.com/threads/measuring-ball-and-lead-screw-torque.37492/with it, I can plot out the measured torque vs. the gib adjustment. It is essentially the same as plotting the lost motion but, IMO, a more sensitive indicator.
I would caution against making any non-reversible changes to your mill without serious consideration of the consequences. It is easy to change one condition to correct a problem caused by another condition and totally screw up the system (that is the reason that I haven't pushed further with my alignment; I haven't as yet completely identified the sources of my problems).
Welcome to the forum and good luck with your endeavor. If you have any additional concerns, don't hesitate to ask.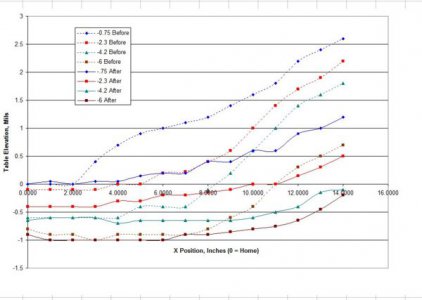

Last edited:
- Joined
- Jul 2, 2014
- Messages
- 7,594
I would second RJ's advice not to start changing things until you understand for sure what the issues really are, what is causing them, and the best plan for dealing with them. Where you see error is very often not where it is caused. When sorting out an issue on a machine with multiple axes, it is critical to start the search from the machine's master reference surface, not from where you found an error.
Thanks for the replies guys. I thought it would be worth tearing machine down and indicating the table on my little granite surface plate. The table is definitely out by almost exactly what I was measuring. The following are some photos of what I mean:
Right Rear:
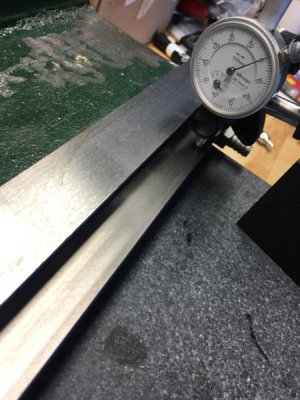
Left Rear:
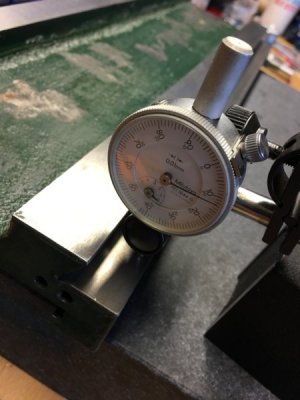
Right Front:
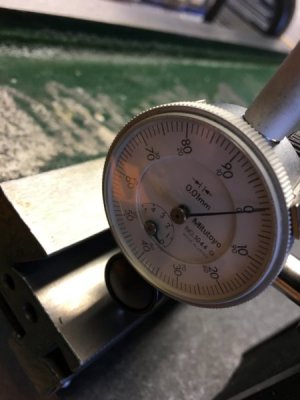
Front Left:
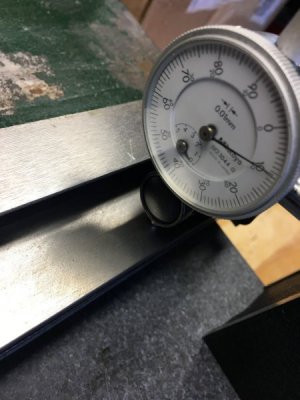
The table sits perfectly flat on my plate. No rocking or anything like that.
The indicator rises linearly as you move along the way from right side of table to left side of table. Something was clearly machined wrong.
Also note I indicated along the surface plate as well as a check and the plate below where I was measuring is perfectly flat. Or much much less than I can detect with my 0.01mm dial.
When I indicate off the bottom of the dovetail however it is pretty much under 0.02mm deviation everywhere. That is not relevant as it does not slide there but made me think the way was machined wrong or they ground the table off the bottom of the dovetail instead of off the way. If they cut the way after the top then fixing this may not be possible at all as the distance between the dovetails will be way out as well. I do not have a micrometer big enough to be able to check that unfortunately.
So again wondering what others have noticed in terms of table accuracy left to right for the G0704. Is this within tolerance or is it way the heck out.
Right Rear:

Left Rear:

Right Front:

Front Left:

The table sits perfectly flat on my plate. No rocking or anything like that.
The indicator rises linearly as you move along the way from right side of table to left side of table. Something was clearly machined wrong.
Also note I indicated along the surface plate as well as a check and the plate below where I was measuring is perfectly flat. Or much much less than I can detect with my 0.01mm dial.
When I indicate off the bottom of the dovetail however it is pretty much under 0.02mm deviation everywhere. That is not relevant as it does not slide there but made me think the way was machined wrong or they ground the table off the bottom of the dovetail instead of off the way. If they cut the way after the top then fixing this may not be possible at all as the distance between the dovetails will be way out as well. I do not have a micrometer big enough to be able to check that unfortunately.
So again wondering what others have noticed in terms of table accuracy left to right for the G0704. Is this within tolerance or is it way the heck out.
- Joined
- Feb 1, 2015
- Messages
- 9,993
You appear to have a smoking gun there. .1mm seems like a lot to be out. You will need to check the dovetails to determine whether ways or the table top is out. A couple of 1/2" dowel pins and a micrometer will do it. Calipers can detect the difference in spacing but it will only be about .05 mm.
If the dovetail spacing checks out, the table top would be the problem and that can be fairly easily fixed with a regrind. of the surface. If your dovetail spacing varies along the length, then the ways are the probable culprit. In that case, you should be seeing a difference in gib adjustment from one end to the other.
How old is the mill and are you the original owner? Did you get an inspection certificate with the mill? The reports usually specify the acceptable deviation and the actual measurements.
Even if it is out of warranty, the manufacturer or vendor may work with you to correct the situation since this would be a manufacturing defect. If you do go that route, document all your measurements and observations. If you present a strong case, they are more likely to side with you.
Good luck!
I put a couple of 1/2" end mills (and then did it again with a couple of 3/8" end mills as a second check) and used the only tool I had that could open that wide. A Chinese stainless caliper. It measured exactly the same at each end of the table as accurately as my digital caliper can (displays to 0.0005"). I would much rather have tried with a good micrometer but do not have one that large. But I feel pretty good that the dovetails are evenly spaced along the table.
I am the second owner. There was no inspection certificate when I bought the mill unfortunately. The is my reason for asking owners of G0704 machines what they are seeing. Craftex is sold by BusyBee tools in Canada and unfortunately they seem to have no real interest in talking about a machine that is older and out of warranty. Also the fact that I am not the original owner does not inspire them to help.
I suspect I can get the table top ground somewhere but not sure if it will be worth it or not.
How accurate can the table practically be ground? if I would be going from 4 thou to say at best 2 I am not sure it would be worth the cost of a grind (no idea what that would cost actually). Shimming the vice and table work to level might be the way to go - though it is a pain in the butt.
Thoughts?
- Joined
- Feb 1, 2015
- Messages
- 9,993
If you are fairly convinced that the error is being caused by a non-parallel condition between the x axis ways and the surface of the table, the easiest fix is to mount a plate in top of the table and mill it with a facing tool. Any play and flexing notwithstanding, you will have a surface which, by definition, is parallel to the ways. Tosa Tools, in Madison Wisconsin( http://www.tosatool.com/modular-fixturing/ ) sells these plates for Tormach and other mills. The plates feature a pattern of alternating threaded and precision dowel pin holes for accurate mounting of fixturing and parts.
Since you are going to resurface the plate to true the surface to your ways, you could just buy some aluminum plate and make your own. Because you cant reach all area of your table, your plate should be smaller than the table surface. I made one to match the work envelope of my machine.
The advantage of this solution is that you are not modifying the mill in any way and you can return to your present configuration by simply removing the plate. John Saunders of NYC CNC on You Tube had a number of videos about the plate.
So I took it into a shop today and they quoted me $75 to grind so I decided to do it. They did it right away and I got it home and put the table on and adjusted to gibs. Very happy with <0.01mm across the Y direction at every X position i checked. <0.02mm across the entire X direction at every Y position I checked. I am surprised at how much better. Less than 0.0008" deviation in the entire work area. They had to take almost 7 thousandths off to make the top parallel to the ways. The dovetails checked out good with a proper micrometer at less that 4/10 thousandths difference at all points on the table. Had that not checked out I would not have gone ahead with the grind.
