First time parting not too good

Garyg

Registered
Registered
Joined
Dec 4, 2014
Messages
22
I tried parting off a 1" piece of cold rolled steel. Extremely noisy. I cut in about a 1/8 in and it grapped in and stalled then blew the fuse. I was feeding so slow aswell. Its a 10x22 lathe
I had watched you tube video's and read about how difficult it can be.
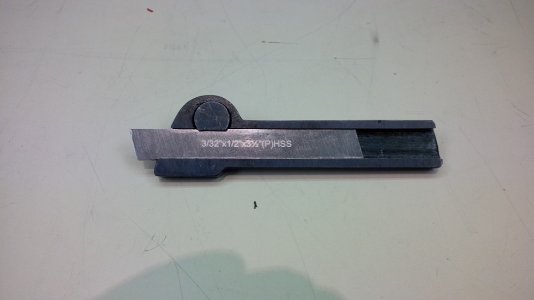
This is what I was using. It is tapered and the top has a bevel on both sides.

Parting tool.jpg

Parting tool.jpg
 
What RPM were you running? Any cutting oil or fluid? What grade of cold roll?
 
I have found that going too slow when parting can cause chatter.
 
The top of the tool needs to be on dead center. And parting verry sharp. and coolant or oil a must.
 
I tried parting off a 1" piece of cold rolled steel. Extremely noisy. I cut in about a 1/8 in and it grapped in and stalled then blew the fuse. I was feeding so slow aswell. Its a 10x22 lathe
I had watched you tube video's and read about how difficult it can be.
This is what I was using. It is tapered and the top has a bevel on both sides.

Gary, here are some things to consider:
  • You are using a 3/16" tool on a 1" piece. This is a huge tool for this cut. I would recommend a T-type tool in size P-1 instead. This tool is only 1/16" wide and will work better in this application.
  • Your tool holder holds the cutter in only one small area. It will move. Better tool holders will clamp the entire blade or a good portion of it so that the body of the blade contacts the holder, thereby increasing rigidity.
  • Your tool is dull. I'm not sure if this is after it dug in but it also may be why it dug in. Your tool has to be very sharp.
  • How rigid is your set up? Any play in your carriage, tool post or tool holder can cause the tool to dig in. Look for ways to improve rigidity.
  • Was the tip of your tool on center height? A parting tool is pushed down (tangential cutting forces) when engaging the work. If the set up is not rigid these cutting forces will push the tip of the cutter down and the tool will dig in. One thing to try is to set the tool height a few thou above center height and try again. Also, do you have a height setting gauge for your lathe? Using the tip of a tailstock center is not accurate enough. You might consider making a tool that is set on the exact centerline of your lathe to aid in this sort of thing.
  • Was your tool perpendicular to the axis of the lathe? This is a form tool with a square nose and zero rake. Therefore, any deviation from dead square will cause one corner of the tool to take the load and may steer the tool. Best to align the side of the blade with the end of the work, the face of the chuck or some other reference surface.
  • Use lubricant on materials other than cast iron or brass/bronze.
  • Feeds need to be positive but don't jam the tool into the cut. You should feel a slight resistance to feed, the emphasis being slight.
  • In my opinion, speeds vary with the rigidity of your set up. If you have a good set up you should be able to part at turning speeds. If not, then slow down. You will need to learn how your lathe and tool likes to cut. You might set a speed at say, 1/2 turning speed and see if you can feed smoothly and steadily with a feed that gives you a slight positive feel to the cut. By that I mean you should feel a slight resistance to the feed and the chips should curl continuously out of the cut. Don't rush this; it is a controlled feed and will vary as you go from the faster turning outer diameter to the slower turning inner section. You will notice you need to slow down the feed about 2/3 of the way in.

If you can figure out how to do it, parting from the rear with a purpose-built tool holder and an inverted parting tool will make all your parting issues go away. It seems that only those of us who use these tools favor them but they work so much better that I wonder sometimes why folks don't try them. I use one on my Sherline lathe and I would walk through the cut you made at about 1200 RPM. It is at the top of my list of things to make for my new Emco lathe.

Anyway, hope this helps,

Mikey
 
It seems that only those of us who use these tools favor them but they work so much better that I wonder sometimes why folks don't try them. I use one on my Sherline lathe and I would walk through the cut you made at about 1200 RPM. It is at the top of my list of things to make for my new Emco lathe.

Mikey

Serious question, what mechanism enables parting off from the backside on a machine that is not constrained by the number of tools on the cross slide or it's travel to perform better?
Chip control, coolant flow? I'm not seeing it.
 
I saw a video on youtube where the operator ran the lathe backwards when parting. Instead of pushing down and into the workpiece, the force was away from the spindle. If there were any binding or other undue forces on the workpiece, the tool would be pushed away from the workpiece instead of into it. I believe he ran the tool upside down also. Crashing was near impossible under these conditions. Does this sound like something that should be considered? Just my .02. :makingdecision:
 
Crashing was near impossible under these conditions. Does this sound like something that should be considered? Just my .02. :makingdecision:

Turning on the backside attempts to lift the saddle off of the ways, as far a crashes are concerned, if you crash the tool into the part in either direction it is still a crash. Whomever told you that you can't crash it that way is pulling your leg.

Tell him, as an Englishman might say, to "pull the other one".
 
Serious question, what mechanism enables parting off from the backside on a machine that is not constrained by the number of tools on the cross slide or it's travel to perform better?
Chip control, coolant flow? I'm not seeing it.

Yeah, its sort of hard to wrap your head around it but my personal experience suggests that a rear mounted tool improves rigidity. When parting from the front the cutting forces push the nose of the tool down and causes a lifting force on the tool holder. If there is flex or play in the carriage-holder interface or in the ways then the holder can move and allows the cutter tip to move and cause the tool to dig in. With a rear mounted tool these forces lift the nose of the tool. This lift translates into downforce at the tool holder on the carriage, eliminating play. It works.

In addition, since the tool is mounted upside down the relief angle under the tip now sits above the tip and acts like side rake on a turning tool. This reduces cutting forces and aids in chip ejection, thereby reducing cutting temperatures as well. Furthermore, since the tip is being lifted out of the cut by the cutting forces dig ins just don't happen.

Unlike parting from the front, where much of the cutting fluid is carried off by the chips before it even gets to the cutting tip, the fluid gets to the tip of an inverted tool first. This further reduces cutting temperatures and reduces friction.

In a shop-made holder that clamps the entire width of the blade such that the body of the blade is in firm contact with the side of the slot it sits in, the blade is held very rigidly. This allows a thin blade to cut much deeper than that blade would be able to cut when parting from the front. How much deeper? I use a P-1-N (0.040" thick) to cut 1-1/2" thick steel at high speeds without chatter so I would guess it doubles the depth capacity of that cutter.

On a heavy rigid lathe, rear mounting a parting tool may not make a difference but on a light lathe it definitely does. On a Sherline lathe you will have severe chatter when parting large diameter pieces of steel from the front, even at relatively low speeds, but a rear mounted tool will walk right through that same piece without a hint of chatter at much higher speeds. I haven't had a single dig in or any chatter in well over a decade of use so regardless of how it works, it does work.
 
Back
Top