- Joined
- Feb 1, 2015
- Messages
- 9,939
I recently purchased five pairs of 1-2-3 blocks. My intention was to use them for setups when machining. They arrived last week and on first inspection, actually looked reasonably good. I want to do more thorough metrology but thought that I should serialize them first.
A carbide scribe could do the job but the ridges that would result would have to be removed. My thinking turned to electrochemical etching. The process that I used was coating the work with a resist and scribing through the resist to expose the metal. A 14 volt power supply was connected positive to the work and negative to a Q Tip bud dipped in a saturated salt solution. The wet Q Tip is then gently rubbed over the work for about 30 seconds.
I tried some test pieces and the etching was deep enough to be easily legible. The problem was that the surface exposed by the scribe was anything but art. A better way of cutting the pattern in the resist was required.
The obvious choice was the Tormach CNC. I could generate precision artwork and use the CNC to cut it into the resist. A short time ago, I had gotten my 2.5w laser operational on the Tormach. At the time, I had thought about using it for making printed circuit boards. The laser isn't powerful enough to directly cut the copper but if I coated the board with a resist, maybe I could expose the copper to chemically etch the pattern. The idea was put on a back burner until yesterday when I thought using for the serial numbers.
I set the laser up and coated a piece of steel with some red nail polish. I ran the laser at 3 ipm and 8 ipm (two of my jog shuttle's feed rates) and etched the resultant burns. The laser had indeed exposed the steel and there were two clear etched lines.
Tormach's Path Pilot has a conversational program for engraving text. It will create G code for any True Type font. True Type fonts are all outlines rather than a single line but there are a few fonts around where the outline is reduced to a single line, which is what I wanted for my serial numbers. The font that I chose was CamBam_Stick_2.ttf and I chose a .150" height.
The program is intended to be used with an engraving tool and had to be modified for use with the laser, namely adding code to turn the laser on at the start of a cut and off at the end of a cut. I have set my CNC up to use the G code coolant control to turn the laser on and off by redirecting the coolant power to a relay which switches the power to the laser.
After running the code on a piece of scrap to determine that the program worked and the resulting etching was satisfactory, I put the nail polish resist on all twelve blocks. I chose to mark the upper right corner of a 1-2 surface. This will give me a consistent reference when I start measuring required the use of high powered lasers. the blocks. I the created the twelve G code programs and modified them for use with the laser. I numbered the five pairs consecutively from 11 through 20 and my old blocks as 01 and 02.
Running the program took 1 minute for each block, including part change out. I ran the etching for 30 seconds, wiping the salt solution off when completed followed by a rinsing wipe and acetone wipe to remove the nail polish.
The serial numbers turned out very well, looking like a professional marking. The entire process was simple and straightforward. With the growing popularity of CNC routers and lasers, the available artwork is growing exponentially. The combination of the laser resist etching and the electrolytic metal etching opens the possibility of high definition artwork on metal that had previously required the use of high powered lasers.

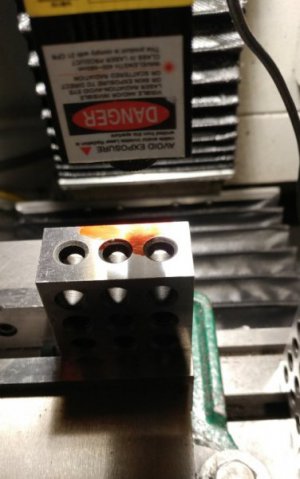
A 1-2-3 Block In CNC just finished.

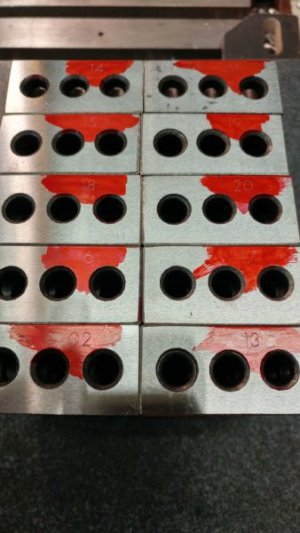
10 blocks with resist etched, waiting for electrolytic etching

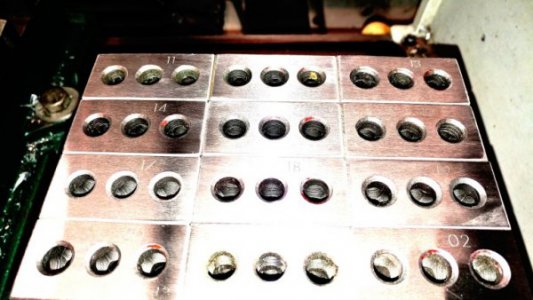
12 finished blocks

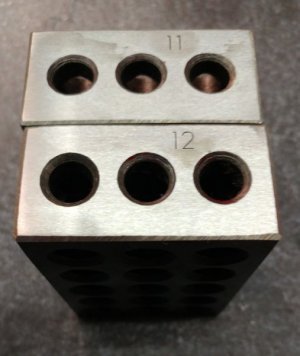
detailed view of etched blocks
The G code used to cut the "15" block is below. Note that PathPilot set the structure up with variables ro permit making changes easier. It makes reading the code more difficult though.
EDITED TO INCLUDE SAFETY PRECAUTIONS
EYE PROTECTION, PPE
Whenever working with lasers, considerations for personal safety are paramount. A 2.5 watt laser is capable of burning flesh so keep hands away from the focused beam. Serious eye damage will occur if directly viewing the beam. Eye protection should always be worn while the beam is activated. I have found that red safety glasses provide the best beam attenuation. They are available on eBay for a modest cost.
USE PROPER VENTILATION
The electrolytic etching process generates a small amount of chlorine gas. This gas can cause serious lung damage if a sufficient quantity is inhaled. Think WWI trench warfare. The amount of gas generated increases with an increased etched area. Do the etching process outdoors or in a non-living space. A welding hood will provide suitable ventilation. Chlorine gas can also attack exposed metal so if any significant amount of etching is being done, it shouldn't be done next your machines.
A carbide scribe could do the job but the ridges that would result would have to be removed. My thinking turned to electrochemical etching. The process that I used was coating the work with a resist and scribing through the resist to expose the metal. A 14 volt power supply was connected positive to the work and negative to a Q Tip bud dipped in a saturated salt solution. The wet Q Tip is then gently rubbed over the work for about 30 seconds.
I tried some test pieces and the etching was deep enough to be easily legible. The problem was that the surface exposed by the scribe was anything but art. A better way of cutting the pattern in the resist was required.
The obvious choice was the Tormach CNC. I could generate precision artwork and use the CNC to cut it into the resist. A short time ago, I had gotten my 2.5w laser operational on the Tormach. At the time, I had thought about using it for making printed circuit boards. The laser isn't powerful enough to directly cut the copper but if I coated the board with a resist, maybe I could expose the copper to chemically etch the pattern. The idea was put on a back burner until yesterday when I thought using for the serial numbers.
I set the laser up and coated a piece of steel with some red nail polish. I ran the laser at 3 ipm and 8 ipm (two of my jog shuttle's feed rates) and etched the resultant burns. The laser had indeed exposed the steel and there were two clear etched lines.
Tormach's Path Pilot has a conversational program for engraving text. It will create G code for any True Type font. True Type fonts are all outlines rather than a single line but there are a few fonts around where the outline is reduced to a single line, which is what I wanted for my serial numbers. The font that I chose was CamBam_Stick_2.ttf and I chose a .150" height.
The program is intended to be used with an engraving tool and had to be modified for use with the laser, namely adding code to turn the laser on at the start of a cut and off at the end of a cut. I have set my CNC up to use the G code coolant control to turn the laser on and off by redirecting the coolant power to a relay which switches the power to the laser.
After running the code on a piece of scrap to determine that the program worked and the resulting etching was satisfactory, I put the nail polish resist on all twelve blocks. I chose to mark the upper right corner of a 1-2 surface. This will give me a consistent reference when I start measuring required the use of high powered lasers. the blocks. I the created the twelve G code programs and modified them for use with the laser. I numbered the five pairs consecutively from 11 through 20 and my old blocks as 01 and 02.
Running the program took 1 minute for each block, including part change out. I ran the etching for 30 seconds, wiping the salt solution off when completed followed by a rinsing wipe and acetone wipe to remove the nail polish.
The serial numbers turned out very well, looking like a professional marking. The entire process was simple and straightforward. With the growing popularity of CNC routers and lasers, the available artwork is growing exponentially. The combination of the laser resist etching and the electrolytic metal etching opens the possibility of high definition artwork on metal that had previously required the use of high powered lasers.

A 1-2-3 Block In CNC just finished.

10 blocks with resist etched, waiting for electrolytic etching

12 finished blocks

detailed view of etched blocks
The G code used to cut the "15" block is below. Note that PathPilot set the structure up with variables ro permit making changes easier. It makes reading the code more difficult though.

EDITED TO INCLUDE SAFETY PRECAUTIONS
EYE PROTECTION, PPE
Whenever working with lasers, considerations for personal safety are paramount. A 2.5 watt laser is capable of burning flesh so keep hands away from the focused beam. Serious eye damage will occur if directly viewing the beam. Eye protection should always be worn while the beam is activated. I have found that red safety glasses provide the best beam attenuation. They are available on eBay for a modest cost.
USE PROPER VENTILATION
The electrolytic etching process generates a small amount of chlorine gas. This gas can cause serious lung damage if a sufficient quantity is inhaled. Think WWI trench warfare. The amount of gas generated increases with an increased etched area. Do the etching process outdoors or in a non-living space. A welding hood will provide suitable ventilation. Chlorine gas can also attack exposed metal so if any significant amount of etching is being done, it shouldn't be done next your machines.
Attachments
Last edited:

