Enco 105-1110 rf-30 convert to 240v...

TerryH

I have no clue what I'm doing...
H-M Supporter Gold Member
Joined
May 8, 2018
Messages
336
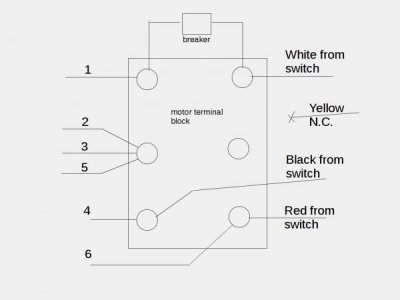
My Enco mill came to me wired for 115v. I have 204v available so I'd like to rewire it to take advantage of that. Problem is, it doesn't appear that the wiring listed inside the motor box cover is wired exactly like it shows in the diagram. Can someone help me with how to properly make this change?

Tahnks,

Terry
 
Post whatever diagrams you can find from the machine/motor so I can take a look
 
Thank you Mark. I'm sorry to be electrically challenged. Zero information in the manual. I downloaded the Jet manual since they still use this same switch setup but all it says is follow the instructions on the inside of the motor box cover.

Switch...


Motor:

Top left 1 - 3- to circuit breaker
Center left
5 - red
Bottom left
2 -4 - black

Top right white - to circuit breaker
Center right blank
Bottom right 6 - yellow


Inside of motor box cover:


Wiring diagrams that the original owner drew in the manual:


Last edited:
Thank goodness the motor wires are still numbered, that helps a lot. Ok so currently motor wires 1 and 3 are connected together and 2 and 4 are connected together correct?
If so then just reconfigure the motor terminal block wires like the following:
220vconvEnMot.jpeg
If the motor rotation is backwards from the switch handle then swap the white and black wires going from the switch to the motor block, either at the motor end or the switch end. Alternately, you can swap 5 and 6 instead. - Enjoy!
ps the yellow can be disconnected at one end or both ends- doesn't matter
Mark
pss 220 volt line wire colors are supposed to be black and red according to code, but you can do what you want, it's your machine. If you do sell the machine though, be sure to tell them that it's wired for 220
 
Last edited:
Thank goodness the motor wires are still numbered, that helps a lot. Ok so currently motor wires 1 and 3 are connected together and 2 and 4 are connected together correct?

Correct, 1 and 3 are together and 2 and 4 are together.
 
If so then just reconfigure the motor terminal block wires like the following:
View attachment 269515
If the motor rotation is backwards from the switch handle then swap the white and black wires going from the switch to the motor block, either at the motor end or the switch end. Enjoy!
Mark

Awesome. Thank you!
 
Hey everybody

I just scored got a Rong fu rf-30. Seems to be the same situation that terry has. It came wired for 115v, but it only went in reverse (up position)
the switch seemed to be wired incorrectly. I have been reading all the posts I can find, and watching YouTube videos.... and I thought I copied the wiring that Mark diagrammed, while also copying the wiring in the switch that terry has in his photo. I connected the mill to 220 and when I flip the switch up the chuck moves back and forth slightly and I hear the starters humming noise.... when I flip it down there is nothing.

is it possible that my switch is wired in a different way? broken ?


i am not very well educated in electronics, though I have learnt more in the last three days about motors and electricity then I ever have before.... but can anyone help me fix what I hope is just a dumb noob mistake ?

(I attached photos of my mill, and the wiring diagram and terry’s switch from an earlier post)
 

Attachments

  • ECDE5506-5CAD-4470-A9EC-003A2AF9811C.jpeg
    ECDE5506-5CAD-4470-A9EC-003A2AF9811C.jpeg
    28.4 KB · Views: 11
  • E7F9BAEA-AEA5-4E2A-BCEB-E49839A9FF87.jpeg
    E7F9BAEA-AEA5-4E2A-BCEB-E49839A9FF87.jpeg
    30.1 KB · Views: 15
  • 0C775916-B22D-4C32-A042-1F66025EBD9F.jpeg
    0C775916-B22D-4C32-A042-1F66025EBD9F.jpeg
    29.5 KB · Views: 12
  • FF8A7B95-25F0-4B04-9E5B-F3FF431B3527.jpeg
    FF8A7B95-25F0-4B04-9E5B-F3FF431B3527.jpeg
    23 KB · Views: 10
  • D969C62D-B56D-475B-9895-73747D1E5458.jpeg
    D969C62D-B56D-475B-9895-73747D1E5458.jpeg
    29.5 KB · Views: 8
  • 9DEC3236-643F-42DF-B8A6-25D1861EB745.jpeg
    9DEC3236-643F-42DF-B8A6-25D1861EB745.jpeg
    24.1 KB · Views: 7
  • 893F5D42-D6B5-422C-8860-E7C31D424519.jpeg
    893F5D42-D6B5-422C-8860-E7C31D424519.jpeg
    27.2 KB · Views: 7
  • C5AAF28D-E15B-46DB-8CD2-F608CB62110A.jpeg
    C5AAF28D-E15B-46DB-8CD2-F608CB62110A.jpeg
    29.7 KB · Views: 8
just to clarify my motor is currently wired like this:
 

Attachments

  • 99A437D5-8AB9-4A41-BEB2-4D3A5D15CB13.jpeg
    99A437D5-8AB9-4A41-BEB2-4D3A5D15CB13.jpeg
    1.1 MB · Views: 10
Back
Top