DRO for BP

Kroll

Active User
H-M Supporter Gold Member
Joined
Dec 23, 2012
Messages
1,307
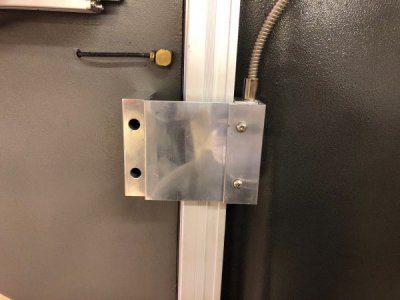
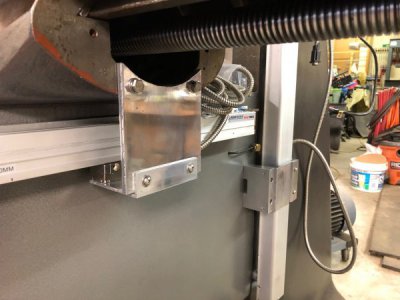
Guys I finally got started back on the DRO,I now have all the material that I think I will need for mounting such as various aluminum angle.I toss in the towel on my power feed so moving back to the X axes.I did have to drill some new holes cause I decided to mount the reader direct to the saddle.My first plan was to use an angle bracket so that I could adjust the reader for correct clearance from the scale.But since I had some me time today I went for a perfect fit(?)After checking from all angles and checking with shims I drill out couple 10/32 bolt holes and I be dang it fits.So I remove the blue plastic pieces that holds the reader in place then install some shims behind the reader and saddle it does fit (yes I was surprise) So I have the scales dial in all is good,I just need to get some longer 10/32 socket heads then the X axes will be 100% complete.Guys if you spot an error or have some advice please pass it on.I will need to mount my vise and get it dial in so that I can make some brackets with holes and slot that are spot on.
IMG_0858.jpg
 
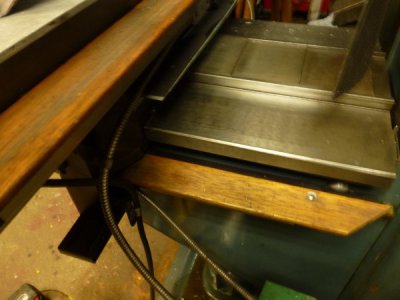
I don't know if this would interest you but I put pieces of wooden molding board above the reader heads to protect
the delicate scale. Sooner or later something heavy will fall and cause damage. Nice looking install job!
By the way, the cables are somewhat vulnerable as well so they need to be routed with some care. I had
a tool bit land on my wiring and cracked open the sheath. Fortunately the wires were fine and the protective metal
went back together perfectly.


P1020365.JPG
Here's a photo of the molding that covers my magnetic scales.
 
I just made a round boss and used a tapped hole that was already in the mill table to keep from smashing the scale into the column
 
Dang that looks good cathead,kinda adds little class to a mill.Well this weekend I will start on the z axes which I already have the scale mounted just have to attach the reader.Technical Ted since you have done this already wanted to ask about the shims that came with DRO.Going to shim the reader from the scale the same as what the blue plastic shipping tabs that holds the scale in place the same which to be about 2-3 shims.Ted did you have to use any of those shims get the reader perfectly in place?Seems like it would be better to let those readers kinda float little to make up what may not be a perfect fit.Say use 2" socket screws through reader into the machine so that reader won't move side to side but just move little up/down on those screws.If any of this makes since.But I watch ton of Youtubes,read T Teds process and no one has use a floating reader method.So going to stick with what works,just wanted to put that out there.Still will have to seat down and go over the instructions few more times before the weekend.
 
Dang that looks good cathead,kinda adds little class to a mill.Well this weekend I will start on the z axes which I already have the scale mounted just have to attach the reader.Technical Ted since you have done this already wanted to ask about the shims that came with DRO.Going to shim the reader from the scale the same as what the blue plastic shipping tabs that holds the scale in place the same which to be about 2-3 shims.Ted did you have to use any of those shims get the reader perfectly in place?Seems like it would be better to let those readers kinda float little to make up what may not be a perfect fit.Say use 2" socket screws through reader into the machine so that reader won't move side to side but just move little up/down on those screws.If any of this makes since.But I watch ton of Youtubes,read T Teds process and no one has use a floating reader method.So going to stick with what works,just wanted to put that out there.Still will have to seat down and go over the instructions few more times before the weekend.

I would not want mine to float... any movement would cause reading errors and inaccuracies.

Somewhere in the paperwork, if I remember correctly, the folded up paper that comes with each head, it specs the recommended clearance between the reader head and the scale. I cut a piece of dense cardboard of the correct thickness to space the head the correct distance from the scale for final mounting. Once mounted, remove the cardboard piece. This is just used for locating during installation. Those blue plastic things are NOT the correct spacing per the paperwork. I'm thinking they are probably just from shipping. I just threw mine away.

I don't remember using any of the provided shims, because I made all my mounts right to the proper size so I didn't need them. But, using shims is fine to install the heads/scales properly. Just remember, nothing get permanently installed between the head and scale. There is just an air gap there. This is where the instructions could have been laid out a little better. But, after reading them and looking at the diagrams multiple times, this is what I came up with and it worked well for me.

1- Center the head with the scale thickness wise. I couldn't find a spec on this, but there seems to be some leeway here. So, I just tried to line up the center of the head with the center of the scale.
2- The head must be square and parallel with the scale. I placed the shim of the correct thickness between the scale and the head and held it tight by hand while mounting.
3- If you have the scale indicated in within a few thousandths and the reader head is square, parallel and at the correct spacing from the scale, everything should work fine.
4- The last thing you'll do is calibrate the system. Don't skip this step.

Ask away if you have any more questions.

Ted
 
Thanks Ted,guys more questions will come as I make some very slow progress
 
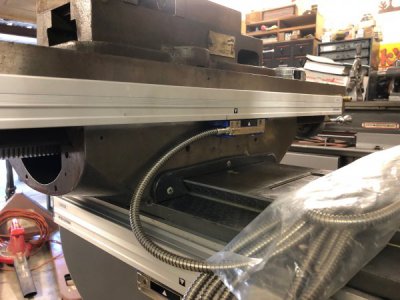
Guys its been awhile and no I haven't been goofing off.Well I finally got the knee done except mounting the shield,this has taken me some time to get it right.I measure and measure again then carefully drill the holes for mounting which I felt were spot on.But after getting it all put together I just could not get the spacing right for the reader and the scale.So other than the holes for the block,I had to mill slots for all other screws so I would have some adjustments for fine tuning.Which I'm glad I did cause it come out lot better and feel its spot on.So making progress at a snails pace.287609
 
Guys little more progress since me my last post,I believe that I may be finish this Saturday then start calibration,and setting up the DRO which does make me nervous.So question to come guys so please be ready,but I am also excited about all this.This afternoon I adjusted the reader to the scale and it good so what I have left to do is move the reader just watch the travel then put to cover on.So,so far so good287855
 
Looking forward to the big reveal.
I haven't even started planning a DRO for the bridgie yet, so this thread has been letting me know what I'm in for.
 
Glad to hear its little help and hope inspiring which is what I needed.But I been going back and reading another member post on his DRO journey which was T Teds and very well written.
 
Back
Top