- Joined
- Nov 16, 2012
- Messages
- 5,596
In another thread, a new member shared his new learning experience. Please read here: https://www.hobby-machinist.com/threads/er32-fail-learn-from-my-mistakes.68803/
In light of that post, here is information on how to diagnose an ER32 collet chuck. This is a $27 unit from eBay that was so far out of spec, I thought my mill was broken when I first saw it spin.
NOTE: This is not a "lets bash products from China" post. Please refrain from going in that direction. I get a lot of value from many of the lower cost items I get on eBay and Amazon. The true intention of this post is to show people meaningful ways of how to diagnose a simple problem.
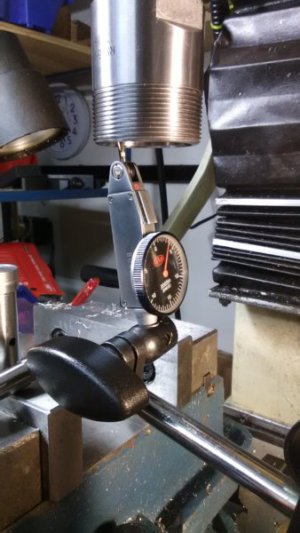
First, wipe off the surfaces and mount the chuck in the mill. Put an indicator as shown and turn the spindle at the top of the machine head by hand. In this case, it was moving +/- 0.003" which translates to 0.006" TIR. I had doubts about the setup so, the chuck was removed, cleaned and re-installed. Subsequent TIR was anywhere from 0.004 to 0.007" which is totally unacceptable. That much TIR will chip carbide tools very fast. Note that measuring off the outside body of the chuck is meaningless. If you do check there, it's only for your own knowledge. If the unit was functioning properly and if the body OD was running true, that could be used as a reference point some day in the future.
Similarly, if you are checking RO (Run-Out) of a drill chuck, the outside TIR does not mean much other than an indication of overall craftsmanship.
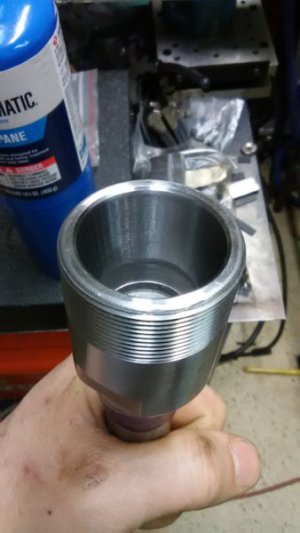
What's going on? Chatter marks. Big ones! Even though we have not checked yet, a collet stands little chance of seating properly. FWIW, I did check with several collets and various pin gages and got TIR ranging from 0.007 to 0.012" very close to the collet mouth. I did not bother to check further down the shaft... -Don't even want to know!
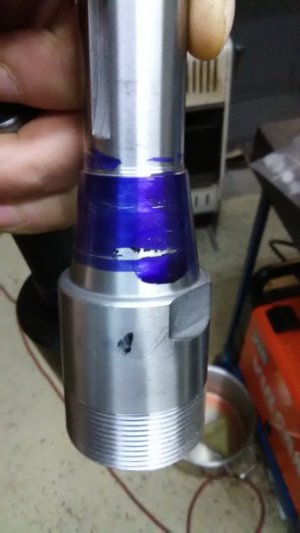
Taper is only touching in one place. It's supposed to be 16d 51m (i.e, 16.85 degrees).
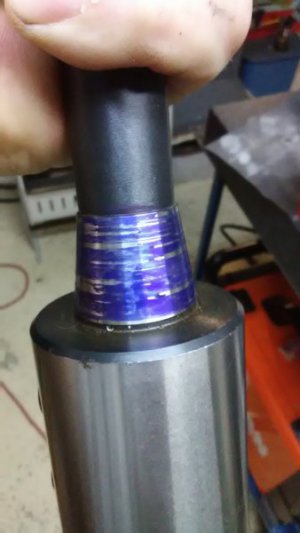
Here's the taper of another endmill holder that holds perfect zero. It touches evenly on the taper.
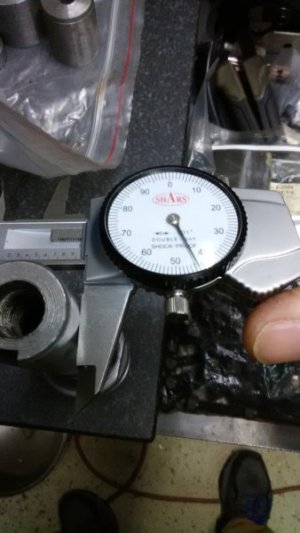
And finally, the end of the shaft measures 0.944" which is 0.0055" shy of spec. R8 spec says 0.9495. +0, -0.0003 (i.e. 0.9492 to 0.9495). All my good quality R8 tools measure in the proper range. The fit here is actually very critical. The close tolerance at the butt of the shaft causes the taper to always seat straight.
The point of this is, when measuring things, look at the critical areas of contact. When I used to support Precision Matthews equipment, I would have 1st time machine owners tell me how some XYZ component was out of spec. Indeed, once in a while, a flaw was found but 99% of the time, it was owner/operator misunderstanding. Seemingly simple things need critical analysis sometimes...
Ray
In light of that post, here is information on how to diagnose an ER32 collet chuck. This is a $27 unit from eBay that was so far out of spec, I thought my mill was broken when I first saw it spin.
NOTE: This is not a "lets bash products from China" post. Please refrain from going in that direction. I get a lot of value from many of the lower cost items I get on eBay and Amazon. The true intention of this post is to show people meaningful ways of how to diagnose a simple problem.
First, wipe off the surfaces and mount the chuck in the mill. Put an indicator as shown and turn the spindle at the top of the machine head by hand. In this case, it was moving +/- 0.003" which translates to 0.006" TIR. I had doubts about the setup so, the chuck was removed, cleaned and re-installed. Subsequent TIR was anywhere from 0.004 to 0.007" which is totally unacceptable. That much TIR will chip carbide tools very fast. Note that measuring off the outside body of the chuck is meaningless. If you do check there, it's only for your own knowledge. If the unit was functioning properly and if the body OD was running true, that could be used as a reference point some day in the future.
Similarly, if you are checking RO (Run-Out) of a drill chuck, the outside TIR does not mean much other than an indication of overall craftsmanship.

What's going on? Chatter marks. Big ones! Even though we have not checked yet, a collet stands little chance of seating properly. FWIW, I did check with several collets and various pin gages and got TIR ranging from 0.007 to 0.012" very close to the collet mouth. I did not bother to check further down the shaft... -Don't even want to know!

Taper is only touching in one place. It's supposed to be 16d 51m (i.e, 16.85 degrees).

Here's the taper of another endmill holder that holds perfect zero. It touches evenly on the taper.

And finally, the end of the shaft measures 0.944" which is 0.0055" shy of spec. R8 spec says 0.9495. +0, -0.0003 (i.e. 0.9492 to 0.9495). All my good quality R8 tools measure in the proper range. The fit here is actually very critical. The close tolerance at the butt of the shaft causes the taper to always seat straight.

The point of this is, when measuring things, look at the critical areas of contact. When I used to support Precision Matthews equipment, I would have 1st time machine owners tell me how some XYZ component was out of spec. Indeed, once in a while, a flaw was found but 99% of the time, it was owner/operator misunderstanding. Seemingly simple things need critical analysis sometimes...
Ray
