Depth gauge on Atlas Craftsman 101.07403 tailstock

ARC-170

Jeff L.
H-M Lifetime Diamond Member
Joined
Oct 17, 2018
Messages
966
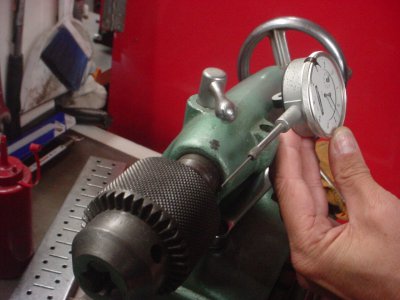
I have a dial indicator with 1" of travel I'd like to use as a tailstock depth gauge on my Atlas Craftsman 101.07403 lathe. I've looked around for reference but it seems no one has done this, probably because there isn't and easy way to attach the dial since the tailstock as all round. All of what I found in my research was on lathes that had a flat top on the tailstock.
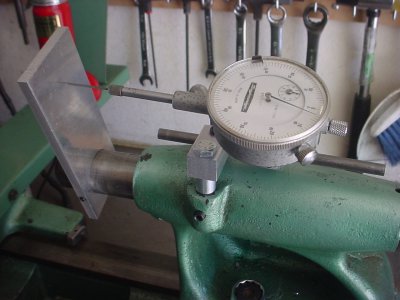
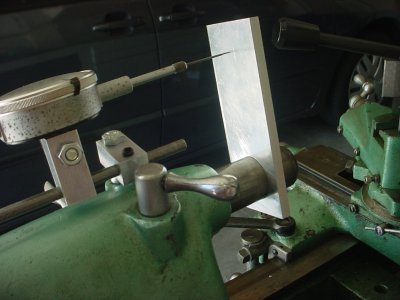
Here are some pictures showing how I'd like to mount it:
DSC00829.JPG DSC00830.JPG

I thought I might tap the hole that was originally for lube and make some sort of mounting bracket for the indicator. I would then make a sleeve for the ram that the indicator needle touched (not shown here). The other option is for some sort of press-fit post.

Has anyone ever done something like this to this specific machine? I'd like to see images and get any thoughts and comments on what you did, how you did and if you are happy with it.

Thanks!

UPDATE: See post #9 for my solution.
 
Last edited:
Anohter option, (obtain a second tailstock, just in case). Mill a flat on the top of the TS, mount a 6" Digital Caliper on there with the movable head mounted to the end of the quill. Put in a drill, touch off, set zero, and bob's your uncle.
 
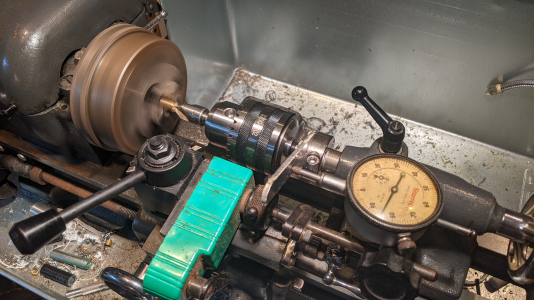
Not a great setup, but I used a magnetic base on the QC toolpost. The indicator bears on an aluminum arm screwed to a shaft collar clamped to the tailstock. The arm and collar work great, with the bonus of preventing me from retracting the tailstock enough to dislodge the taper, but I do need to come up with a better way to mount the dial itself... I don't really want to alter the tailstock casting.

1635814821361.png
 
I have several magnetic back indicators that I use on my lathe. Mag bases can also be used but more cumbersome. I have generally used a clamp on the tail stock quill but have thought about something like @FanMan but with a handle so that I can position it anywhere along the quill in case I have to have it extended farther out.
 
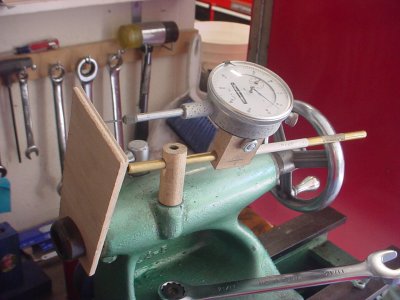
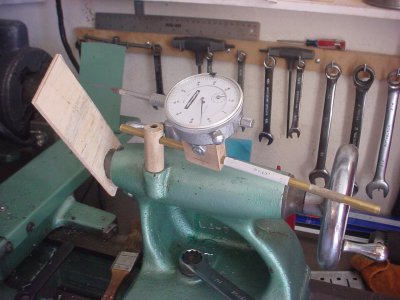
I mocked up an idea:
DSC00832.JPG DSC00831.JPG

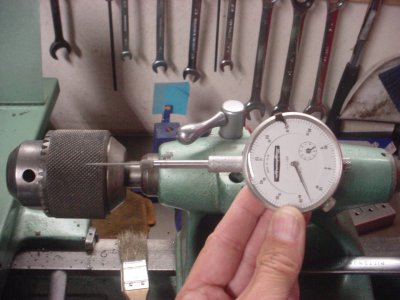
For this to work, I would need to drill and tap a hole in the side of the lube cup for a set screw to hold the shaft that holds the rod that holds the block that holds the indicator. I figure it's easy enough to plug up

There's a plate on the ram that has a screw that tightens it on the ram shaft. The needle of the indicator pushed against this.

Both the shaft and the block have set screws in them to keep them from rotating or moving on the rod.

The brass tube I used for the mock-up is way too long, BTW. It only needs to be about half the length shown.

I figure if I make the tolerances tight, this assembly will not move when all the set screws are tight.

Thoughts?
 
That would work nicely. You may want to extend the quill all the way out and then set your tube (mock up) length so that you could use the dial indicator all the way out. That would require you to move the indicator to the other side of the tail stock post, but that way you would be able to use this concept the entire quill travel.
 
I recall that someone had designed a similar arrangement but with an expanding mandrel that grabbed the ID of the cup, so that no modifications to the tailstock were required.
 
I've been using this digital setup for quite awhile now and it works great. It's a digital scale from taytools that I think was around $25. It's easy on/off and has about 4" of travel. Just remember to take the battery out when not in use and it will last a long time.
 

Attachments

  • 851C8D96-2897-41C6-8DCE-F4023E1456AC.jpeg
    851C8D96-2897-41C6-8DCE-F4023E1456AC.jpeg
    64.3 KB · Views: 30
  • C90CDD62-782A-4D4A-8E48-10F1F47F1211.jpeg
    C90CDD62-782A-4D4A-8E48-10F1F47F1211.jpeg
    64 KB · Views: 28
  • 3C87DE82-5E8D-4541-B192-B7B3704050A0.jpeg
    3C87DE82-5E8D-4541-B192-B7B3704050A0.jpeg
    79.6 KB · Views: 24
I finally finished making my idea:
DSC00973.JPG
I bored out a hole in a sheet of 1/4" aluminum to mount on the ram. It moves a little, even when the set screws are tight, but only if you grab it by hand. I may do something similar to @FanMan 's design.

My boring head on my mill is metric, so I think I ether converted wrong or measured wrong (probably both!) when I was boring this. It needed to be 1.124" to fit tight, but I went a little too large by about 0.005".

I had to drill and tap a hole for a set screw in the tailstock. I tried making something that expanded so I wouldn't have to do this, but nothing worked. I figure I've drilled holes for all the other DRO mountings, one more won't hurt. That hole isn't used for anything now anyway, except to hold the chuck key.
DSC00974.JPG

I used scrap aluminum and bolts I already had. I got the gauge for free. Total cost for this: $0.

I hope this gives others ideas for doing this on their Atlas Craftsman lathes.
 
Back
Top