"centering microscope"

ppod-

Registered
Registered
Joined
May 31, 2024
Messages
16
I would like to share a setup I came up with that could perhaps help folks without one. (On a Sherline it'd be quite a project to make use of one even if you had it.)

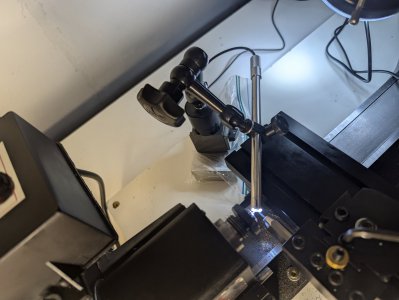
The little silver stick is an "otoscope" from Amazon that was I think $25-30. It can send images to phone or computer. I filed off most of the metal guard in front of it so I can get it as close as its optical system allows. It happened to be exactly the right diameter to fit into the indicator holder.

Since Sherline is mostly aluminum, the indicator holder sits on a 1-2-3 block on a table next to the lathe. (By the way, I splurged on a Noga mini-indicator-holder which happens to be just the right size to sit in the indentation in the middle of the (steel) ways on Sherline, without touching the machined surfaces, so I could probably use it that way, but the 123 block is easier to move around, and fixed position is not needed in this application.)

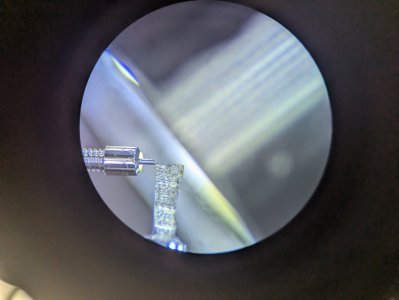
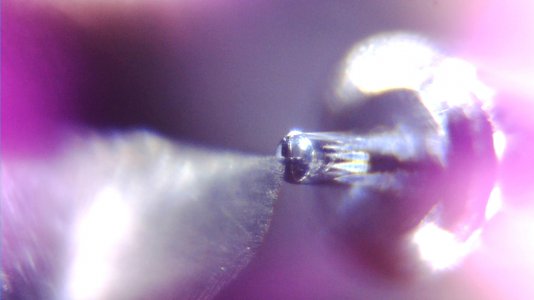
That freshly made (so exactly centered) pinion in the third image is just under 120 microns so (even accounting for parallax issues) I feel reasonably confident that the cutter is within 10 microns of center.

Very best,
-Pavel
 

Attachments

  • PXL_20240626_215650634.jpg
    PXL_20240626_215650634.jpg
    275 KB · Views: 83
  • PXL_20240626_215615809.jpg
    PXL_20240626_215615809.jpg
    321.4 KB · Views: 82
  • 20240626175535530.jpg
    20240626175535530.jpg
    400 KB · Views: 81
Great idea and nicely done. Thanks of sharing!
 
It is for a pallet fork for an old watch movement. I'm attaching some photos, and I posted another one here: https://www.hobby-machinist.com/thr...to-match-an-existing-gear.112804/post-1142480

I am not at all happy with my setup and hope to improve it over time, but here it goes (as with my other posts, in the hope that it helps folks who are new to this and/or are on a budget).

The cutter is a 1mm carbide rod (from Micro100 iirc) that I ground by hand (using a $20-ish 600 grit diamond cup wheel off AliExpress, attached to a $200-ish Foredom mini polishing lathe using a custom holder made on the $2000-ish Sherline lathe...). The 600 grit is not fine enough and I touch it up by hand with a 3000 grit diamond file (which is actually a strip cut off from a cheap knife sharpener plate, $20-ish for a set of 3 on Amazon). All angles are eyeballed.

The cutter is held in a cheap pin vise ($5-ish for a set off AliExpress). The pin vise is held in the Sherline quick change boring bar holder. This deflects quite a lot but I think that actually helps protect the very thin carbide (which also has to stick out very far, relatively speaking, to be able to reach the material right next to the collet) from breaking. It is possible to hit diameters to about the same precision as I can measure them, which is optimistically speaking 2-3 microns, by taking many passes. If you are a few microns oversize after a spring pass at 600rpm, you could be spot on after repeating it at 2000rpm. But if you start at say precisely 1mm oversize and take off precisely 1mm (per handwheel graduations) then you'll be quite a bit off. So it's a slow way of getting things done, and I am still figuring this out.

To get the high shine I kind of cheated: I used little strips of "micro finishing film" , $25-ish for a set of grits off Amazon (I used a few grits like 8000, 14000, 50000 here) while the part was spinning in the lathe.

To be able to flip the part and not scratch it I put it in a little brass cylinder which acted as "soft jaws", see the post I linked above. I actually broke the first one I made while taking it out of its holder because it went over the threaded part and got kind of pressed into it; the second one I made in a different sequence, the holder went over the smooth part, and that worked fine. (As a consolation, that broken part allowed me to validate that it threads into the pallet fork and dimensions are right.)

The 0.1mm pitch thread was surprisingly easy to cut the standard Sherline way; the hard part was making the necessary gears without a mill or pre-made cutters (which is how that other thread started). By the way, with a couple of very simple tweaks to the standard Sherline setup, it becomes possible to cut threads (1) without taking the motor off and (2) while using collets.

One tricky part is to get this tiny thing centered after flipping it. Like I mentioned in that other thread, I was using Sherline collets which are * nowhere near * precise enough for this (they specify max 50 micron runout -- and they make use of that range!) but there is (another) simple trick I found to make them work, which I can post if folks are interested.

Everything including cutting tool grinding happens under a microscope (an Amscope stereo microscope, but I previously used a sub-$100 USB microscope for watch work and it would work here too).

This was the very first watch part I made and it was a very long way to get there. I poured myself a bit of something and sat back when it was finally done. :)
 

Attachments

  • PXL_20240629_063602386.jpg
    PXL_20240629_063602386.jpg
    373.2 KB · Views: 18
  • PXL_20240629_063047651.jpg
    PXL_20240629_063047651.jpg
    191.7 KB · Views: 18
Awesome. Pretty much why i got this lathe. I heard about the sherline collets and decided to diy. There's a witness mark on my spindle, another one on the collet holder, and my hope is that by doing the same on the collets I can keep runout to a minimum.

I have a cheap "Ali scope" (tube and small screen) hanging off a movable microphone boom style arm, works nicely but probably not precise enough once I step down from making tools for watchmaking to the actual parts.
 
The main problem in my collets is with the collets themselves, not spindle or holder, so witness marks would not help all that much - best of luck with yours.

From my experience even cheap microscopes work surprisingly well. My old cheap one, with a screen like yours, can show grid lines which can be very useful to see if there is "wobble" in the part. There is no "stereo" but at high magnification the depth of focus is so small that it kind of replaces the "stereo". Also it seems to be a matter of personal preference whether one prefers to look into an eyepiece or at a screen. For inspection / assembly, the Amscopes (esp. ZM) do have significantly better optics and very useful options like different Barlow lenses.
 
I'm making my own and drill them in place, that should get rid of runout; the witness marks help reproduce the setup.

(I have a stereo microscope - basically an Amscope "clone" - but that one sits safely on top of my repair bench, a floor away from where hot chips fly around :))
 
Ah! I was contemplating making my own but am not sure how, esp. given that I'd want them very small. I have some ideas but not a complete picture. Could you share how you make yours? Thank you!
 
Back
Top