Burke #4 Motor Mount Question

Glenn Brooks

H-M Supporter - Gold Member
H-M Supporter Gold Member
Joined
Nov 14, 2014
Messages
851
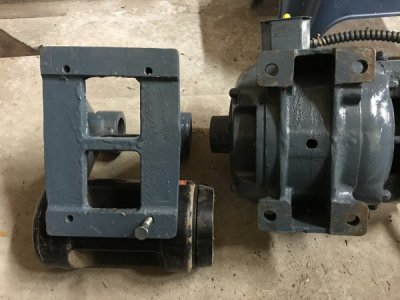
image.jpeg Hi all,

Today a just started re assembling my recently acquired Burke #4. Ran into an odd problem - the mounting bracket for the motor has different sized bolt holes than the motor base. The threaded bolt holes in the bracket are 3/8" ID, yet the bolt pattern for the motor is 9/16!

I got the machine partly disassembled, from an estate, so didn't take the motor off, and there aren't any spacers, or odd shaped shoulder bolts in the box of parts to make this work.

Any suggestions for bolting the motor onto the bracket?? As I remember, and maybe I am wrong, but a shoulder bolt won't have a sufficient head to hold down the motor.. Also curious why this be this way.

Thanks

Glenn
 
. You could make bushings for the bolts? as long as the hole pattern is the same. Is the motor the original style gear motor? Usually the gear motor bolted on the bracket and the motor itself bolted to the gear box.
 
Yep, thinking on it few a few hours, it would be easy enuf to make bushings. Initially I was wondering if the Burke had some special bolt for the engine mount...
 
Yep, thinking on it few a few hours, it would be easy enuf to make bushings. Initially I was wondering if the Burke had some special bolt for the engine mount...
I couldn't tell from your pic..... Is that a gear motor or just a plain motor? The Burke came with a gear motor .

My Burke has that same bracket, but there is another stamped steel bracket that mounts there and then the gear motor bolts to it. If you have the Lima motor drive, it bolts directly to the bracket you have , I believe.
 
Yes, it's a gear motor, I believe.. Maybe I am missing the extra bracket. I wondered about a missing piece. However The bolt hole patterns seem to line up....
 
If everything will line up, I would make bushings. On my Burke 4 , the extra bracket moves the gear motor forward to line up to the spindle.
 
Thanks Mark, I wil be setting up,the motor mount this afternoon. Haven't yet check the pully alignment.

BTW - Couldn't find a 9/16 x3/8 spacer ANNWHERE locally - apparently DYI guys don't do 9/16! So bought a 6" 9/16 bolt and plan to drill and ream put to proper ID, part off and use these as spacers. Saves $11 over the price of shoulder bolts.

Thanks for the info thus far . Very interesting putting these old mills back together.

BTW, do you know of a source for bronze or brass gears that sit inside the table auto feed assembly. The one I have still works but is worn enuf to merit replacement at some point. Iam sure I can buy a steel gear, but the worm gear that mates to it is brass - no point in wearing the worm gear excessively.

Thanks
Glenn
 
First....... You cannot buy parts for this mill. If you cant find a used part, you have to make it. You might find a gear close to what you need from Boston gear, but I have my doubts. Parts for these mills are very scarce. When I make a part for my mill , I make a print for it. I am going to make new acme nuts for the table, saddle, and knee. I am also making new acme screw assemblies fro each axis.

The motor slides back and forth on that 2" diameter post it mounts on. this is to line up the different pulleys for different speeds

Check for brass bushings at Lowes. I just bought some there with a 9/16 OD. I cant remember the ID though.
 
Thanks Mark, I figured Burke parts are non- obtainiam but things like gears once in awhile might be found. I have a list of gears I need to cut at some point, so will add this to the (small) list.

I opted to fab a couple of spacers from a grade 5 9/16 " bolt. Found some shoulder bolts having the correct dimensions, but they were $4.50 a piece at the local hardware store - so almost $20 bucks for four bolts - ridiculous pricing, so once I drill out the center and part off the pieces, should have what I need - all for $3 bucks. As usual, simple plans go awry. My good Chuck is a 10" four jaw, which won't close down to 9/16". So in order to indicate the bolt I set up a short piece of 1" round stock to act as a collar to fit the jaws of the Chuck and started drilling out the center to hold the 9/16 bolt,. then discovered I didn't have the appropriate size drill for the request interference fit to press the bolt into the collar. So 20 minute job is stalled until tomorrow.

I've found The path of least resistance is usually the one that goes up the steepest hill...
 
Back
Top