Boring problem

mickri

H-M Supporter - Diamond Member
H-M Lifetime Diamond Member
Joined
Oct 31, 2016
Messages
2,720
Hi,
I needed to increase the diameter of the shaft hole in a handwheel from 0.645 to 0.750. I mounted the handwheel in a 3 jaw chuck and I set up my boring bar on the compound. I brought the tip of the boring bar so that it just kissed the inside of the hole and set the dial to zero. I had taken out the backlash when I did this. All seems fine and I start by making a 0.002 cut. Next cut is 0.003. All goes well. So I start making 0.005 cuts. I am measuring the diameter after each cut. When I get the diameter to 0.700 I make 4 cuts of 0.005 without taking a measurement. I take a measurement and my diameter is 0.775. This is 0.025 too big. I was expecting the diameter to be 0.720.
My procedure on each cut was to 1) make the cut 2) back the boring well past zero 3) bring the boring bar out of the hole 4) advance the boring bar back to zero taking out all backlash and then bring boring bar back towards the work in the increments described above. I was basically counting backwards on the dial. The dial readings were 98,95,90,85,80,75,70,65,60,55.50,45,40,35, and lastly 30.
The only thing that I can think of is some how the cross slide moved.
Any ideas on what I did wrong?
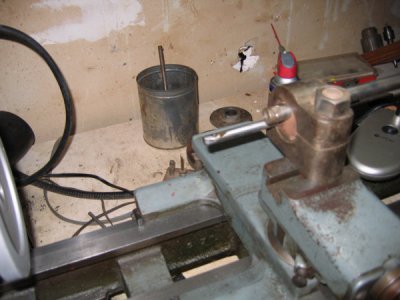
IMG_3431.JPG
 
You didn't take into account that you were only taking off of the radius. X2 for the diameter.


Sent from my iPhone using Tapatalk
 
Thanks. Boy do I feel stupid.
 
Dials aren't always accurate. On my import lathe I've noticed some inaccuracies. My cross slide dial reads .100" per revolution. It's pretty accurate until it gets to half a revolution, at .050" it's actually off by .002" but when I come back to 0 on the full revolution it's accurate to .100" again.

No big deal as I have a DRO but before I had a DRO I just adjusted for it. When roughing it didn't matter, then when I got closer to my final diameter, I would remeasure, zero the dial, then go on to final size. It's good practice to do this anyway.

Lathes come both ways, direct dials (diameter reading) & indirect dials (radius reading). My lathe has a indirect dial, feeding in .010" on the dial will move the cutter/cross slide .010" & remove .020" off the diameter. Direct dials is of course the opposite. Feeding .010" on the dial will move the cutter .005" & remove .010" off the diameter. I actually prefer the indirect dials.

Get to know your lathe & what type of dials you have but I think you have learned that already. Setup a dial indicator on your tool post, zero your dial & feed in or out comparing with the distance traveled showing on the dial indicator. Make a note of your readings & going forward you'll know how your dial behaves. Might as well check the other dials while you're at it.
 
But wait. It should have measured .740 , after the 4 cuts. I think what happened, looking at your setup, is you grabbed the wrong crank handle by mistake maybe at
some point. Easy to do.
Yes/no?
Mark S.
 
Did not grab the wrong handle because I had to hold my light over the dial to be able to read the dial. Old eyes what can I say. But I could have brushed my hand against the cross slide handle while moving the compound dial handle. Like Mark said I should have still been OK I think that I may have taken a bad measurement because my last cut was on the 30 mark which was a total diameter increase of 0.070 times 2 = 0.140. Live and learn. This was not a critical part. Just a hand wheel for my mill/drill. I will put a shim in and all will be good.
What I learned from this is that I have to 1) really think about what I am doing, and 2) be very careful when taking measurements to be sure that the measurements are accurate.
 
Hey Mick, I have some questions if you don't mind.
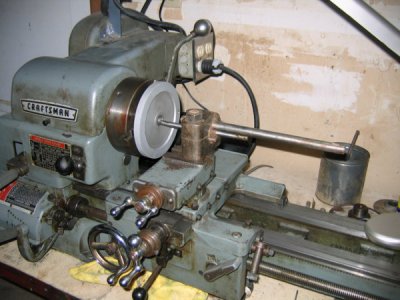
1. What kind of boring bar is that? I can't tell. Is it a 3/8 steel bar with a HSS cutter held sideways with a set screw or is it an inserted carbide bar? If using a HSS cutter then the geometry makes a difference, especially the relief angles and the nose radius.
2. The boring bar holder is one of those universal types that hold bars of different diameters. They are not very rigid and also have a relatively narrow base so accuracy may be affected.
3. Does your bar cut predictably? That is, if you take two 0.005" deep cuts, is the increase in ID the same? You said you took 4 cuts and measured each time until you got to 0.700". If the ID increases by 0.010" for each of those cuts then you can rely on the depth of cut for that bar. If not, then you can't.
4. If the bar was cutting predictably then taking 4 cuts at 0.005" should have brought you from 0.700" to 0.740" ID. I am not sure how you got 0.775" ID unless you dialed in a cut that was not what you thought it was.

Frustrating to miss a bore, especially when it counts. I switched to inserted tip carbide bars for this very reason - I needed predictability.
 
The boring bar is a 3/8 bar. The cutter is HSS and is held in place by a set screw. This setup came with my lathe.

IMG_3432.JPG

The more I think about what I did I can see errors that I made. My first big error was not realizing that my cuts were twice as deep as I thought because of the radius verses diameter. My second big error was inaccurate measurements. I just took some more measurements. If I was really careful the measurement is 0.775. But if I wasn't careful I got measurements that ranged from 0.751 to 0.789. When I was taking measurements after each cut I thought that I was getting consistent measurements but I realize now that I was anticipating certain measurements and I got what I was looking for rather then taking careful measurements to see what was actually happening. Because of the small cuts the chips were a fine grit. It was hard to get the grit out of the bore when taking measurements. I think that a dirty bore also affected my measurements. In the future I will come up with something to clean the grit out of the bore.
I have also discovered that I now have some play in the cross slide. I thought that I had gotten this adjusted properly after I had cleaned the lath. So I will revisit adjusting the gibs.
I am learning as I go here. Nothing that I want to make in the near future will have critical dimensions.
Thanks for all the help.

Chuck
 
Blame it on the CD player....

I've done the exact thing mis-reading the mike by one turn, which is =0.025"

Ken
 
Chuck, this is how we all learn so don't be too hard on yourself. Boring is the most difficult and confusing "basic" operation there is on a lathe. Let me make a few suggestions:

1. Reduce your overhang to a minimum. In your first pic, the bar is sticking out way more than it needs to be for the thickness of the material and this can lead to a lot of deflection of the boring bar. Stick the bar out only enough to get the job done.
2. If you are using a telescoping gage to measure your bores, buy a ring gauge to check your technique. Knowing what the ring should measure, it allows you to verify your technique. Boring is as much about measurement as it is about cutting. On the other hand, if you're measuring the bore with a dial caliper then you are not going to get consistent readings, at least not enough to bore accurately with.
3. Buy or make a better boring bar holder. The length of the holder should be at least 3-4 times the diameter of the bar and it needs to be solidly anchored. If you have a QCTP, consider a holder that looks like the Aloris 4D; it is a vastly better holder than what you have and better than those that lock a bar down with set screws.
4. Use a bigger bar if you can. The bars like you used need a lot more room to work because you have a tool bit sticking out of the side. This limits the diameter of the bar, which leads to greater deflection. Brazed carbide or HSS/cobalt boring bars are smaller in size so you can use a bigger, stiffer shank on them. Inserted tip bars are also compact. The best option are inserted tip carbide bars that are very stiff for their diameters; they also cut very predictably.

Lots more to say about boring but I just wanted to give you some food for thought. Hang in there, it gets better.
 
Back
Top