Basic setup help needed

VTdave

Registered
Registered
Joined
Feb 17, 2021
Messages
40
Hello, Just got my (new to me) Atlas QC10 setup and have attempted some very basic work on it.

In the pics, I'm using an 80 degree Accusize L tool. I'm set up so that the tip of the tool is barely beneath the centerline of the work. Pulleys are in the 3rd position (counting right to left). Part is just a piece of stock steel about 1.25" diameter. I'm cutting at around 5-10 thousands at a time. Mostly getting chips--no real spirals of steel coming off. I have tried different speeds without much different results. I've also tried auto feed as well as manual feed. Again about the same results. The pics below are after an auto feed run. Questions:

1) Do I have the tool set up in the correct orientation for going right to left? It says "L" on it, which if I understand correctly, means I should be running it left to right, but it seems to cut better going right to left.
2) The cut seems to be rough to me. Perhaps you can see the texture of the cut in the photos. I'm assuming I should be able to get a much smoother cut. If so, what can I do to achieve that? Do I need a different setup or a different tool?

If you see anything else going on in the pics that you can offer advice to correct, don't hesitate to point them out. I will undoubtedly be many more questions to follow! Thanks!
Dave
 

Attachments

  • IMG_20210311_144521744.jpg
    IMG_20210311_144521744.jpg
    3.3 MB · Views: 70
  • IMG_20210311_145830349.jpg
    IMG_20210311_145830349.jpg
    3.5 MB · Views: 71
  • IMG_20210311_144529629.jpg
    IMG_20210311_144529629.jpg
    2.3 MB · Views: 60
  • IMG_20210311_145515480.jpg
    IMG_20210311_145515480.jpg
    2.9 MB · Views: 66
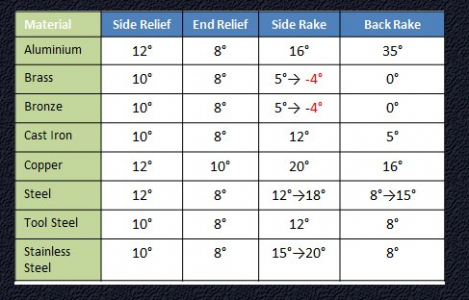
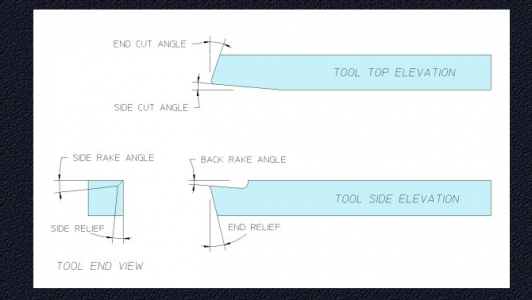
From what the pics show, adjust your tool more to the right to give more relief, looks close to rubbing the work, check the radius on the tool, 1/64 -1/32 should be ok. to start. Be sure the tool is on center of the work. Doesn't seem to be any back rake on the tool, you need some.
1615494899511.png1615494853833.png
 
From what the pics show, adjust your tool more to the right to give more relief, looks close to rubbing the work, check the radius on the tool, 1/64 -1/32 should be ok. to start. Be sure the tool is on center of the work. Doesn't seem to be any back rake on the tool, you need some.
View attachment 358887View attachment 358886
Thanks for the quick response. To be clear, I need to do a little grinding on the tool to create some back rake? And the tip is basically pointed--should I round that slightly with a grinder to get it in the 1/64 to 1/32 range? Will that help produce a smoother cut?
 
Just a quick note on the angles and grinding: the angles don't have to be perfect - for years I've been grinding general tools for lathe turning using 7 degrees for all the angles and getting very good results. the thing is, to get turning and tune your cutting to the way you use the lathe.

Back rake reduces the pressure to cut into steel, for instance, which can be very helpful on a small lathe like yours.

all the best with your new purchase!
 
I wouldn't use a grinder for the nose radius, use a stone . A grinder is too aggressive and would be difficult to achieve a small radius. The smaller the radius the sharper the the cut, you'd have to reduce your feed rate or suffer getting a record player finish.
 
Dave,

First, QC10 isn't the correct model number of your machine. QC indicates that it has a QCGB, which looks to be correct. But if the model number begins with "QC" it is understood that it is a 10" (and that is a 10" compound slide shown in some of your photos). However, the two digits following the "QC" should be 36, 42, 48 or 54. This is the nominal overall bed length in inches, and those are the four choices.

You should acquire a copy of the 1954 or 1955 Atlas produced Manual of Lathe Operations (or MOLO for short). Later editions best cover only the Atlas or Craftsman late 12" and earlier editions don't cover the QCGB. The Atlas version has gray covers. The Craftsman version has black covers, as do almost all MOLO's printed in 1953 or earlier. The MOLO's have tables showing what available RPM and diameter produces the various cutting speeds (measured in surface feet per minute or SFM). And it has paragraphs on each of various materials along with the optimum SFM to run based on the type of material. And a lot of other useful information.

Although they can be found elsewhere, eBay is probably the most likely. Average going prices of most editions is $30 to $50. Selling machines, parts and manuals isn't permitted in the general fora but if you have trouble finding or identifying the correct version, send me a PM. (Conversation).
 
Last edited:
The material that you are turning also makes a difference. Soft steel like 1018/1020 just does not like to leave a nice surface finish till everything is perfect. Many people just get close and then file, sand and polish to a nice finish.
 
Last edited:

I wouldn't buy that pre-ground set from Grizzly for ~ $100 - All my inserts and holders and HSS blanks cost less than that.
 
Dave, just a few comments:
  • Your work is sticking out a bit far and you can increase rigidity in your set up by using a live center. This can improve finishes significantly.
  • Not sure what kind of steel that is but the tool geometry on your tool is not optimized to work with steel. It probably has okay relief angles but there is little, if any, side or back rake and little to no nose radius. These features matter a great deal. Bottom line is the tool is not ground well for the purpose Accusize says it is. You are correct that the direction you're cutting in is appropriate for the tools shape but Accusize labelled it with an L, implying it is a Left Hand tool; it is not. It is a right hand tool.
  • Your lathe is not that rigid so HSS is probably a good tooling choice. However, a HSS tool must be ground to perform well. Just the fact that the tool is made from HSS doesn't mean much. It is the geometry ground into the tool that matters. Sorry, I know you're probably new at this and grinding tools might seem challenging but it isn't really that hard to do. As Dabbler said above, the angles don't have to be perfect and I'm sure you can easily improve the performance of your tool if you simply add some side and back rake and put a small nose radius on it.
I know tool grinding isn't for everyone but for us guys with smaller, less rigid lathes that don't have a lot of speed or power, HSS tools are the way to go. Learning to grind your own tools is not only cheaper, it will be much better than anything you can buy. @mickri referred you to a thread where we discuss tool geometry and grinding and that would be a good place to post about your tools. I also wrote an article about how to grind a HSS tool here; that should give you the mechanics you need to re-grind your tool. Give it a shot and post pics of the tool to the model tools thread and we'll give you a hand.
 
Back
Top