- Joined
- Oct 10, 2018
- Messages
- 545
WARNING: wordy write-up on a beginner-level project!!
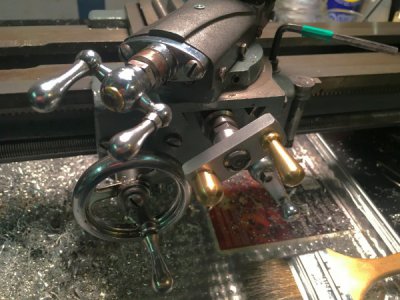
The cross-slide handle was broken when I got my tiny Atlas 618. I could make it work by using the remaining ball end but it was awkward. Since I'm a rank beginner, I figured making a replacement would be a good little project. I used short pieces of 1/2" and 3/8" brass round stock to make the short-fat and tall-slim knobs.
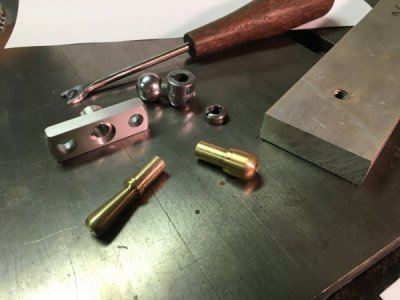
BTW, I also used a damaged spade bit to make a split-nut screwdriver so it would be easier to screw the retaining nut on and off the cross-slide.
Since I had a length of aluminum bar stock 2" wide and 5/8" thick, I used a chunk of that for the main body of the handle. Cut it off on my table saw to give me a piece roughly 5/8 by 5/8 by 2 inches.
Faced both cut sides in the lathe using the 4-jaw chuck as I don't have a mill. Laid out the holes to mount the brass knobs as well as the centre shaft. Drilled (on the drill press) and reamed the hole for the tall-slim knob without problems. When I went to drill the hole for the short-fat knob, the drill chattered and chewed up the perimeter of the hole. Switched to another drill bit and finished the hole without problems. I actually made two blanks for the aluminum body--one for practise and one for real! I also drilled the centre hole on the drill press that I had actually meant to do back on the lathe. Luckily I caught it when the hole was still undersize (before reaming).
Mounted the blank in the 4-jaw again. The drill bit fit the centre hole well so I used that to indicated the part and get the hole on centre. Then used the reamer to finish the hole to the final diameter.
Next was to bore the recess for the nut. My first time boring. Again, I messed up on the practise piece. Oh, the boring went OK but I went too deep. When I trial fit it, I realized that the handle goes over a No 1 woodruff key which is 1/2" long. With the too-deep recess, the nut was going to run into the end of the key before securing the handle. On the for-real piece, I worked out how far I should bore to leave the unbored section just over 0.500.
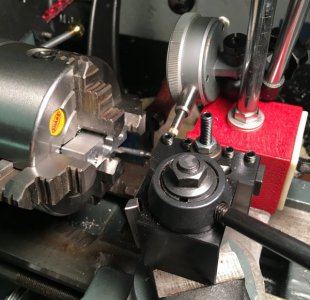
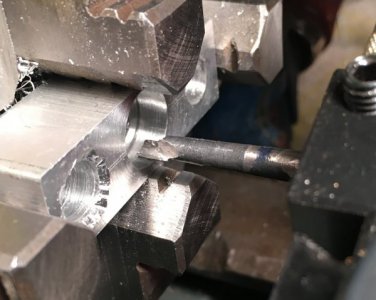
The next operation was to 'broach' the keyway using the lathe carriage. Again, a first for me. I used a spare cutoff blade to form a single-point scratch tool. The cutoff blade started at 3/32" thickness so I needed to grind a little off each side to bring it down to the 1/16" needed for a No 1 woodruff. A bit hairy and I went a teeny bit undersize. Scratching out the keyway wasn't hard, though, at about 2 thous per pass. A little bit of work with a needle file and it fit the key.
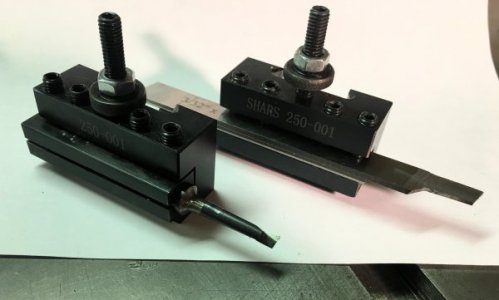
Strictly for looks, I wanted to reduce the thickness of the 'wings' of the aluminum body. I chucked a short cutoff to use a mandrel and drilled and tapped it for a bolt the same size as the centre hole (5/16"). I needed a 'dog' to engage the body piece so the lathe could drive it. I drilled and tapped a #6 hole on the perimeter of the mandrel and then screwed in an allen head cap screw. This worked fine. As I faced down the wings on the practise piece, I left a hub in the centre. Eventually I realized that I didn't have a facing tool with an acute-enough angle to properly finish the shoulder. Before I did the for-real piece, I ground both left and right knife tools. Since I was working aluminum, I followed the recommendation from steves-workshop.co.uk and used a significant back rake on the tool bits. These cut very well on the for-real piece and let me finish the hub nicely.
Finally, I used 320 and 400 grit sandpaper to clean and polish the aluminum a bit. Secured the brass bits with thread locker and cut off the excess brass. I think the completed handle looks pretty good and it certainly works far better than the broken original!
Craig
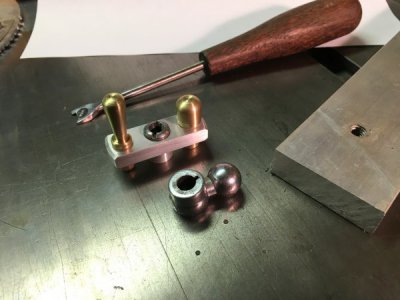
The cross-slide handle was broken when I got my tiny Atlas 618. I could make it work by using the remaining ball end but it was awkward. Since I'm a rank beginner, I figured making a replacement would be a good little project. I used short pieces of 1/2" and 3/8" brass round stock to make the short-fat and tall-slim knobs.

BTW, I also used a damaged spade bit to make a split-nut screwdriver so it would be easier to screw the retaining nut on and off the cross-slide.
Since I had a length of aluminum bar stock 2" wide and 5/8" thick, I used a chunk of that for the main body of the handle. Cut it off on my table saw to give me a piece roughly 5/8 by 5/8 by 2 inches.
Faced both cut sides in the lathe using the 4-jaw chuck as I don't have a mill. Laid out the holes to mount the brass knobs as well as the centre shaft. Drilled (on the drill press) and reamed the hole for the tall-slim knob without problems. When I went to drill the hole for the short-fat knob, the drill chattered and chewed up the perimeter of the hole. Switched to another drill bit and finished the hole without problems. I actually made two blanks for the aluminum body--one for practise and one for real! I also drilled the centre hole on the drill press that I had actually meant to do back on the lathe. Luckily I caught it when the hole was still undersize (before reaming).
Mounted the blank in the 4-jaw again. The drill bit fit the centre hole well so I used that to indicated the part and get the hole on centre. Then used the reamer to finish the hole to the final diameter.
Next was to bore the recess for the nut. My first time boring. Again, I messed up on the practise piece. Oh, the boring went OK but I went too deep. When I trial fit it, I realized that the handle goes over a No 1 woodruff key which is 1/2" long. With the too-deep recess, the nut was going to run into the end of the key before securing the handle. On the for-real piece, I worked out how far I should bore to leave the unbored section just over 0.500.


The next operation was to 'broach' the keyway using the lathe carriage. Again, a first for me. I used a spare cutoff blade to form a single-point scratch tool. The cutoff blade started at 3/32" thickness so I needed to grind a little off each side to bring it down to the 1/16" needed for a No 1 woodruff. A bit hairy and I went a teeny bit undersize. Scratching out the keyway wasn't hard, though, at about 2 thous per pass. A little bit of work with a needle file and it fit the key.

Strictly for looks, I wanted to reduce the thickness of the 'wings' of the aluminum body. I chucked a short cutoff to use a mandrel and drilled and tapped it for a bolt the same size as the centre hole (5/16"). I needed a 'dog' to engage the body piece so the lathe could drive it. I drilled and tapped a #6 hole on the perimeter of the mandrel and then screwed in an allen head cap screw. This worked fine. As I faced down the wings on the practise piece, I left a hub in the centre. Eventually I realized that I didn't have a facing tool with an acute-enough angle to properly finish the shoulder. Before I did the for-real piece, I ground both left and right knife tools. Since I was working aluminum, I followed the recommendation from steves-workshop.co.uk and used a significant back rake on the tool bits. These cut very well on the for-real piece and let me finish the hub nicely.
Finally, I used 320 and 400 grit sandpaper to clean and polish the aluminum a bit. Secured the brass bits with thread locker and cut off the excess brass. I think the completed handle looks pretty good and it certainly works far better than the broken original!

Craig

