A few months back I asked the question about the split nut versus traditional nut upgrade. I had researched it for awhile on the internet, and came up with all kinds of answers and arguments. So I decided to go to a direct knowledge source and find out what he thought. Having maintained heavy machinery for years, I asked him when he got to town. The basic conversation came down to this explanation and a few sketches. I had to redraw them due to him sketching them out freehand so I could explain. I am not trying to drive the argument, but provide what I have had explained to me.
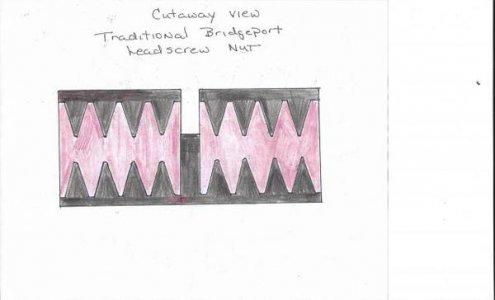
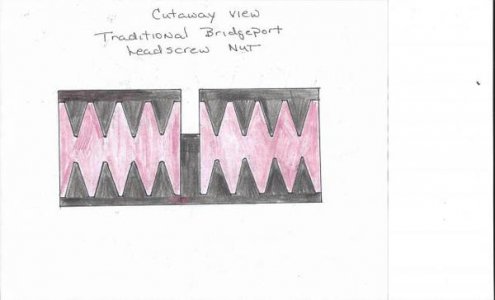
When Bridgeport originally designed the mill, it incorporated a single leadscrew nut in the yoke for both axis. This allowed adjustment to backlash overtime as there was wear in the ways and leadscrew. It essentially provided a one point pressure system to adjust out the backlash. The lead screw binding against the nut reduced backlash and increased accuracy.
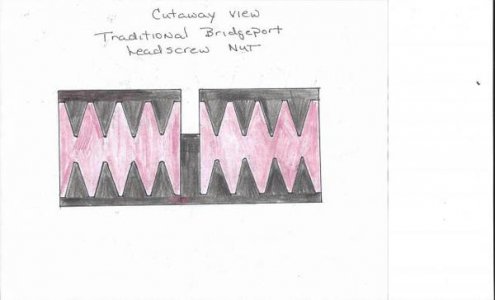
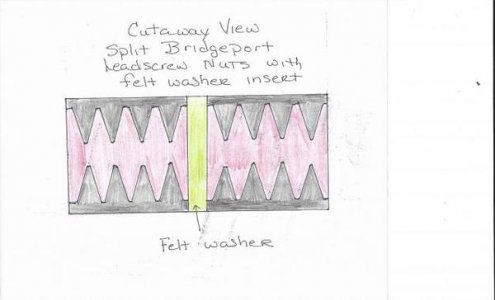
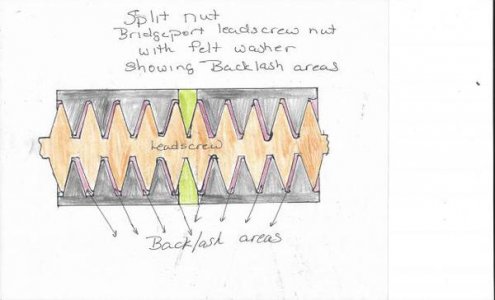
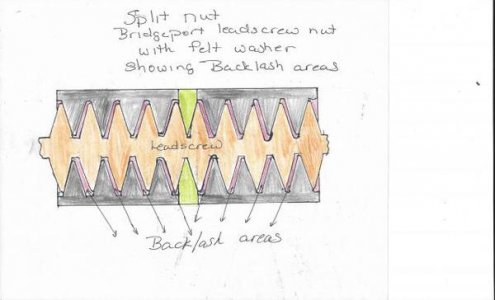
Over the years as time progressed, some machine shops and maintenance people split the nut to allow greater adjustability within the backlash. Eventually Bridgeport made the upgrade and incorporated the split nut design. This allowed two points of pressure on the axis, greatly reducing backlash, and raising accuracy even more over time.
How it works
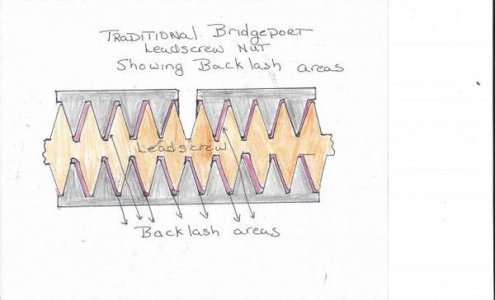
A single nut with the relief cut binds against the leadscrew as it changes direction and moves the table. The backlash will be on one side of the screw threads throughout the entire nut/leadscrew engagement. This places the pressure on one side of the screw threads, when you change direction the backlash changes direction and flips to the opposite side of the threads. Thus the amount of backlash when changing directions or engaging the leadscrew for movement.
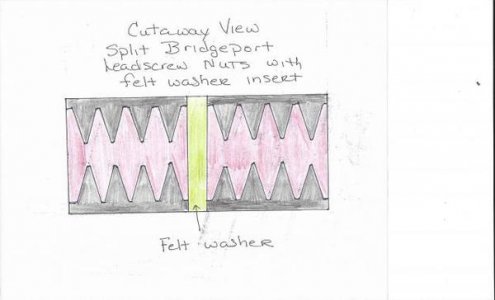
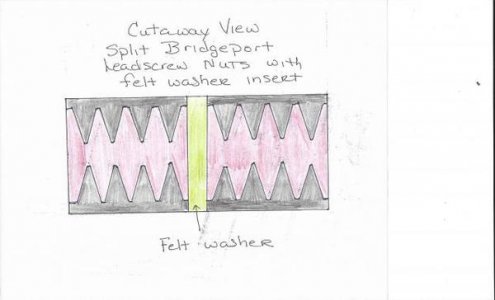
By splitting the nut you now have two points off pressure opposite of each other. One nut engages one side of the screw threads, while the other nut engages the opposite side of the leadscrew threads. This greatly reduces the amount of backlash when moving the table or changing directions.
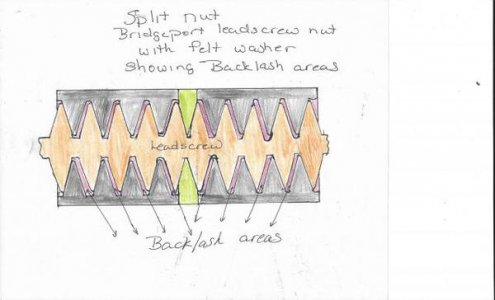
The felt washer came about as a way to maintain the distance between the two nuts while installing them. This creates a stable force and maintain the distance between the two nuts. An added factor is helping to maintain the relief between the two nuts, and a friction point on the threads. An added bonus is that it reduces intrusions of abrasive chips to wear the leadscrew and nut, and also acts a absorbent sink for lubrication helping to maintain the lubricant on the leadscrew.
I was informed when first installing the new nuts prior to making final adjustments, lubricate the threads lightly run the table through its full range a few times, makes the adjustment, and repeat. This lets the nuts settle into the leadscrew. If it is heavily lubricated while making adjustments it may hide tight areas or mask a bad adjustment. This will only cause additional wear on the new split nuts and leadscrews.
I do not claim to be an authority, but after it was explained to me this way and shown with a few sketches I began to understand the principal, and see the reason for the change and upgrade to the original design. I hope in passing this along, it will provide some insight to the overall theory of the split nut conversion and upgrade. I am no expert on the Bridgeports but as I progress through my rebuild, I tend to ask questions and look for answers. Sometimes things make sense if you understand why they are done originally. I hope this helps some out.
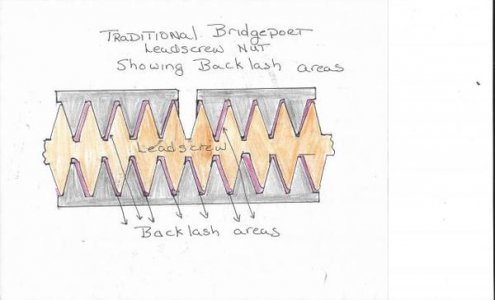
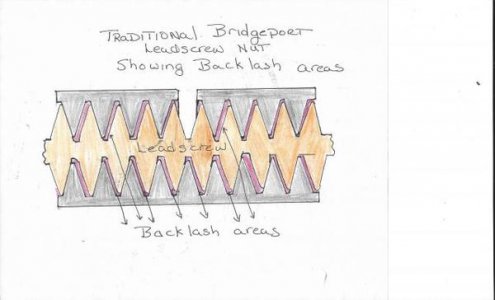
When Bridgeport originally designed the mill, it incorporated a single leadscrew nut in the yoke for both axis. This allowed adjustment to backlash overtime as there was wear in the ways and leadscrew. It essentially provided a one point pressure system to adjust out the backlash. The lead screw binding against the nut reduced backlash and increased accuracy.

Over the years as time progressed, some machine shops and maintenance people split the nut to allow greater adjustability within the backlash. Eventually Bridgeport made the upgrade and incorporated the split nut design. This allowed two points of pressure on the axis, greatly reducing backlash, and raising accuracy even more over time.

How it works
A single nut with the relief cut binds against the leadscrew as it changes direction and moves the table. The backlash will be on one side of the screw threads throughout the entire nut/leadscrew engagement. This places the pressure on one side of the screw threads, when you change direction the backlash changes direction and flips to the opposite side of the threads. Thus the amount of backlash when changing directions or engaging the leadscrew for movement.

By splitting the nut you now have two points off pressure opposite of each other. One nut engages one side of the screw threads, while the other nut engages the opposite side of the leadscrew threads. This greatly reduces the amount of backlash when moving the table or changing directions.

The felt washer came about as a way to maintain the distance between the two nuts while installing them. This creates a stable force and maintain the distance between the two nuts. An added factor is helping to maintain the relief between the two nuts, and a friction point on the threads. An added bonus is that it reduces intrusions of abrasive chips to wear the leadscrew and nut, and also acts a absorbent sink for lubrication helping to maintain the lubricant on the leadscrew.
I was informed when first installing the new nuts prior to making final adjustments, lubricate the threads lightly run the table through its full range a few times, makes the adjustment, and repeat. This lets the nuts settle into the leadscrew. If it is heavily lubricated while making adjustments it may hide tight areas or mask a bad adjustment. This will only cause additional wear on the new split nuts and leadscrews.
I do not claim to be an authority, but after it was explained to me this way and shown with a few sketches I began to understand the principal, and see the reason for the change and upgrade to the original design. I hope in passing this along, it will provide some insight to the overall theory of the split nut conversion and upgrade. I am no expert on the Bridgeports but as I progress through my rebuild, I tend to ask questions and look for answers. Sometimes things make sense if you understand why they are done originally. I hope this helps some out.


