- Joined
- Feb 2, 2013
- Messages
- 3,973
In a recent Tool Gloat, i posted a few pictures of my vintage ShopSmith 500.
i got it for $50.
for those who didn't see the pictures, here's another look...
View attachment 54159
View attachment 54160View attachment 54161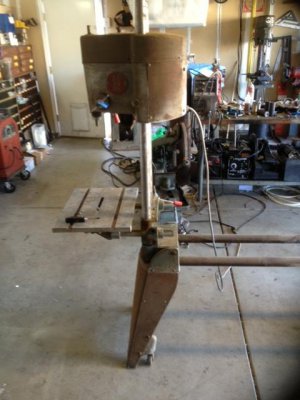
on her initial inspection it was discovered an whole almond, hull and all were wedged inside the infinite drive pulley preventing rotation of the spindle.
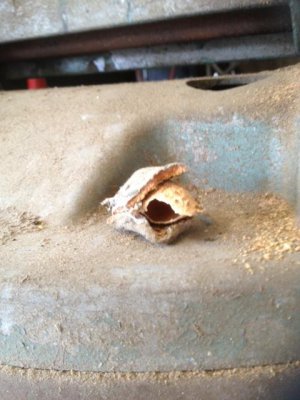
after the motor assembly was removed and a little luck the almond popped out and the spindle was free again. the original switch was faulty, i replaced it with a 15 amp DPDT toggle and replaced some wiring & connectors to ensure good electrical contact.
I made a test run and she sounded like a freight train rolling through the shop.
the bearing howling noise was cringe worthy at high speed.
to save the unit and prevent possible damage i cut the test short.
i found a manual in PDF on how to get the old girl apart for bearing replacement.
the ShopSmith forum is a great place for information.
Shopsmith Forums - Powered by vBulletin
The extendable spindle removal was pretty straight forward and simple. the retaining screw is 1/3 third up the main casting.
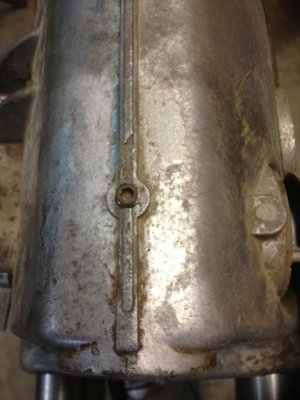
The retaining screw is a dog pointed 1/4-20 hex socket set screw usually impacted in paint or lead(as in my case)
Carefully pick the material out of the center of the set screw to get full depth of the allen wrench for removal.
Extend the quill as far as it will go until it is no longer driven by the crank arm. Pull and tug a little on the spindle...baddabing
DO NOT let go of the quill lever it may damage the spring or get you hurt. Gently release the spring tension.
I mounted the quill assembly into the vise loosely to extract the quill shaft assembly.
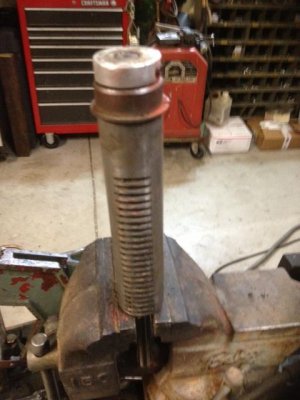
loosen the set screw on the spindle collar and used a brass drift to drive the quill shaft out of the quill tube.
remove the bearing retainer and bearing from the quill tube. Here's a picture of the quill disassembled, i placed the bearing back on the quill shaft for placement illustration ...
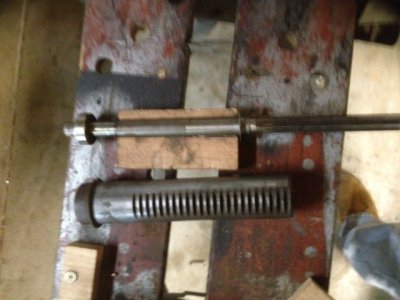
The Bearing is a 6202-5/8, an equivalent is 6202-10 from some manufacturers.
this is a special bearing metric on the outside diameter, SAE on the inside diameter(5/8")
Replacement is a snap, reverse the order of disassembly and tighten set screw.
To re-install the quill:
Wind the quill extend lever, clockwise 3 revolutions and hold while inserting the quill tube into the housing.
push in on the quill until the quill gear engages the quill. Reverse the quill lever to draw the quill back into the housing.
you may need to slightly rotate the quill shaft to align the drive splines.
a light tap was necessary with a soft faced mallet to reassemble my unit.
use caution damaged splines are sometimes difficult to repair and still function smoothly.
Re-install quill retaining set screw, extend quill to 3/4 +/- extension and tighten set screw lightly to lock quill, temporarily.
Slightly loosen the set screw until the quill smoothly retracts under it's own spring tension, not too tight as to bind in any part of the quill's normal stroke. readjust if there is binding noticed in operation.
i would recommend to reseal the setscrew after getting the correct clearance with wax,paint,RTV silicone,shellac,blue locktite, or anything that's removable ,should the procedure need to be reversed again in the future.
In the next Episode of How The Bearing Fails...
i'll detail the replacement of the drive sleeve bearings and adjustment of the belts.
Thanks For Reading.
Please feel free to ask questions or post comments or just share stories!!


i got it for $50.
for those who didn't see the pictures, here's another look...
View attachment 54159
View attachment 54160View attachment 54161

on her initial inspection it was discovered an whole almond, hull and all were wedged inside the infinite drive pulley preventing rotation of the spindle.

after the motor assembly was removed and a little luck the almond popped out and the spindle was free again. the original switch was faulty, i replaced it with a 15 amp DPDT toggle and replaced some wiring & connectors to ensure good electrical contact.
I made a test run and she sounded like a freight train rolling through the shop.
the bearing howling noise was cringe worthy at high speed.
to save the unit and prevent possible damage i cut the test short.
i found a manual in PDF on how to get the old girl apart for bearing replacement.
the ShopSmith forum is a great place for information.
Shopsmith Forums - Powered by vBulletin
The extendable spindle removal was pretty straight forward and simple. the retaining screw is 1/3 third up the main casting.

The retaining screw is a dog pointed 1/4-20 hex socket set screw usually impacted in paint or lead(as in my case)
Carefully pick the material out of the center of the set screw to get full depth of the allen wrench for removal.
Extend the quill as far as it will go until it is no longer driven by the crank arm. Pull and tug a little on the spindle...baddabing
DO NOT let go of the quill lever it may damage the spring or get you hurt. Gently release the spring tension.
I mounted the quill assembly into the vise loosely to extract the quill shaft assembly.

loosen the set screw on the spindle collar and used a brass drift to drive the quill shaft out of the quill tube.
remove the bearing retainer and bearing from the quill tube. Here's a picture of the quill disassembled, i placed the bearing back on the quill shaft for placement illustration ...

The Bearing is a 6202-5/8, an equivalent is 6202-10 from some manufacturers.
this is a special bearing metric on the outside diameter, SAE on the inside diameter(5/8")
Replacement is a snap, reverse the order of disassembly and tighten set screw.
To re-install the quill:
Wind the quill extend lever, clockwise 3 revolutions and hold while inserting the quill tube into the housing.
push in on the quill until the quill gear engages the quill. Reverse the quill lever to draw the quill back into the housing.
you may need to slightly rotate the quill shaft to align the drive splines.
a light tap was necessary with a soft faced mallet to reassemble my unit.
use caution damaged splines are sometimes difficult to repair and still function smoothly.
Re-install quill retaining set screw, extend quill to 3/4 +/- extension and tighten set screw lightly to lock quill, temporarily.
Slightly loosen the set screw until the quill smoothly retracts under it's own spring tension, not too tight as to bind in any part of the quill's normal stroke. readjust if there is binding noticed in operation.
i would recommend to reseal the setscrew after getting the correct clearance with wax,paint,RTV silicone,shellac,blue locktite, or anything that's removable ,should the procedure need to be reversed again in the future.
In the next Episode of How The Bearing Fails...
i'll detail the replacement of the drive sleeve bearings and adjustment of the belts.
Thanks For Reading.
Please feel free to ask questions or post comments or just share stories!!


