- Joined
- Jan 29, 2014
- Messages
- 156
It is summer here in Portland and time to string some lights in the back yard. I need to attach some poles to the fence posts to support the lights. I thought about using wire ties, but decided they would not hold the pole tight enough. I have been thinking about making a wire clamping tool (had already purchased some steel tubing) and decided it was time to finish the job.

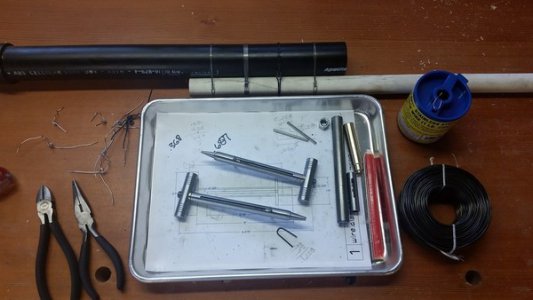
Just before this project I made a great purchase. I went to a restaurant supply store and bought some quarter sheet baker's pans. They are great for holding the parts to a project so they don't roll onto the floor and under the bench. I highly recommend them, they were less than $5 each. I may end up going back for more.
I decided to build these for some 0.041" stainless wire ($8 for a pound of wire in a canister from Harbor Freight) and for 0.061" rebar wire (100' for about $8 from local hardware store {or is it 300'?}).

Some notes about the build:
Mistakes I made on this:

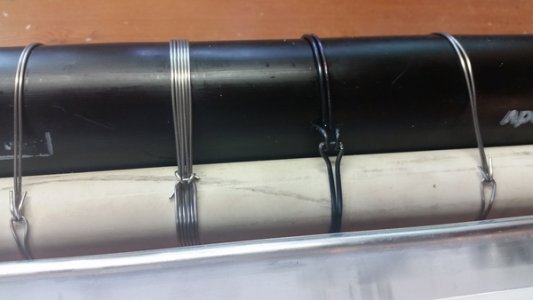
I practiced a bit this morning and am pretty happy with the results. Some notes on using the tool:
Sub projects that made this much longer than necessary:
The real surprise is that I finished the tool before we finished the lighting project using plan B.

Just before this project I made a great purchase. I went to a restaurant supply store and bought some quarter sheet baker's pans. They are great for holding the parts to a project so they don't roll onto the floor and under the bench. I highly recommend them, they were less than $5 each. I may end up going back for more.
I decided to build these for some 0.041" stainless wire ($8 for a pound of wire in a canister from Harbor Freight) and for 0.061" rebar wire (100' for about $8 from local hardware store {or is it 300'?}).

Some notes about the build:
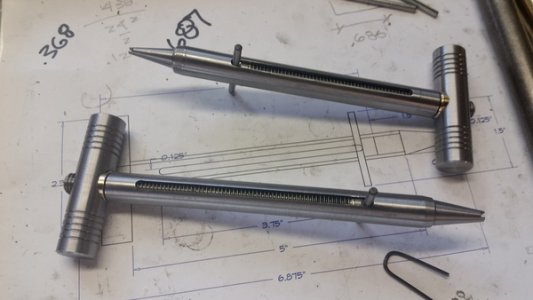
- I used 3/8" stainless carriage bolts (~$4). I milled the head down to the diameter of the threads. This made for a nice full diameter chunk of steel to drill the hole for the pin. (I think stainless was a waste of money, next time I would use a regular carriage bolt)
- The tubing was 1/2" diameter with 0.065" thick walls. (Amazon, 12" for $4.86) I have a bad habit of overbuilding. I think the thinner wall tubing would have worked fine.
- I purchased both 1/8" rolled pin and ground pin. I was afraid the rolled pin would not be strong enough, after using it I think the rolled pin would be okay. If the ground pin loosens up I will switch to the rolled pin. (I think the ground pin looks better)
- I turned a bronze bushing to go between the body and the nut. Not sure if it will help with the operation but I think it looks pretty good.
- I tried to make the diameter of the tip 3x the width of the wire. And the groove for the wire 1 diameter deep and about 1.25x the diameter wide. The wire will most likely be bent when you fit it into the groove, so if it is too close to the wire diameter it will be a bit of a problem. Time will tell if it is the right size.
- The tips are 1014 steel I had on the shelf. I am not sure how well they will hold up.
- The taper of the tip is the maximum my taper attachment will do.
- The inside diameter of the tubing was a bit less than 3/8" of an inch. After cutting the slots in the side I used to a 3/8" ream to bring the inside to finished size and clean up the burr on the inside.
- I used a dividing head to hold the tool when cutting the slots in the side and the groove in the tip.
- I used 5/8" 12L14 for the nut (because it was what I had on hand). I had thought it would be too heavy and was considering drill a hole in each end to make it lighter. It is a bit heavy but that makes it easy to spin down the bolt. It has a nice heft to it.
Mistakes I made on this:
- The first slot I cut I made a pass with a 1/8" end mill and then made a 0.004" clean up pass on each side. Problem was that the hole I drilled in the bolt for the pin was a few thousands off center and the pin rubbed on the side of the slot pretty badly. Had to do some file work to loosen it up. The other slot I made a 0.015" clean up pass and the slot was the perfect size.
- When plunging the 1/8" end mill into the tubing it left a hold larger then the slot it cut. Made for an unsightly bulge. I had the bright idea of lowering the tool into the tubing while making the first pass. That was a very bad idea. As the end mill moved into the work the rotation pulled the tip off center. Even a 0.15" clean up pass did not hide all the damage. (And you thought I did the wider clean up pass because I learned from the first mistake!)
- Don't assume a 1/2" end mill will cut a recess 1/2" in diameter. The actual diameter depends on how many times it has been sharpened. I did not learn this until I removed the nut from the vise. I had a 0.470" recess in the nut for a 0.504" tube. I turned the bronze bushing down to fit, but that made for an odd ledge in the bushing. (I am telling myself this is not a beauty contest)
- I was surprised at how hot bronze gets when machining.
- I don't think I like stainless steel. It was very hard on the tips of my inserts. Even after slowing down the rpm.

I practiced a bit this morning and am pretty happy with the results. Some notes on using the tool:
- It is not as easy as the videos show. The wire is not a willing participant in this effort.
- The ends of the wire and very pointy and can move very quickly.
- It takes quite a bit of effort to get all of the wires in the right place for a multi-wrap job. You need access to all sides of the part. I think if I were doing that on something I could not turn over it would not come out nearly as clean.
- Most of the advertisements I saw for this recommended the 0.041" stainless steel wire. I was afraid that it would not provide enough strength for the clamp. Actually it provides quite a bit of clamping force. It is easier to manipulate than the heavier wire.
- If I were to create one tool I would go with the 0.041" wire.
- Did I mention how sharp the ends of the wire are?
- The 0.061" rebar wire is very stout. A bit more effort to wrangle into place but make for a very strong clamp.
- If you turn the nut without holding the tool, the tip will absorb all of the torque. Be sure to hold the tool to keep it from twisting.
Sub projects that made this much longer than necessary:
- Needed to get a new blade for the new power hacksaw. Did not want to wait for Amazon two day shipping. Store with blade right size as quite a drive to get.
- Had to figure out how to mount a new 3" indicator on the mill to measure Y axis movement.
- Had to make some aligning blocks for the dividing head.
- Had to figure out why the dividing head was so stiff.
- Had to go to the store for a 1/4" pin I damaged while disassembling part of the dividing head.
The real surprise is that I finished the tool before we finished the lighting project using plan B.

