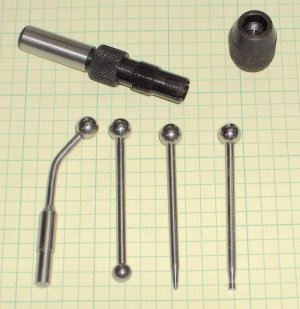
Hi. I bought a box of stuff at a garage sale and found a funny tool that looks like a piece of a wiggler. It is a threaded and partially knurled barrel with a captured probe in it. The long end has a 2 mm ball in it. I remembered seeing a Mr Pete video on using the wiggler to do edge finding with the ball end. I tried it out, and it didn't really work like the video did. It swept around in a cone until it touched the edge. Then it sort of straightened up, but on moving the edge further, it did not kick out like in the Mr. Pete video. Is this caused by missing parts, like a shank, tube and spring. It seems that I should just be able to chuck it by the barrel and it should work. I can get somewhat close by stopping as soon as I see the rotation straighten up, but I can get just as close by eye. The sticky pin trick does not need a spring and pusher tube to work, but perhaps it requires more skill. Does it work like the wiggler for finding edges, or is it only for finding punch marks? I realize that a proper edge finder is the tool for the job, but according to the videos, the old skool techniques should work.
-
Welcome back Guest! Did you know you can mentor other members here at H-M? If not, please check out our Relaunch of Hobby Machinist Mentoring Program!
You are using an out of date browser. It may not display this or other websites correctly.
You should upgrade or use an alternative browser.
You should upgrade or use an alternative browser.
Wiggler missing parts?
- Thread starter ericc
- Start date
- Joined
- Jun 7, 2013
- Messages
- 10,140
Yes, missing parts.
OK, I figured out what is going on. My wiggler is not like the one above shown by @hman . It is more like Mr. Pete's style, with the separate barrel and shank. It appears that @benmychree is correct about the importance of the missing parts.
I tried a sticky pin. Had to dig up a broken end mill, a dress pin, and a blob of modeling clay. It worked exactly like the videos, although there are no videos on edge finding with a sticky pin (only finding a punch mark or intersection of layout lines). It seems that the drag induced by the viscosity of the modeling clay is what gives the rotating pin traction to climb the edge when it is pushed too far. That means that I really need the shank, spring and pusher sleeve to press against the hidden ball surface. This device is very strange compared to the Starrett style in the picture above. There are two ball ends, but it seems to be impossible to switch their position to bring the shorter shank to bear on the edge. Making a shank looks possible, but that is really an odd thread on the barrel. It measures as M6x0.6, which does not have an easily available special tap. Might be better to turn it off, sleeve it, and re-thread to 1/4-28. Or, just chuck the thing into the trash, looking at how well that sticky pin works. Man, that thing works great. By the way, I put a little modeling clay around the top of that probe and tried the tool again. The clay added enough drag so it worked. Still, no needle point or disk probe. Hate to see it sitting on the nic-nac shelf doing nothing.
I tried a sticky pin. Had to dig up a broken end mill, a dress pin, and a blob of modeling clay. It worked exactly like the videos, although there are no videos on edge finding with a sticky pin (only finding a punch mark or intersection of layout lines). It seems that the drag induced by the viscosity of the modeling clay is what gives the rotating pin traction to climb the edge when it is pushed too far. That means that I really need the shank, spring and pusher sleeve to press against the hidden ball surface. This device is very strange compared to the Starrett style in the picture above. There are two ball ends, but it seems to be impossible to switch their position to bring the shorter shank to bear on the edge. Making a shank looks possible, but that is really an odd thread on the barrel. It measures as M6x0.6, which does not have an easily available special tap. Might be better to turn it off, sleeve it, and re-thread to 1/4-28. Or, just chuck the thing into the trash, looking at how well that sticky pin works. Man, that thing works great. By the way, I put a little modeling clay around the top of that probe and tried the tool again. The clay added enough drag so it worked. Still, no needle point or disk probe. Hate to see it sitting on the nic-nac shelf doing nothing.
I finally figured out what is REALLY going on. This is not a wiggler!
I was talking with a fellow, and he showed me his Central Tools dial indicator set. This is the hole attachment for measuring inside bores. You remove the auxiliary cap from the dial indicator and screw the hole attachment in. It reads perpendicular displacement just like a Starrett 196 hole attachment. The fellow told me that these are popular with automotive people.
I was talking with a fellow, and he showed me his Central Tools dial indicator set. This is the hole attachment for measuring inside bores. You remove the auxiliary cap from the dial indicator and screw the hole attachment in. It reads perpendicular displacement just like a Starrett 196 hole attachment. The fellow told me that these are popular with automotive people.
Universal Indicator Sets
www.centraltools.com


