What is the best way to remove a wound tachometer from a motor shaft?

11andrew11

H-M Supporter - Sustaining Member
H-M Platinum Supporter
Joined
Feb 15, 2022
Messages
45
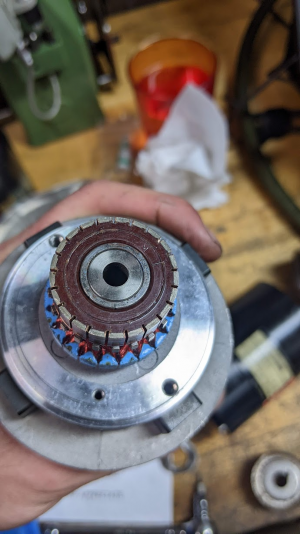
I've been working through a Haas HRT9 that I picked up at auction a few months back. I need to replace the servo motor and the replacement I found is correct except that it has a tachometer, the type with its own commutator and windings riding on the motor shaft.

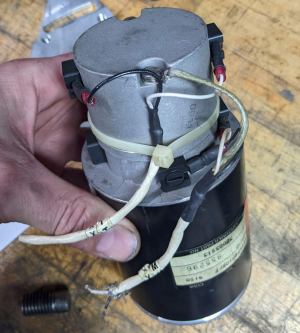
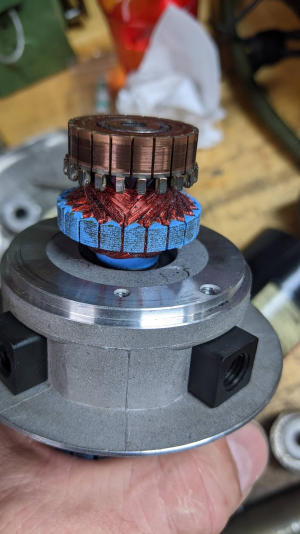
As you'll see in the pictures below, the tach rides on a 5/8 OD hollow shaft that surrounds the 1/2" motor shaft. I can't quite get visual access to the end of the 5/8'' portion because it is hidden by the brush holder, which cannot be removed without removing the tach (I think).

My first thought is to use a gear puller to pull the tachometer and 5/8" shaft off the motor shaft. Before just going for it, could someone confirm whether this would be the best way to go at it or should I try something else? Should I use any heat? Should I try to remove any of the blue epoxy towards the bottom of the 5/8" section?

I appreciate any help offered.
1659126702521.png

This is the entirety of the tachometer. The rest below it is the motor.
1659126736216.png

1659126765201.png
 
Will it hurt anything just to leave the tachometer on the servo and use it as is?
 
Will it hurt anything just to leave the tachometer on the servo and use it as is?
Unfortunately I can't do that. I will be using the brush holder from the original motor and mounting an encoder on top of it. This option is costing me about $225 and some ingenuity. I called about having the original motor rewound and having the commutator replaced. That is going to run somewhere between $1000 and $1,250. Given that I'm a hobby shop and not a production shop, I would prefer to keep the repair inexpensive and learn along the way.

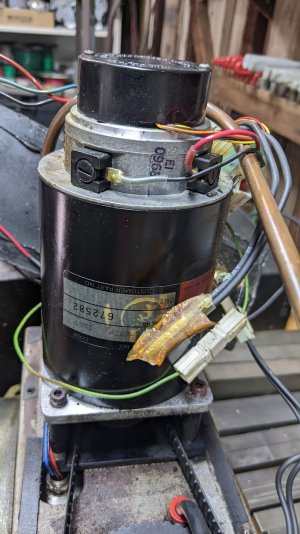
This is the original motor. The encoder is under the black cap.
1659149768745.png

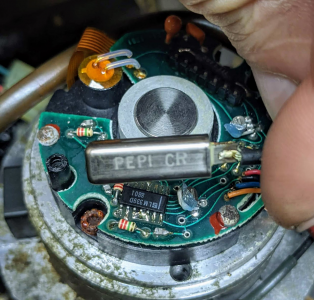
And here is a view of the encoder that is under the black cap. I need to transfer these things over to the replacement motor.
1659149834858.png
 
Just at an overview, there appears to be an age difference in the control systems. The small tach generator on the older motor is simply a small DC motor that is being used as a generator. It provides an analog DC voltage that is proportional to speed. As opposed to the digital tach from the newer motor, that provides a pulse train that varies with speed. There may be, in addition, a second pulse train that shows direction, where the analog version uses polarity for this purpose.

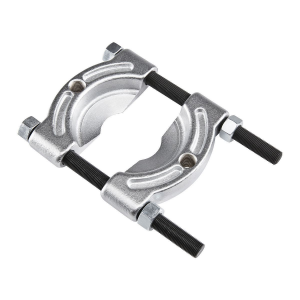
When I refer to "older" versus "newer", it is strictly a matter of the technology, not the motor itself. With all that said, useless to the original question, removing it will be simple. There is a flat device that clamps around the lower part of a bearing. I don't remember what it is actually called. . . Thin where it slides below the bearing, it gets thicker where bolts or studs attach to a wheel puller. The ones I have came from Horrible Fright, they are a fairly common item in automotive shops. The only proviso is that the lead screw be smaller in diameter than the motor shaft. (1/2")

From what I can tell from the photos, the lower portion of the bushing is out of sight in the end bell. Not reachable with the fixture I described. If that is indeed the case, pressure can be applied to the rotor assembly itself. If the generator is to be salvaged intact, the grip would need to be applied to the outer edge, outside the windings. This would be optional, of course, depending on the skill of the mechanic. I personally would want to salvage it, but that is just how I do things.

The laminated rotor will be pressed onto the bushing, not an integral part. But with the commutator just above it, it is quite likely that applying pressure there will move the bushing. Its' reuse is questionable, but with a digital encoder installed, not too serious a problem. I would advise that as the bushing moves along the shaft, the clamp be reseated to pull against the bushing when it comes into sight.

There is also the possibility of using the bearing in the end bell to apply pressure to the bushing. But this carries the likelyhood of damage to the bearing. That would be at the descretion of the person doing the work.

.
 
Thanks Bill. Everything you said makes sense. Thanks for taking the time to walk through your thought process. Regarding the tach, I'm like you and hope to salvage the tachometer. When the bell housing (what I was calling the brush holder) is loose, I may be able to get enough room to get under the tach assembly with a tool, but it would be close. Otherwise, I'll pull on the outer edge as you suggested. Regarding that tool, are you talking about a bearing separator:
1659235822109.png
 
That is exactly what I was referring to. My mind has been upset some the last couple of years, so sometimes (too often) I can't remember what a tool is called. But you got the message right away, first guess, so I must be doing something right.

.
 
Well, guys, I tasted the sweetness of anticlimactic success, after the research, assistance from you guys and the prep work. I set up with a bearing splitter to grab the bottom of the tach and the associated puller. I put a tad bit of pressure on the wrench and the tach moved with minimal effort, so I kept going, and it easily came off without any issues.

I reconfigured the new rotor/stator with the end caps from the original motor and everything went together well. I'll need to mill a slot in the shaft at one end for the pulley's 1/8" keystock, and turn down the other end for the encoder.

Thanks for the help on this. This was so simple and I thought it was going to be more of an issue.

Pulling rig
hP68yK5UpYrCQgWbJA0i78Q7uNOo1Ryava-OZcNaURgexwX7fmWvJQyS-VzoVKZspO5Oyzsbnq1-fQrZbSqctC-_EjQ0riKTWrNtcaGXOIz3DggGl-LzZN9IHWxYn26mCKgaK7dxlI8=w2400


Success
BnZCqYt1WnhLYr_O_kysaXMag-YNa9SqPRc4ODuJ2tfRl6mR3ZgJ2vsyV3KcF_k55-z2YcmCe76naU2yBwgX6M48UCip2Js4RyBYBS8m8RRsroRrPp8g6YxFHUhixYiPTxQEv4R9LWE=w2400


Close-up of the knurling
oBXPCWH1W8A-X-eTnN6yuA9CqZ9UG9PbSBuRCr9PZSBy4N91PhVYshX9ClyQElTdSA6sokaPUJsADMSojMt0pKvC9Wo6m-qKuUeqBARTkQMihLgaBUDbrv2YJNw99DTibQt3qQ0ymKo=w2400


The replacement motor is above the original. The difference in shaft lengths will not matter in my case and I will turn them down to the correct length and diameter as needed. Everything buttons up quite well.
eCZrxS3u-52TEbGL1MEMV3plXDyAvJlIjk4Ra-w6jJQHkNglFXCUU5JqjLPFP5mXH9RuqYabJkTlm5_WL7mOK2tW98y9fcx6-QN9SRfooTTDvGUV66ihYzOgB3EWn4_F-BY7TfKxq6Q=w2400
 
Back
Top