Vise Positioning on the Mill Table

PurpLev

Active User
Registered
Joined
Feb 22, 2012
Messages
924
I often see people mounting their vises on the mill table using the center T slot. If I was to mount my vise using the center T slot it would result in the vise stationary jaw to be further closer to the mill column, and for the majority of my work I would have to advance the Y axis toward me to position the work under quill which means that my work center is far from my mill table Y center which limits my Y travel in 1 direction.

I installed my vise so that the work center of most my projects is about the same as the Y center of the table. that means my locking bolt is not the center slot:
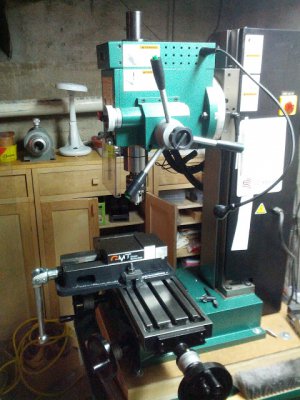
IMG_20121203_212913.jpg

That got me thinking - is there a consensus of what's the 'proper' positioning of a vise? or is it 'whatever works for the current project/machine'?

IMG_20121203_212913.jpg
 
On my machine.. where you have yours mounted, is the way i have to mount mine to take advantage of the y movement.
 
On my round coluum mill I had to mount my vise that way but I did toe clamp it using the back slot also.
 
Hi Sharon,
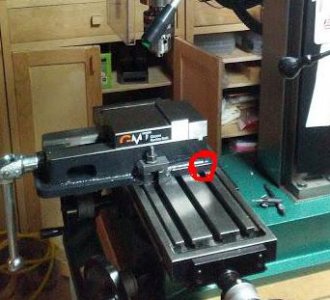
Positioning the vise to take maximum advantage of the xy movement is usually how I setup for a job, unless I am just drilling a quick hole or similar, then I just plonk it down under the collet. I dont think there is any less strength in the edge slots of the table.
However, if it didnt interfere with your job I would be adding a 3rd and 4th clamp (circled) to ensure the vise was pulled down hard and flat.

Cheers Phil

IMG_20121203_212913.jpg
 
I like the clamp in the rear idea as well:thumbsup:


Wait a minute...that didn't sound right did it:thinking:
 
Nice new shiny vise you got there "jawdrop:"jawdrop: -wish I had a nice one.

... Just a thought here. You might want to make some additional jaws. It's a good exercise in making a simple useful thing that requires a little precision. BTW: I tend to always make a few out of aluminum. They hold the work well and don't mar any workpieces that you care about. 6061 is a good material for that.

A couple other thoughts about positioning a vice... Instead of always putting it in the center of the bed, I've gotten into the habit of changing from left, center and right after every job or two. And sometimes I mount the vise in the X direction or in the Y direction if the job allows it. I have no solid evidence to prove it but, suspect it helps wear the ways more evenly over time.

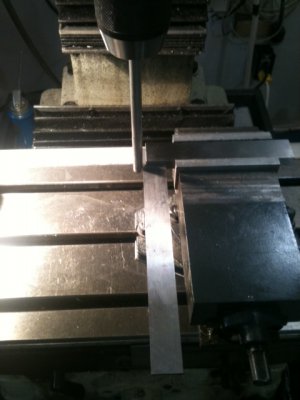
Also, a quick and dirty way to square up a vise, is to mount a piece of rod then, put a square in the vise. Run the bed back & forth until it's running parallel whole length. It's a little bit of cat & mouse to get it right on but, is good enough for most things. Of course, you'll want to mount a TDI when really tramming things up but there's no sense risking your TDI if the job doesn't call for that kind of accuracy.

EDIT: One other thing. If you look closely at the base, you'll see that I have an aluminum plate sandwiched between the vise and bed. This will save the bed from embedding a piece of swarf into it. The CI base is harder than the bed and tightening force on the clamping bolts will embed swarf right inot the bed. And finally, whenever I'm changing tooling, I always toss a little piece of 1/4" plywood on the bed. Sooner or later, something WILL slip out of your hands and that tool steel will make a nice ding in the bed.


Ray

squaring vise.JPG
 
Nice new shiny vise you got there "jawdrop:"jawdrop: -wish I had a nice one.

... Just a thought here. You might want to make some additional jaws. It's a good exercise in making a simple useful thing that requires a little precision. BTW: I tend to always make a few out of aluminum. They hold the work well and don't mar any workpieces that you care about. 6061 is a good material for that.

A couple other thoughts about positioning a vice... Instead of always putting it in the center of the bed, I've gotten into the habit of changing from left, center and right after every job or two. And sometimes I mount the vise in the X direction or in the Y direction if the job allows it. I have no solid evidence to prove it but, suspect it helps wear the ways more evenly over time.

Also, a quick and dirty way to square up a vise, is to mount a piece of rod then, put a square in the vise. Run the bed back & forth until it's running parallel whole length. It's a little bit of cat & mouse to get it right on but, is good enough for most things. Of course, you'll want to mount a TDI when really tramming things up but there's no sense risking your TDI if the job doesn't call for that kind of accuracy.

EDIT: One other thing. If you look closely at the base, you'll see that I have an aluminum plate sandwiched between the vise and bed. This will save the bed from embedding a piece of swarf into it. The CI base is harder than the bed and tightening force on the clamping bolts will embed swarf right inot the bed. And finally, whenever I'm changing tooling, I always toss a little piece of 1/4" plywood on the bed. Sooner or later, something WILL slip out of your hands and that tool steel will make a nice ding in the bed.


Ray

Thanks Ray, the soft jaws are a good idea to make (yet another add on to the ever growing to-do list). I like that setup to square the vise - pretty neat. I do however have keys on the bottom of my vise which puts it at ~.002 parallel to table which is pretty good. with TDI I can get it to within <.0005 which is good enough for what I use it for.
 
Back
Top