Two collar test - how close is close enough?

skelso

Active User
Registered
Joined
May 20, 2013
Messages
45
I posted this in the gunsmithing forum but haven't gotten any replies so I thought I would ask here as well...

I've finally gotten everything together and done the 2 collar test. I was able to get within .002 - .003 over 6" (unsupported end larger) before I ran out of adjustment on the lathe feet. Actually, screwing the rear tailstock foot all the way down raised that corner a little over an inch but did not change the difference in the collars.


I will say I am not convinced it's a bed twist issue. The surface finish on the unsupported end is a lot rougher than the headstock end. This indicates some flex, somewhere, to me. (I did have to take 3 spring passes to get to a point where the tool traversed the length but did not cut).

The lathe is a Romi/Doall 13x20 w/ BXA QCTP, 1/2" HSS tooling.

The test bar was a length of 2" aluminum.

I've done some gun work in the past but it was always on someone else's machine which I assumed was properly leveled, etc but I never ran a test bar so I couldn't say for sure. Which leads me to my question, how close is close enough?

In thinking back to the gun work I have done in the past, it has always been short sections (threading a muzzle, turning a shoulder for a gas block, etc. For that type work, I can't imaging that .003 over 6" will matter much. Contouring a barrel might be noticable but I doubt I'll be doing much of that given the 20" bed length.

I would like some input from those of you with much more experience. Thoughts and suggestions welcome.

Thanks!
 
Since you did the test you obviously have a concern and should see it through. Assuming you've already leveled the lathe properly before you did the test, have you also indicated the tailstock to determine if there it a height difference between the headstock and the tailstock and that there is no offset?
 
Since you did the test you obviously have a concern and should see it through. Assuming you've already leveled the lathe properly before you did the test, have you also indicated the tailstock to determine if there it a height difference between the headstock and the tailstock and that there is no offset?

Holescreek, thanks for the reply.

I did the test because it is a new to me lathe I shipped cross country and installed in my shop (first I have owned). I leveled the lathe with a Starrett 98 before I started. The first cut revealed .003 difference. Not being positive which way to adjust, I put more tension on the back tailstock end foot. The second cut revealed no change so I applied more tension to the same foot. I repeated this until I had that foot cranked all the way down (over an inch of travel). The difference got down between .002 and .003. I tried taking all the tension off the foot and it still showed .003.

To answer your question about tailstock, no. However I am not following you in why it would matter at this point. I only used the tailstock to support the work while relieving between the collars. When I took the actual cuts on the collars, the tailstock end of the piece was not supported.

This is the first time I have setup a lathe. The method I used was described in the owner's manual of the lathe and the same as some youtube videos I watched. If I did it incorrectly, or there is a better way, I am all ears.

I guess a better way to state my question is "What is a realistic goal in terms of difference between collars?". I don't want to beat myself up trying to get to 0 if it is unrealistic. However, if that is what I need to shoot for, I will try shimming the machine, etc to see if I can get there.
 
To answer your question about tailstock, no. However I am not following you in why it would matter at this point. I only used the tailstock to support the work while relieving between the collars. When I took the actual cuts on the collars, the tailstock end of the piece was not supported.

My mistake, I thought you'd done something else. I read what you wrote then rearranged it in my head.

Can you set up an indicator with a magnet (or in your tool holder) resting on the carriage so that you can set zero the indicator on the collar closest to the head then move the carriage to have the indicator touch the other collar? If you do this on the top you might get a better understanding of what's happening. If you leveled the bed front-back and end-end I doubt there is any twist. However if the indicator reads differently on the top from one collar to the other it could be simple bed wear and the cutter is either dropping close to the head (typical) or further out.
 
I posted this in the gunsmithing forum but haven't gotten any replies so I thought I would ask here as well...

"I was able to get within .002 - .003 over 6" (unsupported end larger) before I ran out of adjustment on the lathe feet. Actually, screwing the rear tailstock foot all the way down raised that corner a little over an inch but did not change the difference in the collars."


Skelso, I'm pretty sure that If as you said "the tailstock end of the test bar was BIGGER than the headstock end", then you're adjusting the wrong foot. You need to put the REAR tailstock foot back down to where it was, and raise the FRONT tailstock foot up a little bit and then test again. I'm a beginner myself but I think .003" in 6" is a lot. If I'm wrong about this, hopefully on of the "pros" will correct me. Good luck, JR49
 
If the right hand disc is larger, I would he hesitant to assume twist just yet. Being the bar is aluminum, there will be some pushoff which will present as taper. You didn't give specifics on the tool, but it should be needle sharp and dead on center. And spring passes are a good idea.


Running an indicator on both the top of the discs and he front can be revealing. If, while reading the front, where the tool makes contact, if there is true misalignment in the machine, both will indicate at zero. Any other reading would mean there is something going on with the tool or the bar itself moving, being pushed away from the cutting edge, for example Some, but not all lathes have adjustment for headstock alignment. Could also mean bed wear. Properly evaluating a machine is not so simple at times.

After optimizing during this test, then check the tailstock, remembering that it could be off in horizontal or vertical alignment.
 
Last edited:
Running an indicator on both the top of the discs and he front can be revealing. If, while reading the front, where the tool makes contact, if there is true misalignment in the machine, both will indicate at zero.

Tony,

I'm going to set up an indicator tonight to check what Holescreek suggested. I'll do the check you suggested at the same time. Just want to make sure I understand... I believe you are saying to setup an indicator on front and another on top to make sure their is no out of round, or wobble?

Would you do this by hand or at speed?

If at speed, are you meaning I should indicate while tool is in contact to check deflection?
 
Can you set up an indicator with a magnet (or in your tool holder) resting on the carriage so that you can set zero the indicator on the collar closest to the head then move the carriage to have the indicator touch the other collar?

Set this up this afternoon with a .0005 indicator. The needle chattered a bit as I moved along the length of the stock but never more than the thickness of the needle.

If the right hand disc is larger, I would he hesitant to assume twist just yet. Being the bar is aluminum, there will be some pushoff which will present as taper. You didn't give specifics on the tool, but it should be needle sharp and dead on center. And spring passes are a good idea.


Running an indicator on both the top of the discs and he front can be revealing. If, while reading the front, where the tool makes contact, if there is true misalignment in the machine, both will indicate at zero. Any other reading would mean there is either twist in the bed, or possibly headstock misalignment.

Tony, after rereading your reply several times and thinking about it I now assume you meant to set an indicator up on the front of the stock and move it down the length as I did on top in Holescreek's test. Is that correct? If so, I set that up too and found no change across the collar closest the headstock but .001 - .0015 difference between that collar and the unsupported collar.

You didn't give specifics on the tool, but it should be needle sharp and dead on center. And spring passes are a good idea.

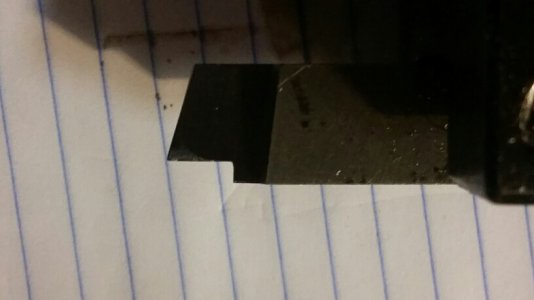
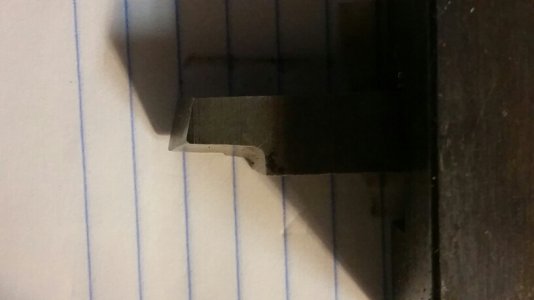
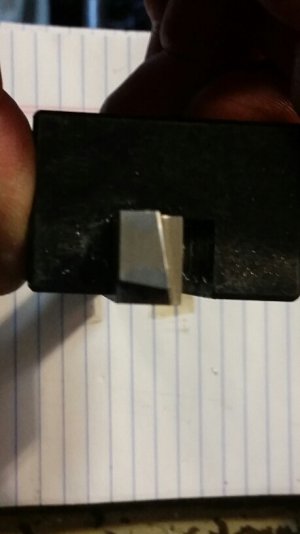
I didn't reply to this portion of your reply this morning because I wanted to have the tool in hand so I could be as specific as possible. I was incorrect, the tool is not 1/2" X 1/2", it is 3/8" X 1/2". It is one that I ground years ago in the gunshop (with the help of a tool and die maker friend who is now deceased or I would ask him for help). Prior to starting this test I honed it on a diamond stone until razor sharp (or so says the 1-1/2" gash in my hand where I bumped it by accident loosening the compound's bolts...) I tried to take some pictures but they didn't come out too well...

End edge angle is 75 degrees
Side edge angle is 8 degrees
Back rake is 8 degrees
Side rake is 8 degrees
No end radius

20150122_064826.jpg20150122_064853.jpg20150122_064928.jpg

20150122_064826.jpg 20150122_064853.jpg 20150122_064928.jpg
 
If I understand correctly you got no difference running the indicator across the top from collar to collar but you are measuring .003" difference in the collar diameters. To me, it indicates bed wear because the indicator followed the dip the carriage dropped into when it made the cut. I've seen worse, I inherited a lathe that had .025" wear as received, it took a lot of scraping to fit that one.
 
If the indicator follows the cut surface(s) with little or no deviation, then you can probably rule out tool pushoff. The tool path would be the same as the indicator path. From the front that is. If the diameter difference is twice what the indicator reads, then the problem likely is simply tool pushoff.

From the top, ideally there would be no deviation either, provided the measured diameters were the same.

You are looking at 2 planes this way, one likely due to headstock misalignment or way twist, the other due to wear in the elevation of the ways.

BTW, these tests are done with spindle stopped.
 
Back
Top