taper turning attachment.

savarin

Active User
H-M Supporter Gold Member
Joined
Aug 22, 2012
Messages
4,101
Not that I want to start this kind of project yet but----- is there an easy method of disconnecting the cross slide lead screw when using the above?
On my 9x20 I would have to remove the handle and fitting so the cross slide could be driven by the attachment.
I believe there are some lathes where a taper turning attachment can be used without this annoying practice.
If such is the fact how do they work?
I have thought of a pair of half nuts in place of the full nut thats there but there aint a lot of room for an actuating mechanism.
 
I made a taper attachment for my 10 x 22 lathe and had to remove the cross slide lead screw to use it, as you noted. I made it for a specific project and have only used it one more time since then. I am still glad I made it and I'm sure it will come in handy in the future. I didn't find it to be a real bother to remove the lead screw for occasional use. I suppose if you were frequently going back and forth between using the attachment and not, it might become a PITA and your solution would be better but also a lot more work, initially (well for me anyways .... probably not for you, based on the work I have seen you produce). If you do make a taper attachment and / or the revised leadscrew system please post pics. I enjoy looking at the quality stuff you produce.
 
Here's a long shot Charles. Machine a set of half nuts to engage and disengage the lead screw. Opps, you already thought of it. Thinking out loud my friend.

"Billy G"
 
I think you're referring to a telescoping taper attachment vs. a plain taper attachment. My Rockwell 10" and Grizzly G0709 14" both have telescoping attachments. No need to disconnect the cross slide nut, just set the taper and clamp to the bed.

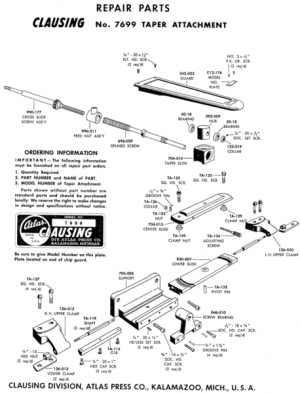
The cross feed lead screw is in two pieces. The two are in line and slip together with either a splined or keyed joint. The cross slide shaft on the crank has the gear on it for power feeds and a splined/keyed end. That end slips into a splined/keyed shaft that has the screw on it. The far end of the splined shaft is held to a block with thrust bearings. That block rides on the taper bar.

The cross slide nut runs on a screw that is locked to the taper bar, not the mounting flange of the crank handle (as with a plain taper attachment).

I know, a crappy description. Maybe this picture of the Clausing telescopic taper attachment separate parts will help.

Bruce

upload_2017-3-3_11-39-29.png
 
A 6" vise is overkill for a RF45 style mill. A 4" is more appropiate for that size mill & IMO 5" max. I have a 5" GMT vise on my PM45 & it's slightly too big. Not enough Y axis travel to make use of the 5" full capacity. Better to save your money rather than getting something too big & most importantly the weight. I take my vise of the table quite often, a 6" is still light enough for me to be carried by hand but I'm glad I have a 5". I also have a 4" vise as well. I prefer the 5" though.

But those GMT 6" Premium vises are pretty nice. I'd love to have one but don't need one on my current mill. But if you plan on upgrading to a full size knee mill in the future than the 6" will be perfect.


Here's what the 5" looks like on my mill.
Img_1921.jpg


I couldn't even complete this cut without my bellows & DRO scale getting in the way. Not enough Y travel & the 5" vise is not even maxed out.
Img_7597_zpscb8b5dd7.jpg


Here's what a 6" vise looks like on another PM45 (gt40's)
View attachment 253544
 
I made a taper slide tool that works on my Logan . It works like a compound and it fits on my production cross slide. It only has about 5 inches of travel but that is all I needed for making my collet adapters. It has some tricks that I built in ,like after you
Cut a taper you can drill thru both top and bottom plate then if later you need the same taper you put a pin in that hole and it returns to that taper. I stamped a L by the hole for Logan taper and stamped an R next to hole for
Rockwell taper. So when I want back to that taper I pin it and am good to go. Add it like a simple sine plate to set the tapers in the first place. It also will cut tapers at 90 degrees to the normal taper set up. Most home shop guys will only cut a few tapers per year so I did not want to spend the bucks for a store bought one. You can find it if you Google Jimsehr's taper slide tool. I now have 2 more lathes that have taper att on them but I still use my slide tool. Jimsehr
 
For a short taper couldn't you just use your compound on top the cross at an angle to cut it? Maybe with tool on the rear and running backward so it is easier to see? Seems this would be same as the post just above with the shop made compound.
 
I've just realised this is the third time I've asked questions regarding a taper turning attachment, the first was 2 years ago and I'm still thinking about it.
gimme a few more years and I might just possibly get a round tuit.

For a short taper couldn't you just use your compound on top the cross at an angle to cut it? Maybe with tool on the rear and running backward so it is easier to see? Seems this would be same as the post just above with the shop made compound.

Originally I wanted to bore a long taper in the end of a casting for my telescope as I only had the compound I set that to do the job, full travel of the compound then retract then adjust the boring bar up to the end of the previous cut and start again, eventually I cut the 7" long taper quite nicely but it would have been way better with a proper attachment.
 
savarin
have you seen mrpete222 videos #717 &72.
Also have you checked the yahoo 9x19 site as I think someone made one and had drawings for it, although I haven't been on that site in years.
I had a atlas/craftsman 12" that had the taper attachment, and on those all you had to do was remove the screw that held feed screw nut, might not work that simple on yours.:apologize:
 
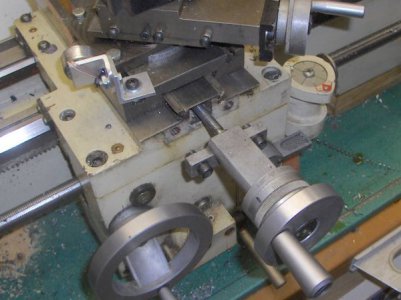
OK, here's what might be the "nucleus" of how to go about freeing the cross slide, based on my own 9x20. Unscrew the two M6 socket cap screws that mount the cross slide crank. Turn the crank clockwise (20 turns ≈ 1'). You now have that much "free" cross slide travel, more if you need it. Attach the back end of the cross slide to your taper attachment.
kHPIM4751.jpg
 
Back
Top