So How Did I Do & What Do I Need ??...

56type

Registered
Registered
Joined
Aug 16, 2016
Messages
178
Just picked this Atlas 10100 6" x 18" today and know it's missing a few things like the tool post, chuck key, wrench for tailstock and the gear pack for threading. Basically all I got was the lathe and motor but thought that with the parts availabilty I could build from here. It looks like it's hardly been used and seems just a bit dirty but a cursory inspection doesn't reveal a lot of wear and the paint is in good shape. Serial #002866 if that helps.

What do I need to get to get things up and running, or get it to "out of the box"condition as far as accessories/tooling ?? Thanks.
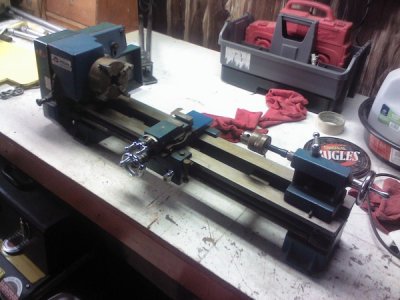
Atlas%206x18%20lathe_zpswi9irs84.jpg
 
It looks like a nice little lathe. I guess what you get for it depends on if you want to restore it back to how it was when it was new or make it as usable as possible.
The first thing your are going to need is a tool post. I'd go for a "Quick Change" tool post. You can find heaps of them online. Just make sure the measurements match your Center Height and suit your compound slide and T slot. When I fitted mine I had to file down the T nut so it fitted in the slot. It was deliberately made oversize so it would suite different models. A chuck key should be easy to find. You could make one fairly easily if you have a drill press are are handy with a file. (and a better one once you have a chuck key).
Finding a full set of change gears could be a little harder. You could buy them individually but I'll bet they aren't cheap. Not only will you use them for screw cutting but also for power feed on the carriage.

Another thing you will need is a revolving center for the tail stock if you want to have anything sticking out of the chuck more than an inch or two.
The list goes on from there depending on what you want to make. Three Jaw Chuck. Fixed / Traveling Steady etc.

Part of the fun is in the locating the bits you want but don't forget to make some stuff along the way.
Good Luck
David
 
Thanks, I'll keep a lookout for the change gears. Just printed the manual for it from the Downloads section of the site and am going thru the "getting to know you" phase of learning the controls on the machine (yeah, I'm that new). So far the only thing throwing me is the engagement of the back gear...The manual says to move the collar, but it would seem the only thing that moves is the v-belt pulley on the shaft. I can get the v-belt pulley to move left and engage the keyway (I guess that's what it's called ??) to turn the shaft but I can still slide it to the right to where it just freewheels ???
 
My Atlas lathe has a back gear but it is a larger model than yours with a 10" swing. It is a a different design to yours in the pulleys.
I pull out a pin (actually two pins but I think it has been modified) this disconnects the the shaft from the first pulley closest to the chuck.
Then I flip a leaver that engages two gears on a second shaft at the back. Hence the term back gear.
If I engage the back gear without removing the pins the drive is locked solid which is handy for removing the chuck.
Can you post a link to the manual you are reading so we can take a look?
You only need the back gear when you wan't to turn very slowly for large diameters.
What speed to use is something you will get the feel of as you get used to it.

BTW I wouldn't worry too much about finding the special wrench for the tail stock. You should be able to find a ring or open ended spanner to fit.
The same spanner will probably fit quite a few things on the lathe, like the change gears and the saddle lock.

David
 
Thanks for the link, I think I *may* have it figured out. Took a bit wrestling with it but I finally got the collar off the shaft after I removed the snap ring. Seems there is a missing detent ball and spring so the collar was staying where it should once I got it to move. Machine had apparently been sitting awhile and the lube turned to cosmoline sticking things up. Found a post on another board that explains it far better than I (and probably with the correct terminology)...it's post# 17 toward the bottom of the page.

http://bbs.homeshopmachinist.net/threads/22269-Puzzled-by-Atlas-Mk-2-back-gear-engagement/page2

Even though I was looking for the detent ball to launch itself into low earth orbit, nothing came out and after inspecting the collar I could find no evidence of either the detent ball or spring so I'm heading to the hardware store to source those pieces and see what to make of it after everything is back together correctly with the right parts. I did give it a thorough scrubbing with an old toothbrush and some WD-40 and so far it's cleaning up nicely.
 
Welcome to the forum.
I have an old circ 1949 Atlas 6". For about 35 years I used the latern type tool post holder. What a pain. I finally got the QCTP from Little Machine Shop. They have a set for the Atlas 6". If you go that route I would suggest order at least 4 more plain tool bit holders. In my opinion you can never have too many. If you have to keep changing tools with the set screws then it is no longer quick change.

As for what else you need? It really depends on what you want to do with it. I.E larger stuff or smaller. I work mainly in aluminum and brass making parts for old clocks so I found the screw on Jacobs 3 jaw chuck was good for stuff up to 13 mm diameter. I also got a set of ER collets for more accurate small stuff.

For anything larger than 13 mm my go to chuck is a 4 jaw independent. I use two horizontally opposed keys for centering and I can get things pretty close by eye and then indicate to get to zero.

Without knowing what other tools you have like drill press or bench grinder it is hard to suggest cutting tools. If you go HSS you will need to forum and sharpen them with a bench grinder.

As mentioned some sort of dead or live center will be useful. Also a couple of center drills perhaps #1 and #2.

You will also need capability to accurately measure. For starters an inexpensive digital caliper with metric / imperial selection would be the most versatile allowing 4 different types of measurements.

For some reason the tail stock chuck seems to have way too much overhang for my liking. I would prefer it to be as close to the quill as possible for rigidity and maximum work envelope.

Keep us posted on your progress.

David
 
For some reason the tail stock chuck seems to have way too much overhang for my liking. I would prefer it to be as close to the quill as possible for rigidity and maximum work envelope.David

That was the first thing I noticed as well. That set-up really decreases the rigidity of the tail stock and won't help with machining accuracy. I don't know much about Atlas lathes, but that drill chuck also looks a little large for that size lathe. Anyway, it looks like you picked up a pretty nice machine and you've gotten some good advice.

Ted
 
Thanks for all the advice, I really appreciate it as all this is brand new to me. I do have a bit of trouble I found after getting the release collar back together with the correct 1/8" ball and using a cut down safety detent spring from an AR-15. I hook up the motor and go to give it a trial run and engage the back gear ....The back gear worked for a few seconds and then disengaged itself !! Not sure what's going on there except that it won't stay engaged under power and simply flips itself back to the down position. It also has about 3/8" of play in backgear lever where it slides into the headstock casting, as in the entire backgear assembly slides left 3/8"and then can be pulled back to the right the same distance. Is this normal ??
 
That was the first thing I noticed as well. That set-up really decreases the rigidity of the tail stock and won't help with machining accuracy. I don't know much about Atlas lathes, but that drill chuck also looks a little large for that size lathe. Anyway, it looks like you picked up a pretty nice machine and you've gotten some good advice.

Ted

The drill chuck was on the lathe when I picked it up. I wasn't sure about it's size or what seemed to be a bit too much of an extension on it (??). Still trying to go thru the machine and see what seems to be working correctly and what needs repair/servicing. So far I have replace the spring & 1/8" ball on the direct drive coupling (according to the parts diagram, numbers 10,11,12). Only to find out the backgear won't stay engaged under power...
 
Back
Top