Rotary Table Chuck

aliva

Active User
H-M Platinum Supporter
Joined
Feb 28, 2012
Messages
1,623
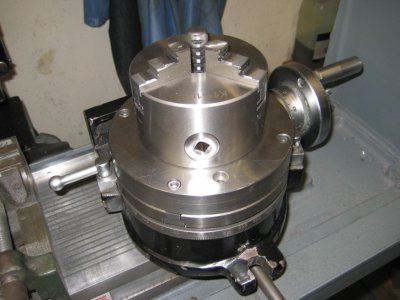
I need some suggestions on mounting a 6” independent 4 jaw chuck on my 6” rotary table.
At the present time I made an adapter plate for my existing 8” 4 jaw lathe chuck. I used a ½”thick stainless steel plate. I threaded a MT 2 adapter to the center of the plate, the MT 2 fits into the bore of the table. The plate has 3 holes that correspond to the mounting pins of the chuck. I remove the camlock pins from the chuck and attach the plate. A couple of draw backs of this arrangement is that I lose the thru hole of the rotary table, the chuck is a little too large for the table, when using the table in the horizontal configuration the MT 2 adapter has come loose. I’m not happy with the rigidity this setup gives me. I need to purchase a 6” 4 jaw chuck just for the rotary table.
My one thought is to drill 4 holes thru the face of a 6” chuck, near the outer circumference, between the jaws, thereby allowing me to bolt the chuck directly to the table with T nuts in the 4 table slots.
My concerns are, is there any mechanism inside the chuck that would prevent these mounting holes, also I’m thinking the chuck is probably case hardened, which would create problems in drilling. I haven’t purchased a chuck as of yet, I have to figure out the mounting first, so this approach is till only a thought.
Has anyone done something similar, or have any suggestions on how to accomplish this?
 
I think the MT2 bore on the RT is great to center the chuck to the table, but is a poor choice for securing it esp. when working in the horizontal mode as the weight of the chuck produces a side force on the taper which will knock it loose as you are experiencing (the nature of the MT). it is best to make an adapter back plate for the chuck which will bolt to the back of the chuck, and bolt to the T-slots on the RT - you can turn a MT on the back of the plate to help align the chuck to the RT, but the bolts should be what is holding it together.
 
You don't want to use the taper to hold the chuck... Nor do you want to use the taper on an MT2 backplate for the chuck that get's bolted to the table. Because of the taper, you've got to have the tolerances spot on else you'll end up with slop, or too much force on the taper that'll drive the center bushing out. Ask me how I know this...

The challenging thing is to use a 6" chuck on a 6" table. Unless the chuck bolts from the front... I'd recommend a smaller chuck so you can use the T-slots to mount a backplate and be able to access the bolts...

Here's what to do (as I did)... Make a MT2 sleeve for your rotary table with a reamed 1/2" bore. This has a bunch of uses for other fixturing as well as mounting the chuck.

Now turn an aluminum (or steel) backplate to fit the chuck with four mounting holes around the perimeter to pick up T-nuts. Bore a a .499 hole and press in a 0.500 pin to pick up the bore in the MT2 sleeve you made.

Mount the chuck to the plate and bolt it to your table. It will be aligned by the center pin and apply no axial force to the taper insert in the table.

Like this:

IMG_1550.JPG

John

IMG_1550.JPG
 
My one thought is to drill 4 holes thru the face of a 6” chuck, near the outer circumference, between the jaws, thereby allowing me to bolt the chuck directly to the table with T nuts in the 4 table slots.


That you could do, if you found the right chuck. I have a 6 in 4-jaw that has the bolt pattern on the outer edge like most 3-jaw chucks have. I took mine, and flipped it up side down, and drilled through the chuck body. Depending on you RT, it will have either 4-slots, or 6-slots.
If you have 4-slots in the table you should be able to just slide the T-nuts in place, and bolt your chuck down with the proper length fasteners. Then you wont need the plate. Other 4-jaw chucks have the bolt circle closer to the centre, then you would need to measure first to see if you can still bolt it up direct.

Being your in Canada, check over at Busy-Bee Tools, that's where I got my 6-inch 4 jaw.
I have a few of there chucks in a variety of sizes that Ive drilled through the original bolt holes and through the the front. Its doable and makes swapping out chucks fairly quick and easy. If your RT has 6-slots like my 12 inch does, then your just going to need a plate between them. Though the 6- slot table allows you to direct mount the 3-jaw direct when drilled through.
 
Thanks for the ideas.
The reason I want to use a 6"chuck is to have the largest capacity possible. I did look at using a smaller chuck and backing plate but that limits capacity.
I have looked at Busy Bee product, Shars and Travers Tools, just want to pick the right one before I proceed.
 
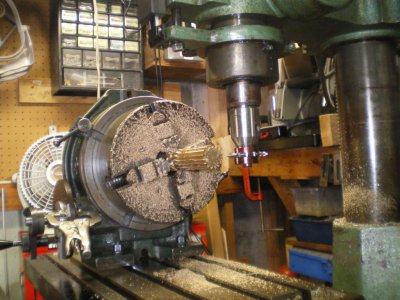
I have a 6" 4 jaw for my 9x20 which bolts on with 4 through holes. I simply took the back plate off and dressed the bore hole on my 12x36 lathe. Then made a plug to fit the bore hole and the rotab.

It is a very handy setup. I can chuck up some work in the 9x20 and do some turning. remove the chuck from the back plate and center it on rotab by using the plug. Mill features as needed and back to the lathe if needed for parting etc. It may require a little finagling for utmost accuracy but for most work it is simple drop on tighten 4 bolts. 6" is a handy size. My rotab is 9" but this method should work great on a 6" rotab.

rotab.JPG

Steve

rotab.JPG
 
hi all, I haven't mounted a whole bunch of chucks but if you're going to drill throught the body, take the chuck apart first! They are not complicated!
I modified an 8"AT buck chuck recently actually to fit my headstock on my B&S #2 Univ. and nearly took out the swirl/screw plate
that operates the jaws on the chuck. Luckily it only grazed it and after cleaning the drill swarf out of it, it works fine. I new it would be close and used 1/2" bolts (probably could have gotten away with 7/16 or 3/8" they were quite long) for the outer mounting as original. It was mounted with 3 bolts at the center and I could'nt do anything there because the pattern diameters interfered with each other. I builtan adapter plate out of a 6" (I believe) pipe blind flange, drilled to fit the
headstock and milled it for the drive dogs. It seems to work. I haven't really used it yet but needed something to assist my 7X12 enco mini lathe. This makes lots of swing and about 17- 20" between ctrs. As far as using a chuck and rotab on the mill I find if you don't have a huge amount of z axis travel best to keep things low profile, some-tooling and adapters can take up quite a bit. I prefer to mount the chuck with t-bolts and a centering dowel for this or dialing in the chuck if some "pass through" space is needed. My rotab 10" h/v and 6" chuck is about 8 1/2" tall with the chuck and no problem when working horizontally but can be cumbersome when doing vertical work on the mill. Hope this helps, alls cool when it goes together nicely then oops!
 
Last edited:
+1. A four jaw chuck should be a cinch to drill through, but take it apart and understand where all the critical features are.

John
 
RandyM
Great adapter plate, certainly something to concider.

Thanks
 
Back
Top