VN Rebuild project for my VN #12

CrankyOldMan

Registered
Registered
Joined
Aug 23, 2017
Messages
19
I've been looking at getting a mill for several years now and finally have the space and time to add it to my life. After looking at BPs and some variants, I found this little beauty on eBay for a song. I couldn't pass it up at the asking price, even with freight charges. It included a 6" Kurt vise, so even if it didn't work (and everything turns freely, so I assume it does) it would still be worth the purchase price to me.

I intend to break it down and give it a thorough cleaning so that I can repaint it, then maybe add some goodies to it.
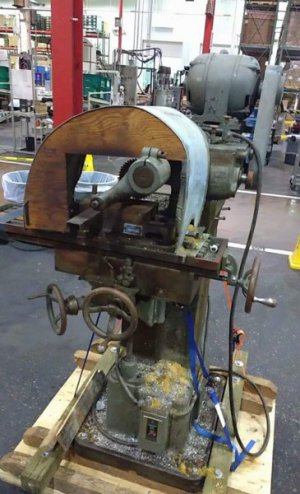
VN12.jpeg
 
Very coooool project. You are in for some real fun now. Thank you for the post.
 
I've got most of the chips brushed off and have started disassembly. The only thing that's given me any real trouble is the over arm shaft. I hit it up with some PB blaster last night and let it soak. I also read a thread elsewhere with the same issue and avoided the mistakes they made--no sledge hammer on the end of the shaft! I got the clamps loose by gently tapping the head of the bolt with a poly-faced hammer until the rear clamp broke free. I gave the shaft a few smacks with a small deadblow and it started to give. Rather than push it all the way back through, I put a scrap of lumber in the back of the ram and gave it a few more whacks. Success! I was able to slide it out the rest of the way by hand. The shaft and interior bore look like they're in really good shape, and smelled like old dinosaurs.

Tomorrow I'm going to try and remove the knee and table as a single assembly. I'm not sure how to disconnect the table feed shaft--all I found was a single dog point screw by the universal joint on the back of the table. Do I need to drop the entire gearbox from under the table to get it apart, or am I OK with just that screw coming out?
 
My own experience is I found it takes usually a year to strip down an old machine, paint it and put it back together. Which generally turns into a huge time sink that usually contributes nothing to making them work better.

The photo looks like you may have a functional machine. So, Personally, I would squirt everything down with diesel, just to free up the machined surfaces, clean it up a bit if needed, then lubricate, and turn it on to make some chips. Find out what works, what's tight or loose, etc and actually get some good solid experience making parts with it, before doing a major tear down. The downside to tearing the mill apart is lost parts, damaging pieces during dissembly, and the very real risk of never restoring the machine to running condition.

Anyway, there are some rebuild threads from earlier days that might give you some ideas on how to dissemble, and how long these things stay disassembled, if that's the direction you do decide to go.

Glenn
 
Glenn--Thank you for your wisdom! I've been watching a lot of Keith Rucker rebuild videos on YouTube and probably have a distorted sense of what's involved and how long it actually takes. It's just as much about making it look new as it is about learning how it works and goes together. I don't have any projects that have to be completed in the immediate future, so a year of downtime would probably be OK. I don't have any tooling or collets for it yet, or even the 3-phase power source.

Now that the overarm support is free, everything seems to be in good shape. All the ways are smooth and travel easily, but a little sticky at the ends. The gear change levers all move to all positions, but are stiff in some spots. The spindle turns freely and easily with the belts disconnected.

I almost feel like a fool for asking--since it should be obvious--but I can't figure out how to lock/brake the spindle to remove the arbor. Do you have to use a spanner in the drive lug slots? I'm used to using a BP style brake, so this is a little odd for me.
 
CR,

Actually I have a VN 12 sitting in the corner awaiting some repairs, so haven't used it all since it followed me home last year. So memory vague. But i think the arbor maybe will seat into the spindle with a draw bar. So perhaps look at the back of the universal milling head and see if it isn't held in place with a long thread bolt looking thing. As to how to lock or hold the spindle tight, I haven't even attempted that yet - so have to admit, I don't know! The spanner idea seems logical. Maybe Cal or one of the other expert VN people will comment.

BTW, you have an invaluable part with the overarm support hanging off the front of the round support shaft. Many machines are missing these, and they are impossible to source these days, they hardly ever come up for sale. As in never. You can't do much if anything in the way of horizontal milling with out this one component. So yours is a big plus with this machine.

Glenn
 
Yes, it's definitely a drawbar like a BP mill. It's also a 25/32 nut, so you'll need an old wrench for that if you don't already have one. I just can't figure out how to keep the spindle from rotating while breaking the draw bar loose.

The overarm support was definitely a factor in buying this machine. If it didn't have it, even at the price they were asking, I'm not sure I would have bought it. It's been repaired at the small end. The welds don't look very good, but it seems functional. There's also a live center in it, so I don't have to worry about lube and contact pressure as much as those of you with dead centers on the end.

I can't seem to find a serial number anywhere. Is there an ID plate in a weird place, or is mine likely just missing it altogether?
 
...

Tomorrow I'm going to try and remove the knee and table as a single assembly. I'm not sure how to disconnect the table feed shaft--all I found was a single dog point screw by the universal joint on the back of the table. Do I need to drop the entire gearbox from under the table to get it apart, or am I OK with just that screw coming out?
I do not recommend trying to trying to remove the table, saddle and knee as one unit. Besides, you need to pull all that apart, clean and lubricate it.

Take the table off first: Remove the right handwheel, remove the screws from either end of the table gib, then tap the gib to the right to free it and remove same. Support the table (I use an engine hoist, with a length of chain and bolts in the T-shots), crank the table to the left until you run out of screw, then slide the table off the left end.

Removing the saddle is pretty straight forward. Remove the setscrew that holds the retaining collar on the cross-feed screw. Back the screw out. Remove the cross-feed nut bracket. Loosen the gib and slide the saddle off onto a cart, with suitable blocks to get things to the same level. The top of the saddle catches swarf, it needs to be cleaned and filled with way oil. Blow out all the lube passages.

Removing the knee is more involved because you have to pull apart the gears that drive the elevation screw. I don't have time to go into that now. Don't try to take the knee off with the elevation screw attached, it's way too easy to damage the screw that way.
 
Dang, day late and a dollar short! I already pulled the whole knee with my engine hoist. Wasn't easy! I had to remove the Z-axis lead screw before it would cooperate with being laid down, but it came out without much protest. I'm going to try and separate the bed and saddle from the knee, then the bed from the saddle. I'm not sure how I'm going to get my crane high enough to lift off the ram, since the base is about 8" up in the air on a pallet and dolly to make room for the legs of the hoist.

The most awesome thing I've found with this machine is that it was absolutely made to be serviced. No weird cost cutting tricks in manufacturing to shave pennies off the price. Every screw has come out without complaint or breakage and didn't require special tools beyond a little bit of observational prowess.
 
Finally figured out where the serial number is. Looks like 12-8442. That puts it in late 1945 production!
 
Back
Top