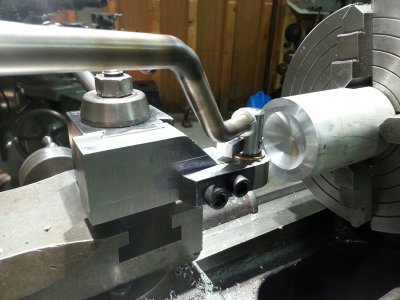
This is the initial set up, since modified to fit a larger lather and a few improvements. The piece of stock was for testing purposes and not the actual diameter or length.
I am turning an 1.250 inside radius on the lathe and having issues with the diameter and radius matching.
Material: Aluminum
Dia: 2.50
Radius: 1.250
I have tried several methods of ensuring the tool is centered, but for some reason I still come out with a diameter bigger than the radius. i.e., 2.50 dia with a radius of 1.1xx
The tool is solid, no movement. The lathe is a 21" x 60" and solid.
Tool height:
- Used factory mark on lathe to set tool height.
- Measured and set tool height
Axis:
- Measured dia of work piece (work piece has been turned down) and lined up tool then used 1/2 to set tool. i.e., 5.500 dia, = 2.750 from edge
- Measured dis of chuck and did the same as above
- Scribed center line on work piece and lined up tool using a square on the vertical center line and lined up tool.
- Turned a center and lined up tool on the point. So far this has been the most effective but still off, 2.250 dia and 1.250 radius and 2.500 dia and 1.190 radius
The carriage and saddle is lock in position and I used an indicator to check for movement, zero.
The compound is set at 90deg so I can use the compound to advance into work. Again, indicated to detect movement, zero.
4-Jaw chuck with worked piece indicated in.
The tool is set on a 3/4" post rotating on a bronze bushing. The complete set up is mounted on a QCTP.
I have 20 of these I have to produce and would like a solid checklist to ensure I obtain as much accuracy on each part.
I have also researched a carbide core box nosed radius cutter, for a custom 2.500 dia one it is pricey. I could rough out the radius with the tool and then finalize with the core box radius and finish up.
Thanks, Dan

Last edited:
