Question On Aligning The Lathe Spindle And Bed Twist

sanddan

Active User
Registered
Joined
Jan 22, 2012
Messages
655
I am setting up my new PM1340GT lathe and have a question. I leveled the lathe on the long axis and across the two flat ways. I then installed a 2.5" dia by 12" aluminum bar in the chuck and after truing the bar I made a light cut (.002") at each end (bar only supported in the chuck). Over the 10" span I saw .008" taper with the headstock end being smaller than the tailstock end. I next extended the front adjuster foot on the tailstock end and made repeated light cuts measuring the 2 ends of the bar. I was able to get enough twist out of the bed to reduce the taper to .0015" over the 10" but at that point the rear adjusting foot at the tailstock end wasn't touching the floor anymore. After extending the rear foot until it made contact with the floor I made another cut and confirmed the taper didn't change. Here's the question.


Does this seem like an excessive amount of twist in the bed or more like the headstock isn't aligned properly with the ways? How do I tell which it is or which should be adjusted?


I'm not sure it's ok to have so little pressure on the one rear foot. Should I make the pressure on the feet more equal, which will make the taper increase again, and adjust the headstock to get the rest of the alignment needed to eliminate the taper seen on the test bar?


One other issue. After leveling the lathe, when I was truing up the bar supported by a dead center I was seeing a lot of vibration/shake, enough that the light was moving and I could feel it in the headstock and carriage controls. As I increased the pressure in the front foot the vibration got less and less until I had gotten out about .005" of the original 008" of taper and then started to increase again. Another indication of loading on the feet not being equal enough to keep the lathe stable?


Another option would be to adjust the feet until the lathe runs smooth without shake and then just adjust the headstock to get rid of the taper in the test bar.


Any other ideas?
 
I'm looking forward to what replies you get. I have about the same issue: when the bed is level, end to end - then a stout overhung bar will end up being tapered (when skim cut). Cranking down the left front foot reduces the taper. However, I'd think that would throw the tailstock alignment off. Of course you could bring the tailstock back to center - but stricktly speaking, you would need to do that any time you moved the tail stock.

I've been meaning to lift the headstock off and make sure all is clean and good (when it left the factory, I doubt it was cutting a taper when level all the way along the bed). On my machine (Enterprise 1550 lathe) the entire bed was ground at one shot - the head stock casting is mounted on the left end of the bed on one Vee and one flat. This is one of those - "haven't gotten aroundtoit" tasks. I don't cut any long fits overhanging from the chuck (i.e. boring a very deep hole). I've been working around this issue for over 30 years, and it isn't that big a deal - on longer cuts close to the chuck I may tweak the cross slide. Things like bearing fits, bushings - and things that need to be straight, are generally not very long. Longer items usually involve tailstock support - so that little bit of taper is managed with the tailstock.

I suggest you set your bed level end to end, set the feet on shims (just use the jack screws for lifting and lowering when setting the shims). Then align the tailstock properly and use the lathe for a while. You could lift that front foot a little bit (I find a little bit of twist gives quite a bit of benefit - if I try to fix it all, then I really have to twist the machine - which does not seem right).

Let us know how it works out.

Regards, David
 
I had to realign the lathe headstock on my PM1340GT, very small change on the alignment screws in the back of the headstock after loosing the mounting bolts. . If the bed is level, the headstock might be slightly off. Also try different chucks, as there chuck seating could be slightly off. Just some thoughts, but I wouldn't want one foot off the ground. Are you using solid feet or rubber cup type feet?
 
It sounds like you're using the leveling feet of the cabinet to level the lathe. Lot of folks do this and this works. However, depending on the floor it can leave you chasing the bubble. Well, it left me chasing it, anyway. What worked best for me was to get the cabinet reasonably level so the base was solid, then I leveled the lathe independently. My lathe fastens to the cabinet with just two bolts but has four leveling feet, two at each end. The lathe was brought into level with these bolts and the fastening bolts were tightened. I had to make minor tweaks to the leveling bolts as this was done but was quickly done. This worked really well and the lathe is solidly planted.

It looks like your lathe bolts to the cabinet with 6 bolts, 4 at the headstock end. Would leveling the cabinet and then using shims under the lathe feet work for you?
 
0.008" over 10" is far too much. You may has well spent a third the cost for a Chinese machine.
The factory spec is 0.02mm over 300mm, which is 0.0008" over 11.811". So you are more than 10x out of spec.
Using the leveling feet to twist the bed to align the spindle is pretty normal and common. It is not true that you will have to re-align the tail stock for different positions. The carriage and the tail stock both travel down the same bed, if the carriage is running true, then so is the tail stock.
That said, 0.008" is a bit much to remove via the leveling screws, this is really a fine adjustment and should be kept to something under 0.005". It is meant to compensate for the way cast iron relaxes over time or for minor errors in the factory. Cutting a taper is a possible indication of a head stock not aligned, it is just as likely the bed is twisted, or both. Cutting a taper is not an indication of chuck mis-alignment. Turning removes any run out from the chuck.

There are a few things you can do, including clocking the head stock. Matt had these lathes made so the head stock sits on a machined flat rather than on the v-ways. It is possible that the lathe was sitting on a piece of swarf when aligned, or it might have gotten knocked out during shipping or mounting. More likely the problem exists with it being bolted to a stand that is not especially flat.

Before you get too carried away, loosen all the bolts that hold the lathe to the stand and retighten them. Look for any obvious gaps under the lathe (use a thin feeler gage or something) to see if the stand is just not making a good bed for the lathe. When you try to adjust the leveling feet, the lathe will twist differently than the stand. They need to move freely and then be bolted up. The stand is anything but a level surface, and if you bolted it up on an uneven floor, then leveled it, there is already unnatural tension in the system. I just used a framing square to level the two cabinets with each other, then put the machine on it and bolted it down. My floor is uneven and slopes, so I loosened the lathe after leveling and retightened, then did a final level check before making a test cut. The PM1340Gt does not weigh enough to flatten the stand, and the stand itself is not especially well made - though it is fairly solid. You might have to put shims under the lathe, and use the feet.

The typical way to test squareness of the head stock is to make a wide facing cut. Mount something as big as you can on the faceplate and face it, or just face the faceplate itself. Mount a dial indicator on the cross slide, zero it at the near end, then sweep to a spot an equal distance over center on the far side while looking for a convex or concave cut. This test assumes the cross slide travel is square to the ways - which on this lathe is a fair assumption. Assuming the cross slide runs square to the ways, this is a definitive and quantifiable test. The lathe bed should also be free of any gross twist, so it is best to level the bed with your machinist level before doing this. This test is worth doing because it works in conjunction with the taper test. If the head stock is turned, it will report a similar error on the facing test. Your taper is bigger at the head stock end, so the facing cut should reveal a dish of approximately the same ratio (0.008:10).
If the facing produces a measurement that is out of spec, mount two dial indicators on the bed. Zero one at the near side at "0", zero the far side indicator at whatever reading you got in the above test. Loosen the headstock bolts, and tap it around with a mallet until both indicators have the same reading. Tighten and reface to check. If you try to do this with one indicator, you will be chasing it around for days and use up your faceplate. It is also important that you do not remove the faceplate between cutting and clocking, and that you indicate on the same spots during alignment that you used during checking - so mark the faceplate with a marker.
 
Another cause of taper can be a spindle that is not aligned vertically parallel with the bed. Check for that problem as well. Indicate the top of your test bar as well as the sides.
 
0.008" over 10" is far too much. You may has well spent a third the cost for a Chinese machine.
The factory spec is 0.02mm over 300mm, which is 0.0008" over 11.811". So you are more than 10x out of spec.
Using the leveling feet to twist the bed to align the spindle is pretty normal and common. It is not true that you will have to re-align the tail stock for different positions. The carriage and the tail stock both travel down the same bed, if the carriage is running true, then so is the tail stock.
That said, 0.008" is a bit much to remove via the leveling screws, this is really a fine adjustment and should be kept to something under 0.005". It is meant to compensate for the way cast iron relaxes over time or for minor errors in the factory. Cutting a taper is a possible indication of a head stock not aligned, it is just as likely the bed is twisted, or both. Cutting a taper is not an indication of chuck mis-alignment. Turning removes any run out from the chuck.

There are a few things you can do, including clocking the head stock. Matt had these lathes made so the head stock sits on a machined flat rather than on the v-ways. It is possible that the lathe was sitting on a piece of swarf when aligned, or it might have gotten knocked out during shipping or mounting. More likely the problem exists with it being bolted to a stand that is not especially flat.

Before you get too carried away, loosen all the bolts that hold the lathe to the stand and retighten them. Look for any obvious gaps under the lathe (use a thin feeler gage or something) to see if the stand is just not making a good bed for the lathe. When you try to adjust the leveling feet, the lathe will twist differently than the stand. They need to move freely and then be bolted up. The stand is anything but a level surface, and if you bolted it up on an uneven floor, then leveled it, there is already unnatural tension in the system. I just used a framing square to level the two cabinets with each other, then put the machine on it and bolted it down. My floor is uneven and slopes, so I loosened the lathe after leveling and retightened, then did a final level check before making a test cut. The PM1340Gt does not weigh enough to flatten the stand, and the stand itself is not especially well made - though it is fairly solid. You might have to put shims under the lathe, and use the feet.

The typical way to test squareness of the head stock is to make a wide facing cut. Mount something as big as you can on the faceplate and face it, or just face the faceplate itself. Mount a dial indicator on the cross slide, zero it at the near end, then sweep to a spot an equal distance over center on the far side while looking for a convex or concave cut. This test assumes the cross slide travel is square to the ways - which on this lathe is a fair assumption. Assuming the cross slide runs square to the ways, this is a definitive and quantifiable test. The lathe bed should also be free of any gross twist, so it is best to level the bed with your machinist level before doing this. This test is worth doing because it works in conjunction with the taper test. If the head stock is turned, it will report a similar error on the facing test. Your taper is bigger at the head stock end, so the facing cut should reveal a dish of approximately the same ratio (0.008:10).
If the facing produces a measurement that is out of spec, mount two dial indicators on the bed. Zero one at the near side at "0", zero the far side indicator at whatever reading you got in the above test. Loosen the headstock bolts, and tap it around with a mallet until both indicators have the same reading. Tighten and reface to check. If you try to do this with one indicator, you will be chasing it around for days and use up your faceplate. It is also important that you do not remove the faceplate between cutting and clocking, and that you indicate on the same spots during alignment that you used during checking - so mark the faceplate with a marker.

Good info here and some ideas to try. Your first comment really hit home to me as this lathe in replacing a 12x36 Enco lathe that cost half as much. I have to admit that my initial thought was "WTF" but it's in my shop now so I want to make lemonade and not focus on the lemons.

So the first step should be to setup the faceplate and make a facing cut and measure the results. Knowing how flimsy the sheet metal stand is I don't think it can have much of an effect on the twist in the bed if in fact that's the problem. The facing cut on the faceplate should answer that question. I think I will even out the loading on the feet so the lathe doesn't shake when it runs before checking it. The bar method does check for headstock alignment in addition to the bed ways but doesn't separate the two so there isn't a way to tell which is the main issue, just how much of an issue the sum of the two are.

The bed actually seems pretty stiff as it took a lot of movement on the adjusting foot to make even a small change to the taper on the test bar.

In full disclosure, I did call Matt before posting on the forum as I had heard about the great customer service from PM. Your post was MUCH more helpful than any of Matt's suggestion's. I don't want to bolt the lathe to the floor or build my own stand (at least at this point). He did mention that some of the lathes have had to have the headstock adjusted but also said this was not common. Mostly he didn't seem to take my concern seriously, maybe he had a bad week. I have to thank all on the forum that take the time to help a fellow out, this would be really tough without the support here.

I'll post back what I find out.
 
Another cause of taper can be a spindle that is not aligned vertically parallel with the bed. Check for that problem as well. Indicate the top of your test bar as well as the sides.

This is a good point and it is 100% true.
The problem can be eliminated by using a larger diameter stock.

You will pardon me for going into geekmode for a moment :)
The equation for a circle in Cartesian space is
(x-a)^2 + (y-b)^2 = r^2
where x and y are any points on the circle, r is the radius, and a and b are the coordinates for the center of the circle.
Given a radius and coordinate for the center of the circle, we want to know the how different the diameters are at both ends of the work.

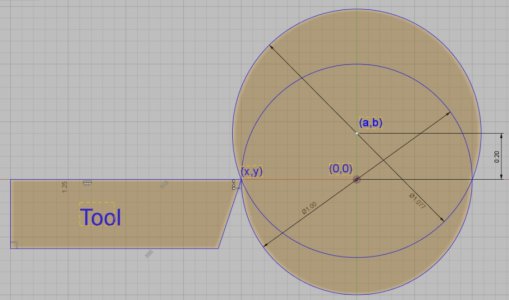
The picture below is an exaggerated example of the head stock being tilted.
In this example the smaller circle is the diameter of the work near the head stock, and the larger circle is the diameter of the work at the tail stock.
The tool is at center height along the entire length of the cut.
The tilt of the headstock results in the center line of the spindle being 0.20" higher at the end of the work.
As you can see from the picture, the diameter is 1.0" at the head stock, and 1.077" at the tail stock.
in the pic below the variables for the equation are:
x = -0.5 (the radius of the work) Note this is only negative for mathematical purity, a positive dimension works equally well.
y = 0.0
a = 0.0
b = 0.20
r = 0.5385 (1.077/2)

circle.jpg

Note the point (a,b) is the same a and b in the formula above.
To keep things simple, we will assume the headstock is not rotated. It follows then that:
a = 0
x = the radius at the headstock
y = 0
r = what we want to solve for
It should also be noted that is it a geometrical impossibility for head tilt to result in a larger diameter at the head stock. Headstock nod will always result in the diameter at the headstock being smaller provided the tool remains on center height relative to the spindle nose. The tool would have to be positioned directly below or above the work to result in the headstock diameter being larger.

So lets compare a 1" nominal diameter test stock to a 3" nominal diameter test stock given 0.020" of nod in the headstock (this is pretty extreme example)
So we make a test cut and find the diameter is 1" (or 3") at the head stock, but it something larger at the tail stock end.
1" example
(x-a)^2 + (y-b)^2 = r^2
(0.5 - 0)^2 + (o - 0.020)^2 = r^2, remember x = radius
0.5^2 + 0.020^2 = r^2
sqrt(0.5^2 + 0.020^2) = r (discard the negative solution)
r = 0.5004
diameter = 1.0008"
This is just measurable on a small diameter with a really huge nod.

3" example
(x-a)^2 + (y-b)^2 = r^2
(1.5 - 0)^2 + (o - 0.020)^2 = r^2, remember x = radius
1.5^2 + 0.020^2 = r^2
sqrt(1.5^2 + 0.020^2) = r (discard the negative solution)
r = 1.50013"
diameter = 3.00027
This is beyond the tolerance of the vast majority of lathes outside of a lab grade machine.

The moral of the story is, that head stock nod will not affect the taper test in any meaningful way provided you use a larger diameter stock.
This taper test is also not an acceptable way of measuring head not because the measurements will fall with in the tolerance of the lathe.
To test for head nod, one would need to position the tool under the work by using a boring bar or something similar and testing for taper.

Sorry for going full geek. Hopefully someone will find it useful :)
 
I didn't read everything & sorry if I missed something but I believe your actually measuring spring in the work. After your headstock is aligned with something like drill rod probably no more then 6" away from the chuck. Move the tailstock to the head with a center in both & a steel rule pinched between both will show you how to align the tail to the head. Then you need to turn between centers to do your taper test.
 
Sorry to hear your problems. If you leveled the bed/ways of the lathe and it turned a taper. And you then had to un-level the ways to cut straight. I do not think it’s a leveling problem. And if you run the lathe with the ways twisted, you will soon have another problem! I would concentrate on the headstock alignment feature, that you said it had. Or swarf between the headstock and ways. Or improper alignment/assembly of headstock spindle to everything. You get the idea. It’s not a chuck problem, unless the jaws are not clamping square and the part rocks in the jaws. Could be a little bit of tool sharpness, your tool bit must be sharp…Good Luck, Dave.
 
Back
Top