

- Joined
- Apr 11, 2022
- Messages
- 16
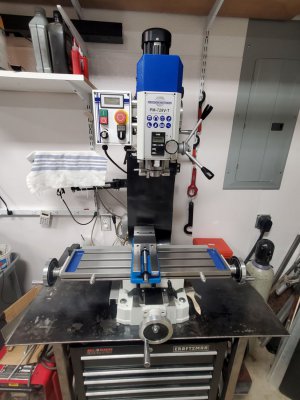
So just as so many of you all have already done, I recently purchased a new mill. I went with the PM-728 for the simple fact that the machine was touted as being a more refined, ultra-precision mill for the size and in all respects, I did not need a larger machine for what I plan to do.
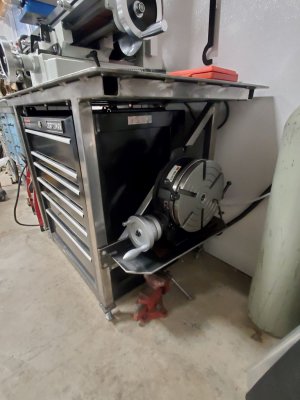
I built my own table as I did not much care for the PM version and I wanted to incorporate a tool box below it for storage. So far it has been working out well and is very stable. It also affords me the ability to add on side storage like what I did to keep my Vertex RT out of the way.
I wanted to share my initial thoughts on the machine in hopes of letting others know what it's like or maybe what to expect. I will apologize now for the length of this post.
Overall, the machine will suit me really well as it is so much more capable than what I had at my disposal before. Some of the things I like are that the table and castings are solid. With a little fine tuning, the X & Y movements are smooth (z-axis is another thing entirely). The overall rigidity is good, but you can see some movement if you work at it...no biggie that was expected. Am I happy with the 728 - absolutely.
The DC brushless motor is strong, pretty quiet, and my initial thought of going to higher HP has been postponed for quite a while – there is just no need for more power. The controls are really good, simple to use, and conveniently placed for me. I went with the MX-100M DRO which works great, has a good display, and is easy to use. You can read the manual for the DRO if you like, but it’s pretty straight forward. I did move it from the right side to the left as I did not care for having the quill feed levers in the way. I also made an extension so the display is out farther and not blocked by the power & speed control box. Finish on my R8 spindle was really good and I measured less than .0005” of runout in the R8 taper with everything locked down – more if you applied side pressure to the quill.
The three things that are sort of disappointing/frustrating come down to this:
The PM728 is touted as being Ultra Precision and a step above the other mills in the class, but I found that there are a number of things that, in my opinion, are just poorly executed.
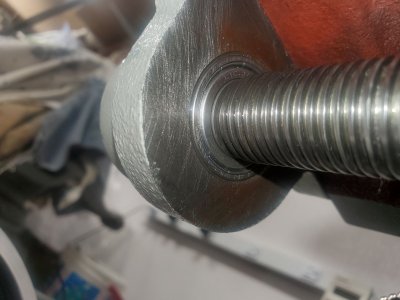
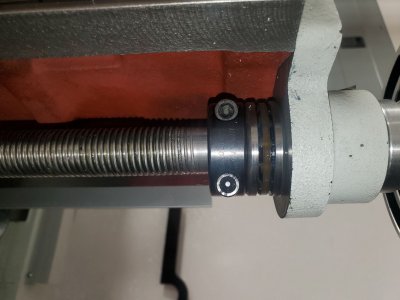
First, the X & Y lead screws, while robust in size, have the wrong bearings to properly transfer axial loads and provide smooth motion. Each screw has a 6002 radial bearing and a 51204 thrust bearing (x-axis has two 6002’s, one at each end – back of y-axis floats). These are fine, in one direction, but induce slop in the movement and transfer axial forces to the radial bearing, which then starts to bind up and provide a crunchy feel.
Looking into it, this is how a lot of machines are built. I also found that 51204’s are only meant to be loaded one direction, which explains why the crunchy feeling comes into play when the radial bearing starts getting loaded axially.
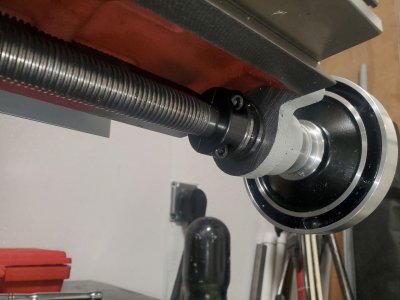
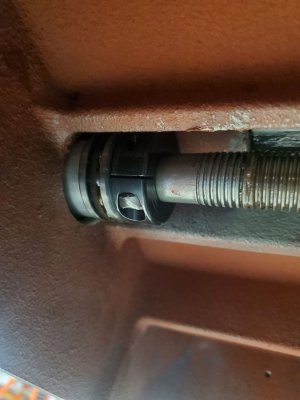
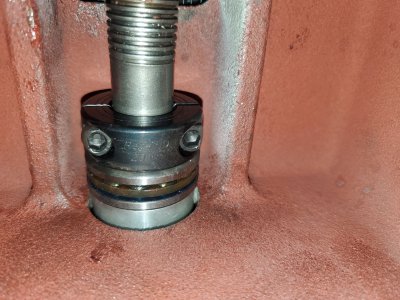
I decided to fix the thrust problem by means of adding a split collar plus an additional thrust bearing to the inside of the lead screw flange. This allows for the slop to be taken up at the flange and with thrust bearings on each side, movement is now much smoother. I did end up replacing two of the 6002’s as they were not smooth, possibly due to damage from being loaded axially.
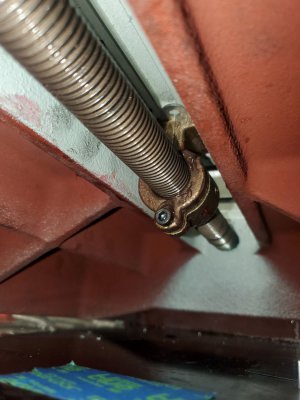
The Y-axis was handled in the same manner, albeit it was a bit more complicated due to the limited space around the split collar to the base casting. I ended up having to sand down the socket head cap screws. I also made a 15mm deep spacer to step the thrust bearing away from the base casting. A side note – I don’t think my machine had a once-over on the y-axis as it developed a ton of slop as I used it. Found out that the cap screw holding the lead screw nut in place was loose and needed attention. Side note #2 – I added a .031” shim between the table and the lead screw nut so it would align properly with the lead screw flange bearing. I had quite a bit of binding after I tightened it, which is why the shim was necessary.
The z-axis is an entirely a different bag of burritos and honestly is not causing me issues. It is not particularly smooth, or accurate, and sort of hangs up at times, but as it was explained to me by the guys at PM, it is what it is and the quill worm drive is your friend.
The second most concerning issue for my machine pertains to the main spindle bearings. There are two or three notable harmonic points at which one or more of the bearings are loud. I think it’s the top-most bearing, but not really sure. The sound is coming more from the area of the spindle pulley and is made worse by putting tension on the belt. The bearing whine come on at low rpm (150-300 or so) then again at 1150 rpm. I don’t have any significant vibration, but bearings should not sound like they do on my 728, end of story.
I’m going to let the unit break in for a while as PM suggested and see where this all goes. I don’t have a need to keep the pulley belt super tight, at least not as tight as the manual says to keep it, so that’s good. The tables are doing much better as they see use – I try and cycle then through full motion regularly. I like the one-shot oiler for sure.
The little things that just twist your crank are like when you find dings in the precision ground ways that the guys at the factory just said, “meh, it’s fine – ship it”. Nothing my precision flat stones could not handle, buy come on man!
Last bone of contention was the DRO install – a bit more care during the install would have resolved the x-axis aluminum angle shroud from rubbing on the mounts causing movement in the y-axis. These were fixed by simply adjusting the scale and the shroud. I added a cable guide so the x-axis cable would track better as the table moved. Now the DRO is working well.
This is all great but what have I done with the 728 you ask?
Please keep in mind I have never machined anything before. I know CAD and doing designs and such, but I have only played with my SB lathe to this point. My only exposure so far to milling is a bunch of web research and videos.
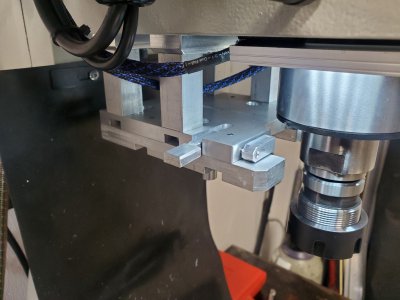
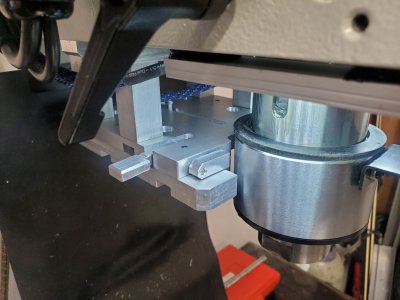
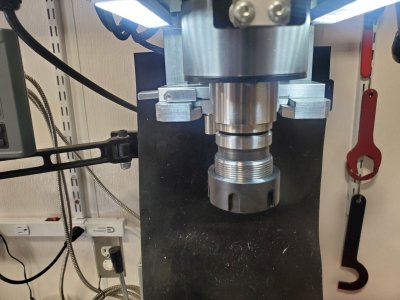
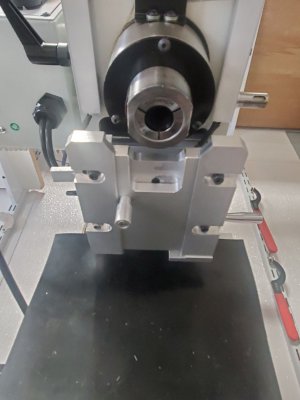
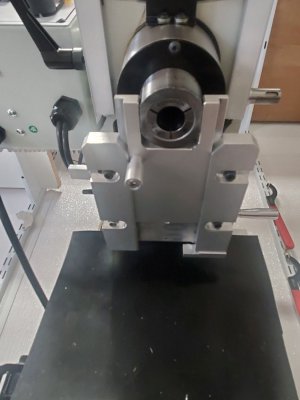
I saw that many people commented that tool changes are a pain. You need three arms so you don’t drop a 2lb drill chuck on your vice or mill bed. Since I did not want to drop the coin at this time for a pneumatic collet release setup, which is really cool by the way, I decided to design and build a quill locking mechanism as my first go at milling. The attached photos show what I did. This lock is now installed on the mill and is functioning really well for tool change outs as well as tightening up/loosening a drill chuck. I have used it for a few days and is a huge help.
The 728 is a great little mill and I would recommend it if you are looking for a machine with a smaller footprint that has plenty of capability and power. Don’t fuss over the 1HP motor – its plenty strong. Also, keep in mind that the 728 has x & y axis throws that are larger than similar machines, which is nice.
I have really appreciated reading many of the posts here on THM - most all have helped me get to where I am now with the 728.
Keep on sharing and as always, I appreciate your constructive comments.
I built my own table as I did not much care for the PM version and I wanted to incorporate a tool box below it for storage. So far it has been working out well and is very stable. It also affords me the ability to add on side storage like what I did to keep my Vertex RT out of the way.
I wanted to share my initial thoughts on the machine in hopes of letting others know what it's like or maybe what to expect. I will apologize now for the length of this post.
Overall, the machine will suit me really well as it is so much more capable than what I had at my disposal before. Some of the things I like are that the table and castings are solid. With a little fine tuning, the X & Y movements are smooth (z-axis is another thing entirely). The overall rigidity is good, but you can see some movement if you work at it...no biggie that was expected. Am I happy with the 728 - absolutely.
The DC brushless motor is strong, pretty quiet, and my initial thought of going to higher HP has been postponed for quite a while – there is just no need for more power. The controls are really good, simple to use, and conveniently placed for me. I went with the MX-100M DRO which works great, has a good display, and is easy to use. You can read the manual for the DRO if you like, but it’s pretty straight forward. I did move it from the right side to the left as I did not care for having the quill feed levers in the way. I also made an extension so the display is out farther and not blocked by the power & speed control box. Finish on my R8 spindle was really good and I measured less than .0005” of runout in the R8 taper with everything locked down – more if you applied side pressure to the quill.
The three things that are sort of disappointing/frustrating come down to this:
The PM728 is touted as being Ultra Precision and a step above the other mills in the class, but I found that there are a number of things that, in my opinion, are just poorly executed.
First, the X & Y lead screws, while robust in size, have the wrong bearings to properly transfer axial loads and provide smooth motion. Each screw has a 6002 radial bearing and a 51204 thrust bearing (x-axis has two 6002’s, one at each end – back of y-axis floats). These are fine, in one direction, but induce slop in the movement and transfer axial forces to the radial bearing, which then starts to bind up and provide a crunchy feel.
Looking into it, this is how a lot of machines are built. I also found that 51204’s are only meant to be loaded one direction, which explains why the crunchy feeling comes into play when the radial bearing starts getting loaded axially.
I decided to fix the thrust problem by means of adding a split collar plus an additional thrust bearing to the inside of the lead screw flange. This allows for the slop to be taken up at the flange and with thrust bearings on each side, movement is now much smoother. I did end up replacing two of the 6002’s as they were not smooth, possibly due to damage from being loaded axially.
The Y-axis was handled in the same manner, albeit it was a bit more complicated due to the limited space around the split collar to the base casting. I ended up having to sand down the socket head cap screws. I also made a 15mm deep spacer to step the thrust bearing away from the base casting. A side note – I don’t think my machine had a once-over on the y-axis as it developed a ton of slop as I used it. Found out that the cap screw holding the lead screw nut in place was loose and needed attention. Side note #2 – I added a .031” shim between the table and the lead screw nut so it would align properly with the lead screw flange bearing. I had quite a bit of binding after I tightened it, which is why the shim was necessary.
The z-axis is an entirely a different bag of burritos and honestly is not causing me issues. It is not particularly smooth, or accurate, and sort of hangs up at times, but as it was explained to me by the guys at PM, it is what it is and the quill worm drive is your friend.
The second most concerning issue for my machine pertains to the main spindle bearings. There are two or three notable harmonic points at which one or more of the bearings are loud. I think it’s the top-most bearing, but not really sure. The sound is coming more from the area of the spindle pulley and is made worse by putting tension on the belt. The bearing whine come on at low rpm (150-300 or so) then again at 1150 rpm. I don’t have any significant vibration, but bearings should not sound like they do on my 728, end of story.
I’m going to let the unit break in for a while as PM suggested and see where this all goes. I don’t have a need to keep the pulley belt super tight, at least not as tight as the manual says to keep it, so that’s good. The tables are doing much better as they see use – I try and cycle then through full motion regularly. I like the one-shot oiler for sure.
The little things that just twist your crank are like when you find dings in the precision ground ways that the guys at the factory just said, “meh, it’s fine – ship it”. Nothing my precision flat stones could not handle, buy come on man!
Last bone of contention was the DRO install – a bit more care during the install would have resolved the x-axis aluminum angle shroud from rubbing on the mounts causing movement in the y-axis. These were fixed by simply adjusting the scale and the shroud. I added a cable guide so the x-axis cable would track better as the table moved. Now the DRO is working well.
This is all great but what have I done with the 728 you ask?
Please keep in mind I have never machined anything before. I know CAD and doing designs and such, but I have only played with my SB lathe to this point. My only exposure so far to milling is a bunch of web research and videos.
I saw that many people commented that tool changes are a pain. You need three arms so you don’t drop a 2lb drill chuck on your vice or mill bed. Since I did not want to drop the coin at this time for a pneumatic collet release setup, which is really cool by the way, I decided to design and build a quill locking mechanism as my first go at milling. The attached photos show what I did. This lock is now installed on the mill and is functioning really well for tool change outs as well as tightening up/loosening a drill chuck. I have used it for a few days and is a huge help.
The 728 is a great little mill and I would recommend it if you are looking for a machine with a smaller footprint that has plenty of capability and power. Don’t fuss over the 1HP motor – its plenty strong. Also, keep in mind that the 728 has x & y axis throws that are larger than similar machines, which is nice.
I have really appreciated reading many of the posts here on THM - most all have helped me get to where I am now with the 728.
Keep on sharing and as always, I appreciate your constructive comments.
Attachments
-
 728-front on stand.jpg220.7 KB · Views: 155
 -
 728-side stand.jpg187.1 KB · Views: 160
 -
 x lead screw flange.jpg250.2 KB · Views: 136
 -
 x-axis lead screw flange inside.jpg192.3 KB · Views: 125
 -
 x-axis lead screw flange inside-2.jpg206.4 KB · Views: 126
 -
 y lead screw split collar and thrust bearing.jpg169.8 KB · Views: 120
 -
 y lead screw split collar and thrust bearing-2.jpg433.1 KB · Views: 115
 -
 y-axis lead screw nut with shim.jpg200 KB · Views: 128
 -
 slide lock left-1.jpg215.9 KB · Views: 125
 -
 slide lock left-2.jpg220.6 KB · Views: 131
 -
 slide lock front.jpg222.2 KB · Views: 127
 -
 slide lock bottom unlock.jpg169.1 KB · Views: 132
 -
 slide lock bottom lock.jpg155.1 KB · Views: 156
Last edited: