- Joined
- Sep 22, 2010
- Messages
- 7,223
Pedestal Grinder Modification for Grinding Single Point Tool Bits
By Jim Hanrahan
--------------------------------------------------------------------------------
Here is a quick and easy modification to a standard pedestal grinder that will make grinding single point tool bits with nice straight angles. It is especially helpful when grinding thread cutting bits for the lathe. This idea is not new and I forgot where I learned of it. It is very similar to a feature that comes with a standard "carbide" tool grinder. However, if you have not already done this, you might benefit from this tip.
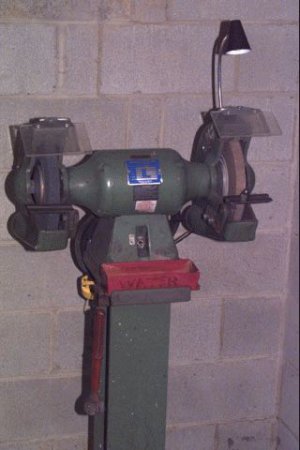
Figure 1. - Pedestal Grinder
Figure 1 shows my Baldor pedestal grinder. This type of grinder has simple, flat, tool rests which can be adjusted, although tediously, to give an approximation to the desired end relief angle (let's use 5 degrees), see figure 2.
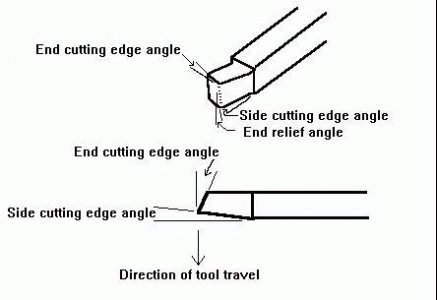
Figure 2. - Tool Bit Nomenclature
This means that the surface of the tool rest and the tangent to the wheel is more than 90 degrees, in this example 95. The wheel is circular, therefore the tool bit is cut with an arc instead of a straight line, but my 10 inch wheel reduces that somewhat. The problem comes when trying to put the side cutting edge and the end cutting edge angles on the tool bit. Especially, when grinding thread cutting bits, this must be a straight line at the desired angle. Holding the tool bit by hand made this task difficult.
Figure 3. - Using the Jig
Figure 3 shows one solution. It is composed of a simple jig that slides in a slot milled in the grinder tool rest.
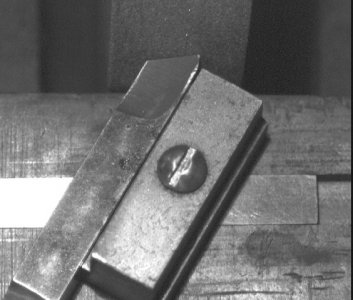
Figure 4. - Slot in Tool Rest
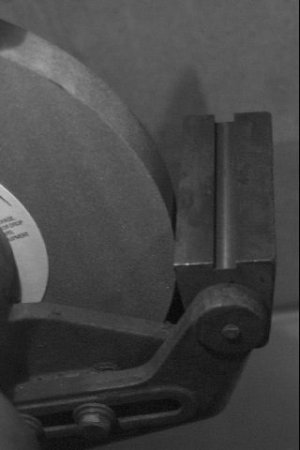
Figure 4 shows the slot in the tool rest which is parallel to the surface of the grinding wheel. When dressing the wheel, I recommend using the slot for reference to maintain this alignment. I sized mine for 1/8 by 3/8 flat stock. Leaving some room for clearance and to allow the flat stock to slide back and forth in the slot even when dirty, I made it 0.150 deep and 0.385 wide. In use, press the jig against the side of the slot closest to the grinding wheel. The jig rests on top of the tool rest, so the 0.150 dimension leaves clearance at the bottom of the slot for grinding dust.
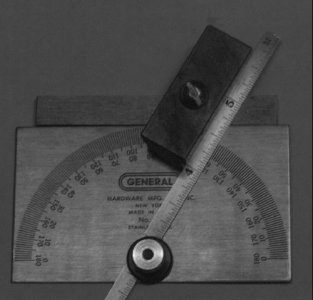
Figure 5. - Setting the Angle
Figure 5 shows how I set the angle using a protractor. I used oil hardening flat stock (I used it unhardened) for the part of the jig that slides in the slot since its dimensions are nice and square. The set up shown is very simple and only required drilling and tapping the hole for the 10-32 screw. The block that the tool bit rests against has a clearance hole and the 1/8 flat stock is tapped. Simple, but it works!
--------------------------------------------------------------------------------
Jim Hanrahan
 View attachment 102124
By Jim Hanrahan
--------------------------------------------------------------------------------
Here is a quick and easy modification to a standard pedestal grinder that will make grinding single point tool bits with nice straight angles. It is especially helpful when grinding thread cutting bits for the lathe. This idea is not new and I forgot where I learned of it. It is very similar to a feature that comes with a standard "carbide" tool grinder. However, if you have not already done this, you might benefit from this tip.
Figure 1. - Pedestal Grinder
Figure 1 shows my Baldor pedestal grinder. This type of grinder has simple, flat, tool rests which can be adjusted, although tediously, to give an approximation to the desired end relief angle (let's use 5 degrees), see figure 2.
Figure 2. - Tool Bit Nomenclature
This means that the surface of the tool rest and the tangent to the wheel is more than 90 degrees, in this example 95. The wheel is circular, therefore the tool bit is cut with an arc instead of a straight line, but my 10 inch wheel reduces that somewhat. The problem comes when trying to put the side cutting edge and the end cutting edge angles on the tool bit. Especially, when grinding thread cutting bits, this must be a straight line at the desired angle. Holding the tool bit by hand made this task difficult.
Figure 3. - Using the Jig
Figure 3 shows one solution. It is composed of a simple jig that slides in a slot milled in the grinder tool rest.
Figure 4. - Slot in Tool Rest
Figure 4 shows the slot in the tool rest which is parallel to the surface of the grinding wheel. When dressing the wheel, I recommend using the slot for reference to maintain this alignment. I sized mine for 1/8 by 3/8 flat stock. Leaving some room for clearance and to allow the flat stock to slide back and forth in the slot even when dirty, I made it 0.150 deep and 0.385 wide. In use, press the jig against the side of the slot closest to the grinding wheel. The jig rests on top of the tool rest, so the 0.150 dimension leaves clearance at the bottom of the slot for grinding dust.
Figure 5. - Setting the Angle
Figure 5 shows how I set the angle using a protractor. I used oil hardening flat stock (I used it unhardened) for the part of the jig that slides in the slot since its dimensions are nice and square. The set up shown is very simple and only required drilling and tapping the hole for the 10-32 screw. The block that the tool bit rests against has a clearance hole and the 1/8 flat stock is tapped. Simple, but it works!
--------------------------------------------------------------------------------
Jim Hanrahan


 View attachment 102124
Last edited by a moderator:

