Mine sandblaster sucks!!!

I made a water trap with a long and short tube using a 5 gallon plastic bucket and am not happy with the results. Tempting to get the Dust Deputy but, it looks so easy to make from a traffic cone. Might try building one, if I cannot get it to work, then part with the money for the D.D. Whistling is a concern.
Paul
 
Screen your sand regularly, and put a line dryer on your air line. Water in your air line makes the media jam up in no time.

Chris
 
My shop vac is a 5 gallon Ridgid. I used all large diameter hose (2 1/2"?) and there is no whistle. I did not cut the hoses down. There are three 8ft lengths of vac hose on it. Cabinet to Dust Deputy, DD to shop vac, and vac to outdoors.

I tried making a water trap, but the vac just collapsed the bucket as soon as you turned it on.

It has worked perfectly since I put the Dust Deputy on.

GG
 
I was just researching the dust cyclone issue as I do drywall repairs in completed homes, and the people living there are not happy about a lot of dust. check out this link for a large unit that could serve a whole shop. On some woodworking forums guys have scaled this design down to a 5 gallon bucket with a great deal of success: http://www.jpthien.com/cy.htm

A five gallon bucket with a couple pieces of plywood, a couple of pvc fittings and a lid is all that is needed.
 
Update about Buffalo Tools
I received my metering valve, hoses, foot pedal and blast gun. The foot pedal is identical to the Tacoma unit. The blast gun looks identical to the Tacoma unit, difference being the ceramic nozzle. I did receive 4 different sized nozzles with the blast gun. The metering valve looks similar to the Tacoma unit, theirs has a better finish and a nicer looking flow adjustment. The flow is just an air bleed to reduce or increase the amount of vacuum on the blast media and my valve assembly did not come with the adjuster. On mine, it is just a 7/16" coarse thread bolt that threads in to close off the 2 bleed holes. Not the greatest design but, I am sure it is effective. Since the metering valve assembly did not come with a tube to mount in the bottom of the blast cabinet trap door, I purchased a 1-1/4' pipe floor flange and a pipe nipple, this negates the need for a nut inside the trap door. The floor flange requires a large hole for the media and 4 smaller mounting holes for bolts. I will use Phenoseal Caulk between the door and floor flange and on the threads of the pipe nipple. Buffalo Tools does not stock all the parts. If you need any particular part, you have to call and ask. If they do not have it in stock, I was told they cannot get it. This is due to the stuff being made in China and what businesses deem necessary for inventory. Most state governments tax a company's inventory. To be honest, Tacoma is a good deal. I already had the air pressure regulator and did not need a second one. I also had many of the pipe fittings so that saved me a couple dollars also. I just started working on updating my cabinet. When complete, I will update with the results.
 
I had to do some production sandblasting for a project and my HF blast cabinet really wasn't up to the task. I haven't upgraded it yet. Has not been a top priority because it normally gets used for about 5 minutes every couple of months. The production job was sand blasting some plastic parts to get a mat surface and to hide minor surface scratches, about 200 pieces. I was having the normal problems with the sand delivery.

One thing I found is you have to keep plenty of sand available to the pickup tube. I had about 30 lbs in the hopper and it was starving. So off to HF and pick up two 50 lb boxes of 70 grit, black aluminum oxide (silicon carbide?). Never doing any thing by half measures, dumped both boxes in, that helped, no more starving.

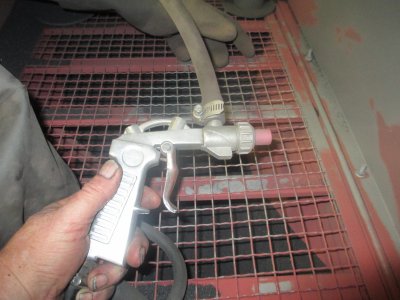
I cut about 10 inches off of the suction hose because it was getting tangled up in my work. Oops, that didn't work well, now it kind of crimps on the bottom because of the way I wanted to hold the gun. OK, now what? I started looking at the nozzle and realized the venturi could be installed with the suction tube on top. Remove the ceramic cup, and reach in with a 10mm deep well socket and remove the air nozzle, pull off the venturi and rotate 180 degrees and re-install everything.
IMG_0481.jpg


This made a nice loop over the top and no more crimping. Sand delivery was just about doubled! Cut my per-piece process time down by about 2/3. Much better!

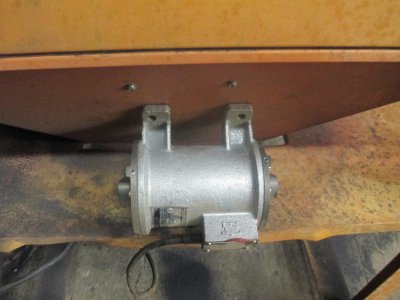
The next mod to the cabinet will be to install this concrete vibrator to shake the sand down. I bought this for another project and found I didn't need it. Hopefully this will eliminate the need to bang on the cabinet with my knee.
IMG_0483.jpg

I'm also thinking about installing a couple of air tubes down low in the sand hopper to ''fluff'' the sand to keep it from packing. This would be on a manual valve that I could hit occasionally.

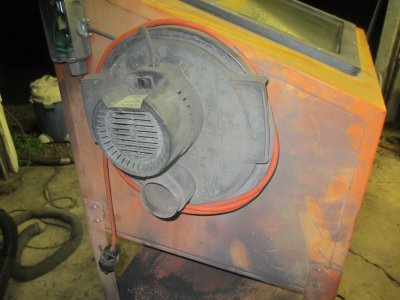
Here is a picture of my dust control, an old shop vac bolted directly to the cabinet. No filters on it so the dust is going through the vacuum motor. It's still alive after 4 years, but starting to get noisy. I just run the hose out the shop door.
IMG_0484.jpg

The other problem is my air compressor. I inadvertently turned my 5 HP compressor into a 2 1/2 HP compressor when my old motor blew up after 25 years. The original motor was a 3450 RPM motor and being an idiot, I ordered 1725 RPM motor. It has worked OK for all operations in my shop but is coming up a bit short for sand blasting. It will maintain about 70 PSI continuous, but I would like to have a lot more. With a full tank (150 PSI) the sand blaster works very well, but at 70 PSI, not so much. I will be ordering a 12 inch motor pulley for the compressor to get it back to the original speed. This is going to be a recurring order, so time to upgrade a bit.

I'm thinking about installing a 3 phase motor and a VFD to run the compressor, that way I can run it at low speed for normal operations, and speed it up when I need more air. Just thinking about this right now, not sure I want to spend that much money on it.


.
.
 
Back
Top