- Joined
- May 7, 2014
- Messages
- 776
OK, another project finished on the new setup and work on the Used Mill. That project involved getting my Mill and Mill stand into a stronger and more rigid state. Why.... What's up? Being new some things I expected this mill to just up and start cutting into steel like butter. From all the "Tooling Mfr. Hype" of brochures and claims; I expected these cutters to hit insane depths and feedrates on my Mill too. KerPow- It really gave me a black-eye when I first started about 2 months ago. Felt like... So Milling is a waste... Someone toss me a handfile pls. ;-)
A small Hobby mill at 1K pounds or less on a stand is sticking up like a tuning fork when you Mill. It wants to Sing and Clatter all over in certain ways and means IMO. There are some solid posts in this site about what to expect, what you can do, and how to approach stability and Mass of these small Mills to workloads.
From my side, for the rest of my fellow Newb's I just wanted to see if posting some recent experiences over a broader range of the components involved helps at all. I also love all the ideas people offer back more that anything else.
Mill Tooling/cutter sizes - My hobby Mill is expected to cut hardened 1045 that was Plasma cut. I read the literature from these big Tooling Mfrs about these .5" depth O' cuts and SFM's in the "oh so fast" range that I just figured I would buy good cutters and go cut steel in the 1/8" to 1/4" DOC. hahah NOT.
The Mill was setup. I put in a 5/8" Super Duper endmill. A nice expensive Carbide and expected this Mill to "go to town" on the workpiece. .... that thing slapped and chattered so badly that I almost instantly shut it all down. Needless to say I've wreaked a few cutters but I expected too! Honestly. It's all about learning from the mistakes as well here. In the end, I now run 1/4, 7/16 and a sometimes max of 1/2 end mills. I can do a 5/8" but it's all so light & slow that I can do better w/ smaller in a sweet spot. And how deep? .004 to .007 max w/ a step over in the same range. That is until I get things tight and dampened. Will know soon as I have two axes to make from some hard steel next week. Looking forward to it!
So when you read that Cool brochure noting .5" max cut depths and step-overs as wide as the cutter itself . . . Insure your Mill can even take these and keep to some semblance of Mfr specs. My guess is it will not come close.
Software Used for "Speed and Feeds"; Yeah, this one was a bit of a shocker too. The two Big names on F&S software and I was really unable to be effective with them until I learned how to do the calculations, get the IPT and work per tooth into a range the MFR liked and keep the Speed and feed rate in a sweet spot for the far smaller Mill that these cutters are used upon. This was a week of Trial and Error alone.
Note- Call your Cutter Co's tech support if you are buying quality stuff. IMCO, MA Ford, all the big guys have tech support to talk to you about your setups. In the end I did and they helped me get into the ballpark too. Just a comment that they will help too.
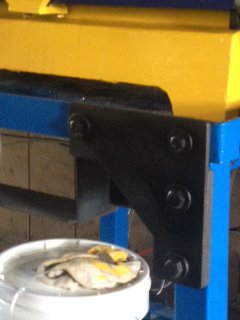
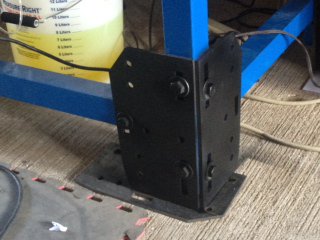
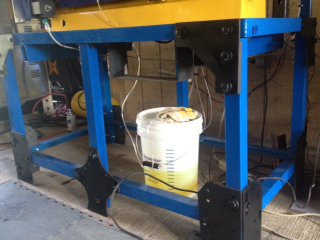
As for solutions, What could I really do? Time to stiffen things up was the conclusion from other posts here! The out of the box Mill and stand together are close to 1500Lbs. And it was sitting on these little tiny Feet. After seeing how a "thunk" w/ a board end, or a brass mallet left it vibrating on I elected to remove those feet! I made some special bracing to go all around my Stand. (pics below). I could have just used a sheet and bolted around the edges, but that did not solve a few other things I need to do later on. So bracing is the way I went. Others here it could be as simple as a sheet of something bolted around the unit in some manner? onwards....
I am lucky in that I own a CNC plasma cutter setup. (and it's fun to make things) I have 1/4" plate in the house and after reading a few posts from the guys on this site about firming up my Mill ASAP I designed (in Draftsight) a few sets of braces. I quickly cut them out and started the process of Drilling and Bolting away. and drilling and bolting and drilling and bolting.
Yet, after just a few braces on the bottom I would hit the Mill & stand to find a far deader thunk as opposed to the singing and ringing of before. I'm about done and the next and final chapter will be trying to deaden the Mill base and Spindle areas some. Again, reality check. It's good enough now. anything else is for Winter when I'm bored. Diminishing returns -vs LOE (level of effort) at work here too. Sometimes I need to be smacked (Remember)that it's a hobby Mill. a Hobby... Huh! Tell the Wife that. She's under the impression I've married it.
the CNC Cookbook site has some unique posts and dialog about filling your Mill stand and Column with a Sand/Epoxy mix in order to deaden the Vibrations. Seems logical to me! But the effort and the work he went through looked rather extreme. Check it out if you need to pursue that end. There is only so much you can do w/ braces and bolting too. Balance is always best I suppose.
And then there are the Fenner belts and clones. If you have a belt drive, some people just seem to swear by these. Especially on Hobby Mills. I've found many people who claim it's freed up a lot of the chatter on runs? I have 5' of that on order from Grizzly and it's very reasonably priced. They call it "power twist" If it gives me another .001/002 of depth and a few more SFM - Over the long run in time it'll pay for itself.
Milling and cutting into quality steel (not aluminum and brass) is a big step for a hobby Mill IMO. For mine it was anyway. And for me to jump straight in to Hard steel really taught me how to be patient and evolve towards my Mill. Not the Mill to me. It's a serious mix of tooling, feed & speed (Hobby Mill values), Mill setup and dampening, and I hope - Some suggestions from ya'll.
So a few pics on what I did w/ the Plasma cutter for some braces. - Oh - If you really want to have some fun a Plasma cutter is so so so so Cool! I find an excuse to cut something a few times a week it seems. A 10 acre Farm and a lot of gear keeps that thing running often. It is also far simpler IMO to 3D CNC work. It's a GREAT hobby too. Just FYI.


