Making a cup in the end of a bar

use your moment thinking--- and before you cut the long slot out--use some fine emery cloth to finely polish the inside of the tube and only have the cutting section no more than half inch and the slotted about 2 or 3 inches---make sure the slotted out area is deeper than half the diameter---so the punch outs will spin out as you are cutting more------you won't get a hole in the center but you can use a little lubricant on the Id every so often to help them slide up and out easy---this will keep your press running without stopping for each piece---you can always solder a small angled piece on the inside to make sure they are forced out if necessary but if your slot is wide enough then they should eject with the spinning force---if your tube has a thicker wall--- then when you turn the id on the lathe turn the area just after the cutting edge a larger Id-----then cut out your long slot---they definitely will spin out easy then-------Dave

Yes ....gotcha ... " Brilliant " :thumbzup3:,
Now my only problem is .......where do I find a 40 mm ID bore thin wall smooth tube six inches or so long , that's why I turned the thin wall on the cutter .
I thought I'd cracked it with some new car exhaust piping but the diameters are ( so far ) way too big on the bits I've been able to source .
I may have to end up inserting a turned up cutter head inside a bigger tube and slipping some /drive /locating pegs in the circumference then glueing a turned cover /collar / sleeve over the drive /locating pegs to keep it burr free and safe where the pegs have been inserted . Then make the cut out slot in the bigger tube . Finally fit a turned insert with the driving flange & spindle to fit in the drill press at the other end of the tube.

:talktogod: I have an inkling that contractors construction 12 or 20 foot long scaffold tubes may be my salvation , along with judicious use of my 9 " long indexed boring bar & electric " Whizzer " cutter ...... Just got to beg , steal or borrow a short length that I can get in my car .:lmao:
 
Last edited:
Now that is what asbo's were created for :)

did i ever mention the time my neighbours called the noise pollution people about the arial mast on their house being lose and banging on the wall. Ahhhh ow well takes all sorts to make a human race :)

On topic, can the punches be used without turning the drill on if their sharp enough? I occasionally want some high density foam washers etc and i normally hack them out with craft knife or scissors. Your method seems better :)

Stuart

Yes look on eBay for " hollow punches " or " saddlers punches " some are as cheap, as chips ,. others are an arm and a leg & some.
You just lay the punch over the foam which bis laid over a decent backing board and give it a wellie with a big hammer , as the throat of the punch fills up with the foam disks they gently self eject through the slashed throat .

The big saddlers ones have a stirrup affair over the punch tube ..usually it's a square bar but I suspect that they can easily be turned down to a round one to fit a drill chuck ( unless the whole thing has been induction hardened or case hardened .. which is unlikely in any case ) .
 
That's a SketchUp drawing. If you're not familiar, it's a free program from Google. I started using it 2 years ago. I'd never done anything in 3D before, and really had no CAD experience. There's lots of tutorials available online. I watched a few and started playing around with my own designs. Give it a try--too cold to work outside anyway, right?

Drills, grinders, and files--they'll do the same job as the mill. Will just take a little longer, but it's not really a terribly huge project. Persistence will win the day!

Jim

Thanks for the programe's name Jim :thumbzup3:.. Guess what I'm going to play at till the weather warms up a bit ?
 
I have a need to make a shape like an cup or drinking tumbler on the end of a 1 & 1/2 " bar of steel and once made and tested for correctness I'll turn a stem on the bar so it resembles a stemmed wine glass so I can fit the cup in a drill press and cut out zillions of foam circles . The cup's internal dia is 22 mm , OD is 24.5 mm with a depth 11 mm .

.

what is the ID of the cutter you need---I thought it was 22 mm--but you are talking about a much larger one now---am I just confused--let me know the exact size ID you need and I will look to see if I have a tube that will work---Dave
 
Arrrrrraqgh !

I'm heavily dyslexic some days in numbers and words ( stroke & medically induced ) I have a fight an a half every time I use the computer , spell check helps but does not autocorrect the wrong correctly spelt word or a set of incorrect numbers .

The washer cutter needs to be 1 & 1/4 inches internally to give a 1 & 1/4 inch dia washer . ie a 40 mm dia washer .

Thanks for the offer , however I may have a workable solution . (Besides the shipping /postage to the UK is extortionate these days. )

I think I have solved the problem , I will cut the existing cutter off half an inch above the cutter lip in the thicker metal and then perhaps weld two round bars on opposite sides & do the same with the driving shaft end . That will give me an extra half an inch clearance to eject the disks by gentle centrifugal force .

I also think that if I set a square faced point in the wooden anvil ( a ground to size No 10 wood screw going right through the wood ) I should be able to pierce the foam as I cut the washer and as it separates from the main body it will rotate inside the cup thus making a decent drain hole
The next two washers or so to be cut should see the fully holed washer ejected.
 
There is an old saying that states " Strong belief triggers the mind to find the way " , I have it pyro-iron burnt into a wooden plaque that hangs on the lounge wall not ten feet away from where I'm now sitting.

Today I went to order my new Mitsubishi Outlander PHEV , the car is going to be adapted by a specialist company to cover my disabilities .
As I drew up by the company office of those who will be doing the modifications I saw a large car towable, open four wheeled trailer loaded with all manner of odd looking bits of what I presumed to be scrap . In it I saw loads of heavy thick walled tubing , so once business was concluded I cheekily asked if I could go diving in the trailer for some bits of 2 inch or so of tube that might be in the trailer , " So I can play on my antique metal working lathe " , " Sure fill your boots " was the reply .

I'm now the proud owner of several three foot lengths of 43 mm OD mild steel tube with a 6 mm thick wall , which should be just dandy to make my cutter out of :)). Even better .. I think it may be cold drawn seamless mild steel for the inside is nigh on as smooth & shiny as a shot gun barrel .

In a few days I hope to have received a reasonable / decent brand new QCTP , a set of new indexable cutting tools plus a hand full of spare tips and a couple of buckets full of associated lathe working goodies ...
I think I'll delay doing anything till they have all arrived and then it's going to be " Playtime " folks .

I promise to take photo's and post up how it's worked out .

Thanks to all those who have commented so far and given me food for thought .
 
No telling what you'll find if you pay attention, eh? It sounds like you've got all the ingredients there or on the way there. . . . Looking forward to what you come up with!

Jim
 
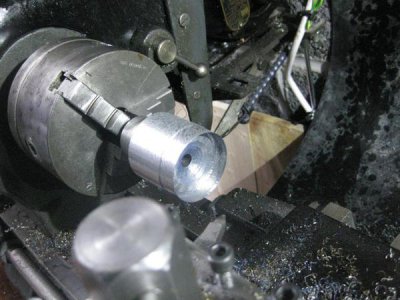
Well folks I finally got the Mk 2 version of the disk cutter made and tested , I cannibalized the MK 1 solid turned up bar steel prototype , took off the cutting lip gave it several shaves and also cut the driving stem down by 1/2 " , then turned up a separate deeper self ejecting cutter ( it's too long :lmao: so I had difficulties getting it positioned for cutting . ).

I had to make an anvil to do the self ejecting but will have to make a new anvil as I've turned the material around the anvil away too much . This has resulted in the foam tearing away in the last few mm giving a ragged ( still useable ) edge to the disks.

It looks like I will now be making a complete Mk 3 version cutter & a Mk 2 version for the anvil for I've learnt a few interesting & useful things .

Now some pictures for you to smile at and shrink away in horror from :-

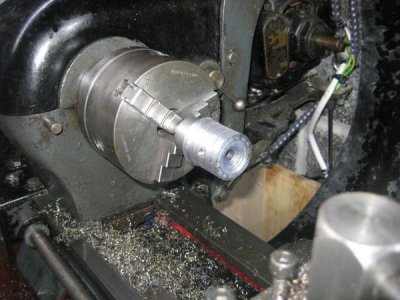
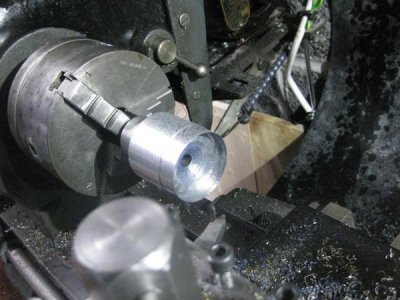
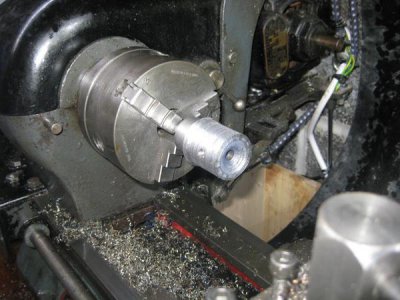
I chucked up & cut down the original disk cutter IMG_5873_zps8088ff6d.jpg.

IMG_5874_zps5ad9e155.jpg

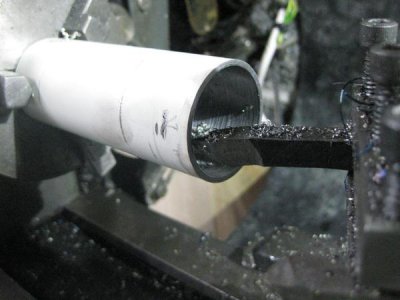
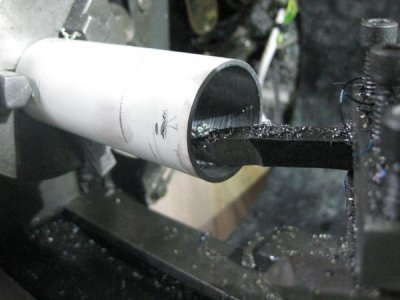
Cut some old scrap metal tube and turned the disk cutter I /D to size .
I used a self ground up right hand cutter as I'm waiting for some indexed tools to come next week ... Big surprise when I discovered I'd ground it just about right first time round on a skanky 30 yr old double wheeled general purpose electric grinder .

IMG_5870_zps192a7ddb.jpg

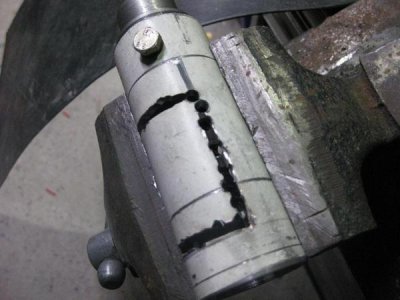
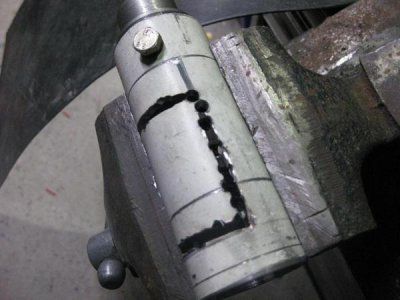
I chain drilled every 6 mm using a 4 mm drill after dot punching the drawn in ejection slot . I should have cut the transverse cylindrical slots first to get the edge of my 4" angle grinder disk down in size so when cutting the vertical slots I would not have over run the drilled & marked line a tad .


IMG_5876_zps92624013.jpg

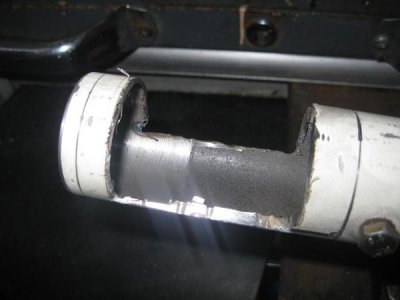
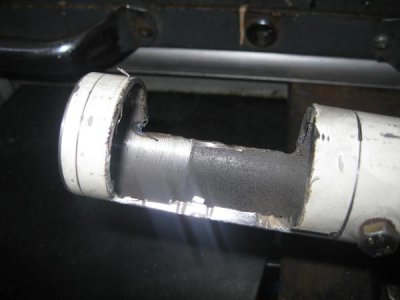
The ejection slot roughly drilled and ground out.. had a bit of file pushing to do to get it a bit safer across the sharp edges and aesthetically looking .

IMG_5877_zpscafb1f94.jpg

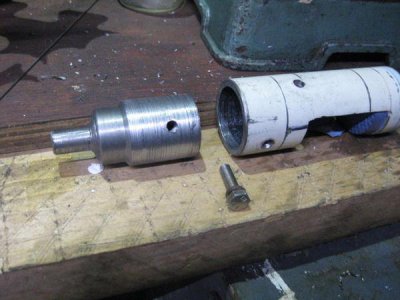
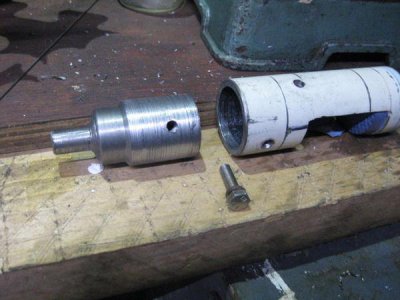
Parts for assembly ..yes it is rough turned , I don't have any precision measuring devices yet , save for MK 1 eyeball & some work hardened fingertips ... What do you want ... Blood ? :lmao:


IMG_5882_zps4679f990.jpg

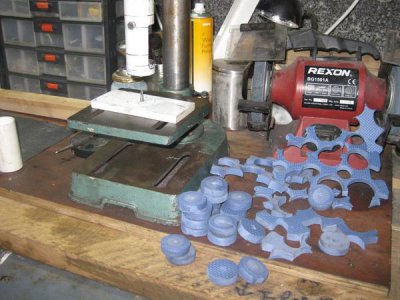
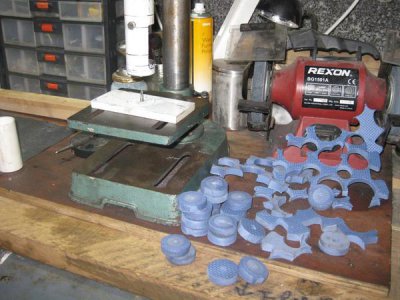
The proof of the pudding shot ... I made 48 disks in just over 7 min .

IMG_5883_zpsc1faec9a.jpg

The white anvil on the drill press table is located in the centre hole with a turned to size spacer washer with a clearance hole for the TEK screw . I used some scrap UPVC strip that I've had for 10 years or more for anvil . It has has worked well in holding the foam whilst is being cut out and also making a centre drain hole in the foam at the same time . You can just make out the fact that the cutter has cut out below the surface of the plastic as it has rotated , this is how the anvil has been made .

Give it a week or so & I hope to present a picture of the final cutter version with a modified anvil .

IMG_5873_zps8088ff6d.jpg

IMG_5874_zps5ad9e155.jpg

IMG_5870_zps192a7ddb.jpg

IMG_5876_zps92624013.jpg

IMG_5877_zpscafb1f94.jpg

IMG_5882_zps4679f990.jpg

IMG_5883_zpsc1faec9a.jpg
 
Last edited:
Back
Top