Improvements to my sons new HF lathe

geckocycles

Active User
Registered
Joined
Aug 9, 2011
Messages
67
hf lathe.jpg
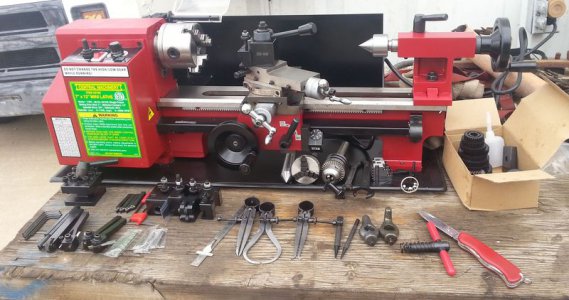
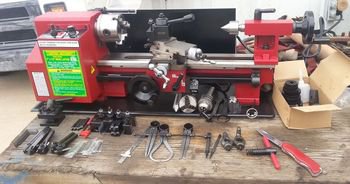
I tightened and adjusted what I could and took some test cuts. I was surprised how well it worked for light cuts right out of the box. There was lots of room for improvement though but decided to play some more. After a hour of use the cuts started getting chatter marks. Inspection revealed the spindle had developed some play and I couldn't get the taper out of parts, .005" in 2". There were multiple loose and tight spots in everything so the bed and all ways got scrapped and lapped in. This took days. I got the bed way thickness front and back within .0003". The carriage "gibs" were a pain to adjust if not impossible with the saddle on. This will get addressed later. I cleaned up the center slot that the tailstock T-Nut rides in and surfaced the casting underneath on the Bridgeport. This was good to .005" average from end to end with little effort. Called it good enough.

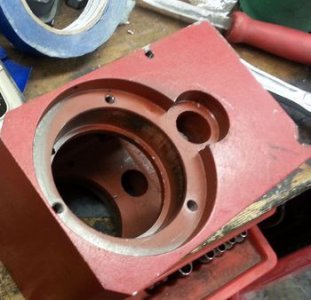
Well this sure doesn't help and I was hopeful this would cure the taper issue. Can't hurt to clean up all this paint. I ordered new bearings that were better designed for lathe applications. The bearings that come with it are not good bearings for this. Why they are installed from the factory is beyond me. I decided not to use taper bearings and go with 7206B-2RS Angular Contact Bearings. You have to make a spacer to use these.
headstock paint.jpg

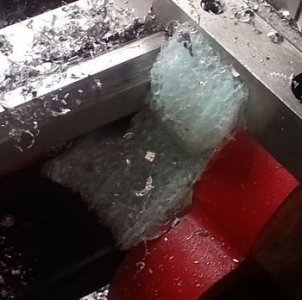
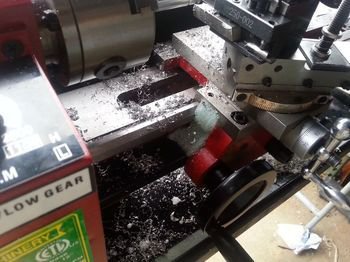
There was big issues with chips getting in the gears. A temp quick fix that worked pretty well was hot glue some foam. I wanted to move on to more important issues. I now have made a lexan cover for the carriage drive gear like LMS one.
chio gaurd 2.jpg chip gaurd.jpg

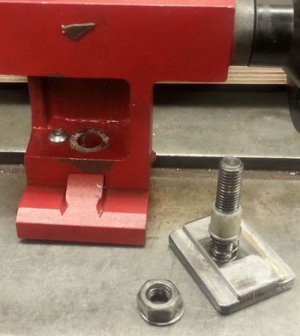
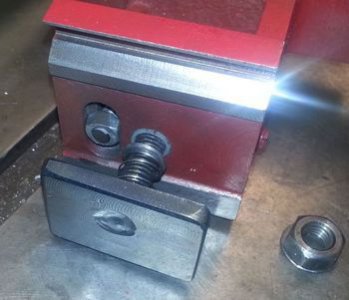
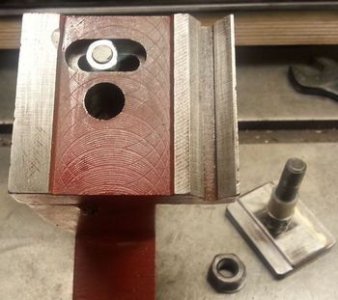
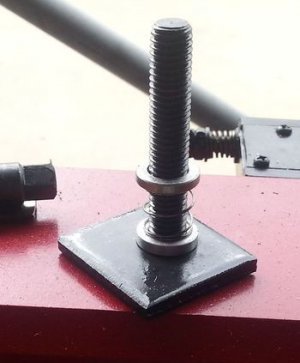
The tail stock action was horrendous. It took too much to loosen and tighten. With the center slot width and thickness machined, T-Nuts work real nice with just a quarter turn. Even with this spring added the stock hold down nut had to go. These are the mods I did. The nylon sleeve in the bottom made a huge difference. The hole is just too big and needs a spacer of some kind.
Stock nut is junk even with a spring
tailstock hold down bolt.jpg

Moved on
tailstock hold down bolt 2.jpg tail bottom.jpg tail bottom 2.jpg

Spotting, scraping and lapping carriage. After a few hours I got this. I wish I took a picture before. I was scared to go further. as I might loose what little contact I had on the inner V.
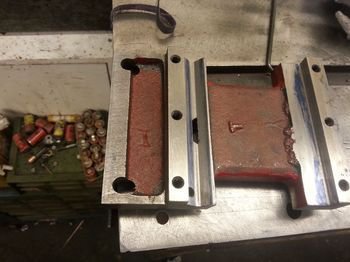
cross slide lapped 1.jpg

Then after another hour or so. This is awesome!
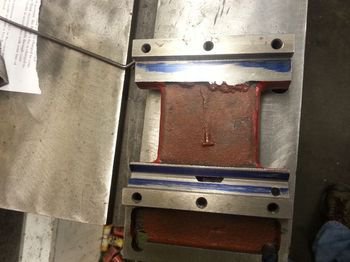
cross slide lapped.jpg

Using existing holes this is my carriage stop. I will move this to the back next time I have the carriage off for the taper gib mod.
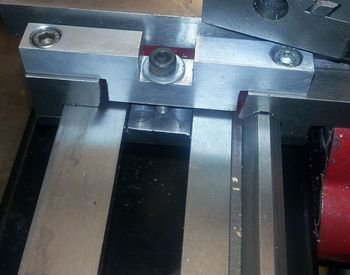
carriage lock.jpg

The cross slide had issues. The bottom of the slide was rubbing on the carriage.
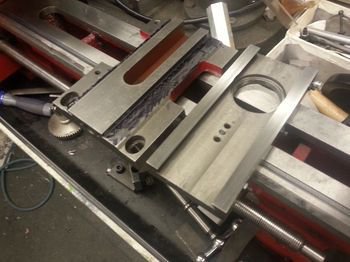
cross slide issue.jpg

I lapped it in this way and it worked pretty well but I knew it wasn't right. I bought a 7" shaper a few years back and this was the perfect machine for it. This is the first cut that I made on it! COOL! Even after removing .003" off the carriage it made no change in the movement of the slide. Interesting. At the time of this writing the slide has a one slight tight spot. It is acceptable for now. http://www.gecko-innovations.com/images/shaper.avi
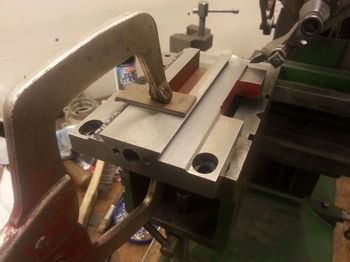
cross slide scraped.jpg

Lapped in the compound. I only had to scrape a small area. I use valve grinding compound for my final lapping.
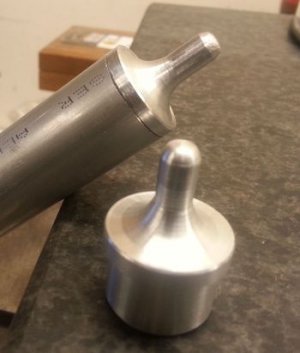
Not bad! Form tools are rippin. 1.25" hex. My neighbor asked my son if he could make some custom pins for camping tarps that would press into AL tube. Worked out great and gave my 16 yr old great satisfaction to have had made something and even get paid for it.
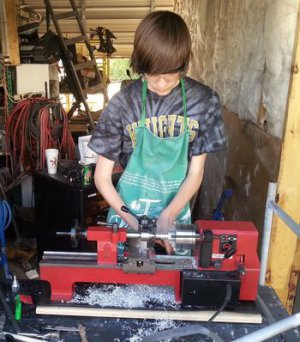
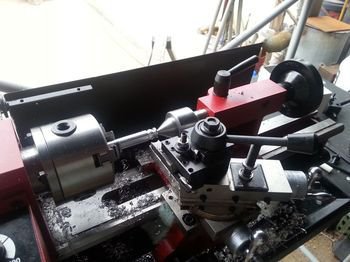
vics lathe.jpg first form tool test.jpg tarp pins.jpg hex pin.jpg

hf lathe.jpg headstock paint.jpg cross slide issue.jpg chio gaurd 2.jpg tailstock hold down bolt.jpg tail bottom 2.jpg tail bottom.jpg tailstock hold down bolt 2.jpg cross slide scraped.jpg first form tool test.jpg cross slide lapped 1.jpg cross slide lapped.jpg carriage lock.jpg hex pin.jpg chip gaurd.jpg tarp pins.jpg hf lathe.jpg vics lathe.jpg
 
:man:
scraping in a mini lathe??? i love it!!!!
that's got to be one of the most tricked out mini's out there!!!!
sweet job
mike:))
 
Looks good! I had to scrape and lap the underside of my bed as well. I also had to shim the apron and pillow block for the lead screw. I gave up on the spring metal saddle gib adjustment and shimmed it. I shimmed it a little tight and lapped it in by oiling the ways and putting lapping compound on the bottom of the ways where the gibs ride, and slinging it back and forth for what seemed like forever. Took me a couple weeks to get everything done but it was a world of difference. And that little lathe made everything I ever asked it to make.

The LMS tailstock quick lock is also a good mod.


Never heard of bearing problems in the mini lathe, they are known for minimal runout.

chris
 
Last edited:
Found some 3/4 key stock, 1018 though. IT will have to do.
I got some 1/2 A36 plate and started making the gib fixture. Squared up two ends and fly cut both sides, drilled 8 mounting holes and locating pin holes to fit the shaper table. Put 1//16" tig rod under one end of the plate and bolted it down to the shaper table. This produced 5.7 deg taper. http://youtu.be/2lCaQhibKmw
I played with cutting the taper and stopping short of the end of the jig.Perfect job for the shaper. I thought this would help hold the gib better. I later opted to cut all the way through and drill pins for stops. This was not the fastest way to do it but lots of fun experimenting. I also cut a small dovetail that I though would also act as a hold down somewhat. THen I thought about just tack welding the key stock and gib material to the jig. I just had too much time in it to make it disposable.
I used my Vernon #0 horizontal mill to drill the 3 holes through holes in the 3/4 key stock. This was the first time I used it. The collets I got sit in too far in the spindle bore for my liking though but this is what I could find as far as B&S 9 tooling. It worked like a champ. A good bit of belt noise from sitting for so long.
Tomorrow get to actually make a part that will hopefully fit the lathe.
 
Last edited:
Got a 13" square 1/4" brass plate, cut a 1" strip out of it. Took a few thou off the surface, flipped it over and bolted it to the taper jig and milled in the taper. THen cut it with slitting saw to .255". I should of made one .275" for the rear gib.
mill%20brass%20gib%20strip.jpg
mill%20gibs.jpg


Cut the step and taper in the bottom plate that holds the gib. Lapped all these in to size. I milled and lapped the top of the L plate till I got the fit of the gib to where I wanted it. With only .57 degs of taper it doesn't take much to move the gib a great deal.

Used the H Mill to drill the end of the L plate for the gib adjusting screw.
drill%20h%20mill.jpg


Found a nice 5x.8 screw with a 1/2" flange. I am using a jam nut to secure the gib screw.
carriage%20gibs%20done.jpg


gib%20screw.jpg


new%20screw.jpg


This is my gib jig.
taper%20jig.jpg


This is amazing improvement. Very time consuming getting this all lapped in. I just don't know where i am getting the patience. To make things easier I scraped the last 3" of the end of the bed .0008" less than the rest of the bed. With the taper gib system this wouldn't of been needed. I did this when using the shim and or stock setup gib setup.

I have yet to need to use a screw driver on it. With the .6 deg taper it takes very little effort to move the gib screw by hand.

mill%20brass%20gib%20strip.jpg


mill%20gibs.jpg


drill%20h%20mill.jpg


carriage%20gibs%20done.jpg


gib%20screw.jpg


new%20screw.jpg


taper%20jig.jpg


mill%20brass%20gib%20strip.jpg


mill%20gibs.jpg


drill%20h%20mill.jpg


carriage%20gibs%20done.jpg


gib%20screw.jpg


new%20screw.jpg


taper%20jig.jpg
 
Last edited:
Looks good! I had to scrape and lap the underside of my bed as well. I also had to shim the apron and pillow block for the lead screw. I gave up on the spring metal saddle gib adjustment and shimmed it. I shimmed it a little tight and lapped it in by oiling the ways and putting lapping compound on the bottom of the ways where the gibs ride, and slinging it back and forth for what seemed like forever. Took me a couple weeks to get everything done but it was a world of difference. And that little lathe made everything I ever asked it to make.

The LMS tailstock quick lock is also a good mod.


Never heard of bearing problems in the mini lathe, they are known for minimal runout.

chris

The runout is great. The spindle just wasn't aligned with the bed and then got some play in the bearings from the form tools. New bearing made a world of difference as did just removing the paint from the castings where the bearings press in.
 
Seems like the venerable little 7X has found itself a good home when it came to your house. There are so many little tweaks and improvements available for them it is almost mind boggling. I started down that road when I first got started with mine, but decided I was only pursuing a fools errand trying to make the little 7X into something it would never be. Don't get me wrong there are a good number of mods that really do help the machine, but I decided that rather than continue to pursue that elusive perfect machine that I would be ahead by getting a larger lathe that was capable of doing what I was trying to modify into my 7X. I found a fellow who had a 9X20 that he would allow me to make payments on and eventually brought that one home. I felt like I needed the additional length so that I could build custom air rifle barrels and integrate the noise suppressor along the entire length in a fashion very similar to Gamo's Bull Barrel option among others. I can sit under the pecan tree and have several squirrels in the canopy above me and they never hear the rifle when I pop them into oblivion. Same goes with Rabbits and any other critter up to about the size of a large Bull Mastiff or great Dane. I'm pretty sure if I had ordered the .22 caliber version of my Pre Charged Pneumatic I could even take a small deer because of the power it is capable of delivering. When I charge the reservoir to the full 3000 PSI it can shoot through a solid core exterior door consistently with no problem at all and groups a decent .50 sized pattern. Most of the flyers I experience now are either due to poor operator interface or a ballistic ally damaged pellet. I can shoot a super sonic 4.5 grain alloy pellet as well as a 23 grain sub-sonic bullet shaped pellet with equal ease and know that they will all strike the target at or near the original aim point with varying degrees of energy available to complete the task of dispatching the critter in a humane way. All in all I am very happy with what the 9X has done to improve all three of my magnum powered air rifles and the 7X is still occupying a spot in the shop and being useful for various other projects along the way. The little Chinese machines are a great gateway into the machining universe and have introduced many of us to the joy of owning our own little chunk of NASA technology at a price we can afford. About the only limits to what these machines can do is not really what the machines lack but the operators inability to think creatively to overcome the machines physical limitations. The 7X group on Yahoo Groups is a gold mine of all the different mods that are available and which ones get the most bang for the buck. Some of the mods those fellows have done are simply amazing, but they have more time invested in the machine doing that to them than they actually spend doing productive work, but to each his own. I am sure those fellows have a certain satisfaction knowing they have built and modified a mini lathe to perform like a regular full size machining center.

Bob
 
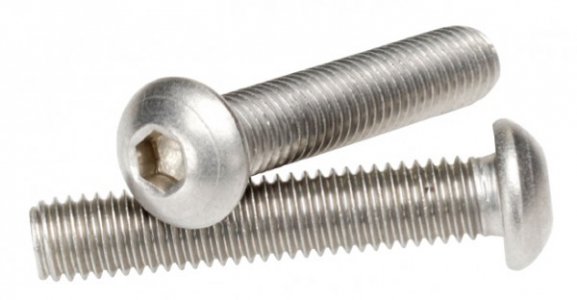
I just noticed you still have the knuckle bashing Allen head bolts in the cross slide and compound dials. I replaced mine with metric pan head bolts from the Ace hardware near me (they had them in stock on the nut and. Bolt wall). Never bashed my knuckles into them again.

Chris
6K.006-23741-1.jpg

6K.006-23741-1.jpg
 
I just noticed you still have the knuckle bashing Allen head bolts in the cross slide and compound dials. I replaced mine with metric pan head bolts from the Ace hardware near me (they had them in stock on the nut and. Bolt wall). Never bashed my knuckles into them again.

Chris
View attachment 92877

LOL. I did buy some of those at Jax yesterday.

At some point they will probably get recessed.
 
Seems like the venerable little 7X has found itself a good home when it came to your house. There are so many little tweaks and improvements available for them it is almost mind boggling. I started down that road when I first got started with mine, but decided I was only pursuing a fools errand trying to make the little 7X into something it would never be. Don't get me wrong there are a good number of mods that really do help the machine, but I decided that rather than continue to pursue that elusive perfect machine that I would be ahead by getting a larger lathe that was capable of doing what I was trying to modify into my 7X. I found a fellow who had a 9X20 that he would allow me to make payments on and eventually brought that one home. I felt like I needed the additional length so that I could build custom air rifle barrels and integrate the noise suppressor along the entire length in a fashion very similar to Gamo's Bull Barrel option among others. I can sit under the pecan tree and have several squirrels in the canopy above me and they never hear the rifle when I pop them into oblivion. Same goes with Rabbits and any other critter up to about the size of a large Bull Mastiff or great Dane. I'm pretty sure if I had ordered the .22 caliber version of my Pre Charged Pneumatic I could even take a small deer because of the power it is capable of delivering. When I charge the reservoir to the full 3000 PSI it can shoot through a solid core exterior door consistently with no problem at all and groups a decent .50 sized pattern. Most of the flyers I experience now are either due to poor operator interface or a ballistic ally damaged pellet. I can shoot a super sonic 4.5 grain alloy pellet as well as a 23 grain sub-sonic bullet shaped pellet with equal ease and know that they will all strike the target at or near the original aim point with varying degrees of energy available to complete the task of dispatching the critter in a humane way. All in all I am very happy with what the 9X has done to improve all three of my magnum powered air rifles and the 7X is still occupying a spot in the shop and being useful for various other projects along the way. The little Chinese machines are a great gateway into the machining universe and have introduced many of us to the joy of owning our own little chunk of NASA technology at a price we can afford. About the only limits to what these machines can do is not really what the machines lack but the operators inability to think creatively to overcome the machines physical limitations. The 7X group on Yahoo Groups is a gold mine of all the different mods that are available and which ones get the most bang for the buck. Some of the mods those fellows have done are simply amazing, but they have more time invested in the machine doing that to them than they actually spend doing productive work, but to each his own. I am sure those fellows have a certain satisfaction knowing they have built and modified a mini lathe to perform like a regular full size machining center.

Bob

I had a 10x36 logan for 35 yrs and did much more to it but different. I even machined the whole bed and scrapped it in. Used Garlok to bring the carriage back up. I needed a larger lathe so I got a 15x56 LeBlond. My son wanted to make some chess pieces and so he bought this lathe and I worked on it for over a week plus got him a large amount of tooling. It sat in his moms garage for 3 months and he never even opened the box. I bought it from him for $500 which is about how much I spent on extra tooling and materials. I told him that owning one of these is a hobby in itself. Kind of like my Logan was. There is endless upgrades you can do to these.
Time will tell for sure but the things I did with this is before I bought it from him was pretty impressive. With these latest upgrades I expect it to be a really fun and very capable machine if you keep it within it's limitations. I have larger machines for bigger stuff. It is really nice to work on a small machine sometimes. Changing chucks on the LeBlond is just not fun and you loose the feel turning small stuff. Don't get me wrong, I can turn a needle with my LeBlond but prefer to keep it for larger stuff.
 
Back
Top