How To Bore A Hole Which Is Off-axis, Using A Lathe

Maybe in not understanding right but from what I see why not bore the hole then Mount it between centers with the tailstock offset to the angle you need & then turn the shaft?

ETA: You'd still have to offset the end at the chuck so you still need a 4 jaw for this.
 
Last edited:
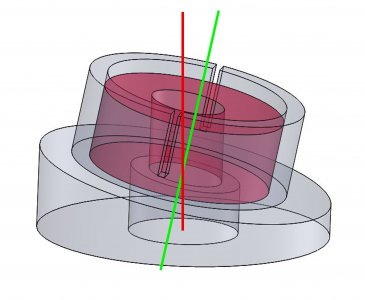
Having slept on this overnight, I think I can answer my own question. Regarding fabrication of the fixture Bob Sakowski suggests above, I believe it can be made/used in one piece as follows:

1. Chuck up the plate in a 4-jaw, with a shim under one jaw to create a 2° angle. (This puts the chuck CL on the green line in the below.)

2. Face the end, then cut the OD of the bushing which will hold the work piece. This will create the 2° slope in the plate.

3. Cut the ID of the bushing to slip fit the OD of the collars. Then cut the cross slot to allow clamping the collar.

4. Remove the fixture and shim from the chuck, and re-chuck without the shim. (The CL of the chuck is now the red line in the below.)

5. Bore (or drill?) a 0.75 “ hole completely through the plate. (I’m guessing this larger hole helps clear chips when cutting the 0.5” hole in the collar blank.)

6. Insert the collar blank in the bushing, clamp and bore a 0.5” hole through the collar. The centerline of this hole (red) crosses the CL of the bushing (green) at the bottom face of the collar.

7. After this, the fixture does not need to be removed from the chuck to bore the other collars.

A punch mark on the collar blank and the edge of the bushing will align and identify the direction of the off axis tilt, and the face to be installed toward the thrust washer.

One other question came out of this… Should I use an end mill to cut the 0.5” hole, or, with only 2° off axis, would a drill work? Location of the hole with respect to the collar OD can be ±0.010 max.Angled Drill Fixture - Centerlines.jpg
 
Having slept on this overnight, I think I can answer my own question. Regarding fabrication of the fixture Bob Sakowski suggests above, I believe it can be made/used in one piece as follows:

1. Chuck up the plate in a 4-jaw, with a shim under one jaw to create a 2° angle. (This puts the chuck CL on the green line in the below.)

2. Face the end, then cut the OD of the bushing which will hold the work piece. This will create the 2° slope in the plate.

3. Cut the ID of the bushing to slip fit the OD of the collars. Then cut the cross slot to allow clamping the collar.

4. Remove the fixture and shim from the chuck, and re-chuck without the shim. (The CL of the chuck is now the red line in the below.)

5. Bore (or drill?) a 0.75 “ hole completely through the plate. (I’m guessing this larger hole helps clear chips when cutting the 0.5” hole in the collar blank.)

6. Insert the collar blank in the bushing, clamp and bore a 0.5” hole through the collar. The centerline of this hole (red) crosses the CL of the bushing (green) at the bottom face of the collar.

7. After this, the fixture does not need to be removed from the chuck to bore the other collars.

A punch mark on the collar blank and the edge of the bushing will align and identify the direction of the off axis tilt, and the face to be installed toward the thrust washer.

One other question came out of this… Should I use an end mill to cut the 0.5” hole, or, with only 2° off axis, would a drill work? Location of the hole with respect to the collar OD can be ±0.010 max.View attachment 105803
I think you can use a stub drill but center drill first.
 
Sounds good but make sure you secure the shim so it doesn't fly out at you.

The Best of luck with your project.
 
For a shim maybe you could weld a small bead on one side and file it to the right dimension. That way you don't have to fool with an actual shim.


Sent from my iPhone using Tapatalk
 
Back
Top