

-
Welcome back Guest! Did you know you can mentor other members here at H-M? If not, please check out our Relaunch of Hobby Machinist Mentoring Program!
You are using an out of date browser. It may not display this or other websites correctly.
You should upgrade or use an alternative browser.
You should upgrade or use an alternative browser.
How is zero set on a thread mic?
- Thread starter Nutfarmer
- Start date
- Joined
- Mar 14, 2022
- Messages
- 696
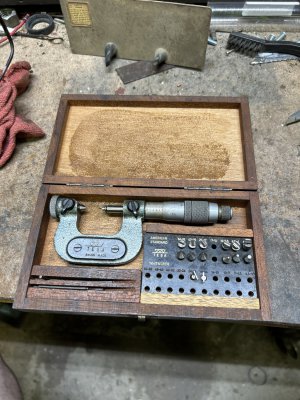
With the anvils (tips) showed in the picture you could set it with closing them down gently. Zero is not what's going to tell you if it's accurate; you'll want to use gauge blocks. I would set them with a gauge block stack of the nominal thread you want to check. Add a .0010" block and recheck, then remove .0020" to check if it's close over the range.
Inspect your anvils for signs of wear and damage; that could affect the accuracy of your readings. It looks like it's been around for a bit.
Inspect your anvils for signs of wear and damage; that could affect the accuracy of your readings. It looks like it's been around for a bit.
I have a similar mic that I zero as bone head described. Choose the anvils required closer then and zero.
I don't think the gauge block test will work and the anvils fit into each other so against a gauge block you are going to measure oversize.
Sent from my SM-S908E using Tapatalk
I don't think the gauge block test will work and the anvils fit into each other so against a gauge block you are going to measure oversize.
Sent from my SM-S908E using Tapatalk
It's hard to see but my set have a point at the movable side and another point at the fixed side but that fixed point has a fine V in it. If you have points at both sides then your mic will not be square to the thread will introduce cosine errors.The anvils in the mic currently appear to be pointed (for checking minor root diameter). That's why I suggested using gauge blocks.
For very fine pitches that V in the fixed side is small and in a low resolution photo like above will appear to be a point.
Each anvil should have it's pitch range etched into it.
Sent from my SM-S908E using Tapatalk
- Joined
- Nov 23, 2014
- Messages
- 2,607
I snap the appropriate tips in place and leave the slide lock on the anvil loose. Then dial the micrometer to an even inch and insert the gauge. Then slide the anvil in contact with the gauge and lock it in place. I back off the spindle and do a couple of test measurements on the gauge block. If it's off, I'll repeat the process above by "zero'ing" on the error/hysteresis amount.
For example, for the 1"-2" mic pictured below, I set the mic to 2.000" when locking the anvil (left side probe). I'd back off 0.010", then do a measurement on the gauge. If I repeatedly got 1.998", I'd repeat the set process but target 2.002" when locking the anvil.
If doing a 0-1" mic, I go to 0.000" (don't use a 1" standard). Same process if I overshoot past 0.000".
Bruce
p.s. You'll LOVE screw pitch mic's over triangles or wires.
- Joined
- Dec 20, 2012
- Messages
- 9,422
Go here and watch this video. Mitutoyo does a lot of stuff on the Quality Digest channel and they provide accurate info.
I own a set of Tesa 0-1 and 1-2 thread mics and follow the procedure in the video. I own the 1" standard as well, and that thing retails for over $200.00 so while it might be "preferable", it isn't all that practical.
Congrats on your new thread mic. It is a superior tool made to a very high standard.