How do you set up a tilting angle plate ?

Alcap

H-M Supporter - Gold Member
H-M Supporter Gold Member
Joined
Apr 16, 2019
Messages
745
After reading this recent thread about angle plates I bought a cheap hump style similar to ones posted . https://www.hobby-machinist.com/threads/tilting-vs-swivel-angle-plates.97836/. How would you set up the angle plate perpendicular to the way your planing on milling ? I thinking you would start by setting the angle then clamping the plate just snug ,then run an indicator along the tilted plate to make sure it’s parallel to the table ? I can’t imagine the T slots being true to the pivot point on a cheap import .
 
I'm sure you'll get many different responses here cap . I'll just say that after whatever method you use to get it right to your satisfaction , mill 2 datum points somewhere on the base to either indicate or use slot blocks to aid you in the future set ups . If you wanted to go the distance at a later date , pick up the datums and surface grind the entire surface . :)
 
Are slot blocks set in the T slots ? I might try taking a picture of what i have in my mind . That might be scary lol
 
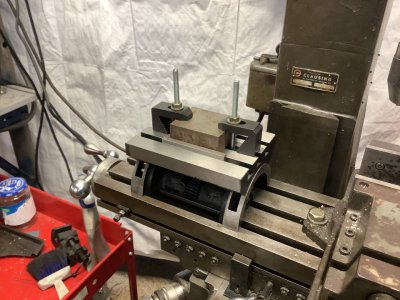
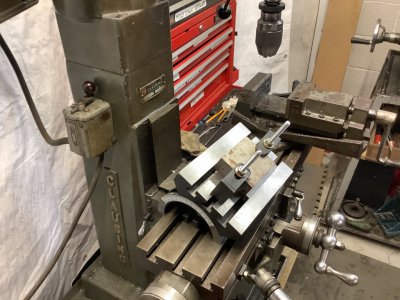
Here’s what I was trying to figure out in a example I clamp my stock and indicate it parallel in the first picture ( is that a block you meant ?) I crank the handle to the desired angle but how do i know its still parallel? I exaggerated example in the second picture . Maybe a dial test indicator with the little arm 90 degrees to the angle ? I’m sure its something easy that I’m not grasping
 

Attachments

  • F7C5F6BB-D0D8-443C-85DC-AA22BA2E2992.jpeg
    F7C5F6BB-D0D8-443C-85DC-AA22BA2E2992.jpeg
    145.6 KB · Views: 50
  • F5498B98-703D-4791-885A-796C2B1C312E.jpeg
    F5498B98-703D-4791-885A-796C2B1C312E.jpeg
    154 KB · Views: 46
The slot blocks I was referring to would be on the mill itself and would locate the tilt fixture . I make any and all fixtures aligned to the mills slots and either use 5/8" dowels , brass hex pins or blocks . I can use spacers between the pins/blocks to adjust my fixture's clamping slots to the mills slots . Just an easy and fast way to set up without having to tram the fixtures every time . Hope this makes sense . :grin:

Yes , your use of the blocks on the fixture itself is great also . :encourage:
 
... Maybe a dial test indicator with the little arm 90 degrees to the angle ? I’m sure its something easy that I’m not grasping
Yes, running a DTI along the X axis should detect the misalignment shown in the second picture of your post. The DTI will indicate that the surface of the plate is higher and closer to the operator on the right side .
 
Last edited:
That’s kind of what I thought I would need to do but wasn’t sure . I need to make more of the small T slot nuts or better yet if this sounds right . Tilt the table and indicate it like you said ,clamped down , tilt to the opposite side if those stayed true cut the T slots slightly bigger , then the outer edges of the table . It would be nice then to skim the lower part of the table so set ups would be easier like mmcmdl suggested . Boy talk about opening a can of worms !
 
I have a sine plate so the procedure is somewhat different. To properly use a sine plate or an angle plate, it is necessary sweep the rotational axis or a proxy of it. In my case, I can access the pivot pin with a test indicator. In the case of an angle plate, the rotational axis is virtual so it would seem that a certain amount of trust in the manufacturer's machining accuracy is necessary. If you are comfortable that the edges of the table are square and parallel to the rotational axis, you can use one of the two parallel edges of the table as the proxy. With the table set horizontal , sweep one of the parallel edges to set up the plate and lock the base in place. To set an accurate angle on the plate, You can set the z distance to the plate ising a dial indicator and move the table a a set displacement in direction perpendicular to the rotational axis. Then adjust the z axis to rezero the dial indicator or if, enough travel on the indicator, note its new reading. The angle can be calculated from the arctan of the ratio of the z axis displacement and the table displacement.

The workpiece can be mounted prior or after setup of the angle plate, depending on its geometry. You will most likely want to orient some feature with respect to the rotational axis. As an example, if you were making a V block, you would want the cut for the V to be parallel to one edge and you would probably set the edge prior to adjusting the plate angle.

There are a lot of factors that make an angle plate accurate. The base and the top plate must be machined parallel to the rotational axis. The edges of the top plate should be square to the rotational axis and square to the top surface of the plate.

As an initial trust but verify operation to qualify the angle plate prior to use, I would set the angle plate for horizontal and one edge parallel to a mill axis Then, I would sweep the top surface and adjust the plate so the surface was horizontal. If I couldn't get a sweep in the direction of the rotational axis to to zero, ot would indicate a manufacturing defect which could be corrected by grinding the top surface. Next, I would sweep the remaining three edges to determine squareness of the plate. To check if the top plate was parallel to the rotational axis to the rotational axis, I would tilt the plate to on extreme and sweep one of the parallel edges. with an edge finder. Then I would rotate the plate to the other extreme and repeat. Assuming that all sweeps are satisfactory, I would feel confident using one of the edges as a proxy for the rotational axis in my future fixture setups.
 
Here’s we’re quality would pay for itself. Let’s say you have a suburban tool and a eBay tilting plate.
The suburban tool will be square, parallel, axis of rotation will be spot on , tee slots will be parallel to table. Something easier to dial in and trust.
eBay table I’m gonna bet not one of those features I just listed would be with within .0002 tenths. That’s what suburban guarantees all their works and better if desired.
As for setting up the table I would run a indicator on the top surface and get it square to the machine axis.
Then I would Indicate the part to the machine.
For angles I would set a precise angle block upside down on table, tilting table while indicating angle block to read 0-0.
 
As been mentioned on HM many time a lot of these cheap imports are more like a casting kit lol. I had a little extra time in the garage and tried to see how flat the table was . At first just set in on the mill unclamped , was really having a hard time then realized its rocking corner to corner , I don’t have anything to really test it other then a piece of granite counter top , no matter how I turned it , still rocked on two corners ,a .015 feeler gauge slipped in very easy , took a new sheet of emery paper , used a marker and sure enough the two corners rubbed through first , Got the rock out pretty quickly but when I put strips of paper on the 4 corners you could still pull out the low ones , I didn’t want to go any more so put it back on the mill along with 4 new pieces of paper in the corners , it pulled tight without much clamping , it seems pretty good but the one side drops off , side to side wasn’t too bad under .002 “ I’ll mess around another time I was getting too cold lol.
 
Back
Top