HF 8x12 Lathe - 3 jaw chuck true up starting at .007 runout - need help

gorlosky

Active User
Registered
Joined
Jan 16, 2014
Messages
81
I have a HF 8x12 Lathe and I had runout of .007 on a 1/2 inch shank mill bit. I have trued up the body of the chuck onto the spindle and now have that at .0005 minus. I have taken the chuck totally apart, deburred and cleaned and reassembled and I still have unacceptable reading on runout. Can anyone tell me how to fix this without buying a tool post grinder and refinishing the grip, as if it is a problem with a jaw I don't want to band aid each internal external grip, if you know what I mean.
(PS: I also tried multiple tightening methods but the reading remain the same within a .0005 of any previous reading)
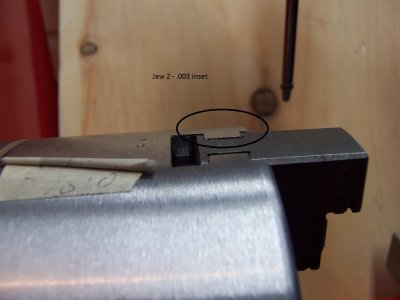
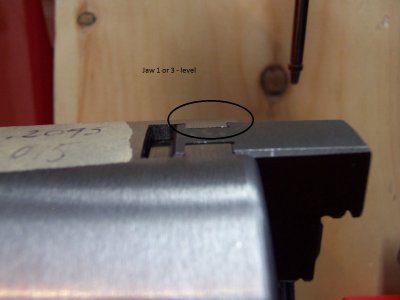
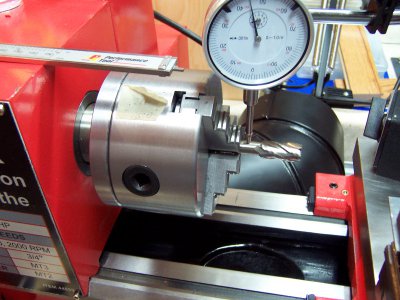
To get to the root of the problem I took 2 reading. 1 on the end mill shank as I hand rotated and 1 on the depth of the end of the jaw from the chuck body itself. To get accurate reading on the jaw end, I centered the depth end of a micrometer and rocked it balanced off the chuck body.
Clearly jaw 1 and 3 have an induced problem, because jaw 2 is going too far toward the center when gripping the material, which I could always remember to add a shim onto my working material of .002 to each of 1 and 3, but where to start to fix it ???
Any help would be appreciated.

Here are my reading:
Jaw 1 Drop = .0715, Runout = .0135
Jaw 2 Drop = .0740, Runout = .0100
Jaw 3 Drop = .0725, Runout = .0145
100_2257.JPG

100_2257.JPG
 
Last edited:
Well the way I put the jaws in order is the start turning the handle and when the scroll just comes around drop in jaw 1, then as I scroll onward drop in jaw 2 then 3. I also remove the external jaws and put in the internal jaws. I started to tighten the jaws until they just were even with the body and sure enough jaw 2 could be felt to be further toward the center by a tad. Tighten in the jaws all the way and then measuring their drop, shows jaw 2 in toward the center closer by .003 then jaw 1 or 2. So it is not the scroll, as I have measured on various pieces and the result is the same.
It is as if at the factory the jaw jig had some crud in jaw 1 and jaw 3 positions and that did not let them go all the way inward and I'll would hazard to guess that if Aronad would check his jaws he has the same issue as our lathes are 4 S/N apart.
 
If you mean that you have got the run-out of a three jaw chuck down to .0005 (5 tenths of a thou) you have done amazingly well, most 3 jaw chucks run out about 2 to 3 thou when new. 3 jaw chucks are not 100% accurate, and never were. If you want 100% accuracy, either use a 4 jaw and a dial test indicator, or take the chuck off altogether and turn between centres. I have just replaced the very worn 3 jaw on my Colchester Student which ran out about 17 thou (.017) when I first got it. I managed to improve it to the point where you could get this error down to about 6-7 thou with a bit of messing about. The replacement chuck is a used one, but "used" by a professional machinist, and is within about .0025 of being perfect. That is about as good as you get on most 3 jaws, and is good enough for all but the most accurate work. Remember, any work you make in the lathe will be 100% concentric as long as you machine all the surfaces and do not remove it from the chuck, and then part it off. It will not however be 100% concentric with the bar stock you part it off from. Very few machine tools are perfect. Machinists, even home shop ones, learn to know the inaccuracies in their machines, and to allow for them, and live with them.
 
Thanks, but I find that .003 is not acceptable. When I said .0005 minus, that was for the spindle and chuck body. The jaws are what are off when gripping a piece, and really I cannot understand why with both internal and external jaws sets when tighten inward, that they both exhibit the same fault on the same jaw position. Which means if I can't fix it, then I have to countershim all the grip surfaces of the opposing 2 jaws.
There has got to be a solution here ???
 
I gather from the pic that the lathe is new, or nearly so. You can indeed grind the jaws, as long as you tighten the jaws inwards onto some stops between the jaws , but it will only be more accurate at the diameter at which you grind it. Get in touch with HF and ask them what the tolerance is on their 3 jaw chucks. I doubt very much it will be any less that .003. Then remove the chuck and check the run out on the spindle register, and on the inside of the spindle bore. check that the threads and register on the chuck and the spindle and refit the chuck. Check the run out on the chuck back plate then on the chuck body, and finally on a known good test bar at 1" out of (away from) the chuck, 4" out and 8" out. Then you will be seeing where the errors actually are. You may be able to get it a little better, but on a HF chuck I would say that 3 thou is perfectly acceptable. If you look at the centre pin which the chuck scroll pivots on, there has to be some clearance, albeit small, or the scroll would not turn. If there is clearance, then the scroll will not be exactly concentric when the chuck is tightened, and will move of centre to the value of the clearance in the direction of the jaw that touches the work first. Then there must also be minimal working clearance between the scroll and the threads on the back of the jaws, so more error creeps in here. If you can get all this below 3 thou you are doing very well indeed! It is after all a HF and not a Hardinge. If you need more accuracy and repeatability, and you don't want the messing about of the 4 jaw or between centres, have you thought of a collet chuck? They are expensive, but very accurate. Trying to get a 3 jaw more accurate than 3 thou will be a hiding to nothing. Just accept that 3 jaw chucks are accurate (for a given value of accuracy)
Hope this helps
Phil
 
Thanks Phil - as I stated up above, the spindle with adjusted chuck body runout to less than .0005 (1/2 of a thousands), which is great. It is that jaw 2 that goes in ahead of the others, whether the internal or the external jaw set, so it has to be with the factory jig, is only thing I can think of. I would have prefer it to lag the others that way I would only have to shim the work piece for one jaw instead of 2.
My first project is to take a 1/4 sleeve and drill it out larger from .137 to .157, so you can imagine my frustration, with a drill bit that is .157 and a runout of .003, I end up with a sloppy big hole.
I do understand your comments about a little slop here and there with the scroll shaft and the scroll to jaw teeth contact, but why in the world is it just one jaw that is closer to center right from the beginning, even when not tighten on anything yet ? It doesn't make sense that both my internal and my external jaw 2 is closer to center by .003 no matter where when or how I measure it ???
Take a look at these pictures.
100_2261.JPG100_2260.JPG

100_2260.JPG 100_2261.JPG
 
Last edited:
If you think about the way the chuck works, when you are tightening the chuck onto nothing, the jaw at the top will have dropped till the front of the threads on the back of the jaw touch the scroll, whereas the lower two jaws will also have dropped till the back of the threads touch the scroll. This will only be by the amount of play present, but nevertheless, it will be measurable as error. Try putting a strong rubber band round the jaws to force them all inwards, then measure as they close. It sounds like (as you say) most of the error is attributable to one jaw. You could correct this some by grinding, but you will only correct it at the chuck diameter that you grind it at, although some overall gain is possible, but by no means guaranteed. Now I see the tolerances you are working too, I feel your frustration :-( but three jaw chucks are never perfectly accurate, even expensive ones. in the UK Pratt-Burnerd used to offer a reconditioning service. They gave it up!!
Phil.
 
Ok I have just seen your pictures, and what you say may be correct BUT the error you are seeing is on the outside (unused) face of an inside jaw, and represents the difference between that machined face and the thread on the back of the jaw. as that face of the jaw is unused, there is no reason to suspect that it is machined to the same tolerances as the internal (gripping) faces of the internal jaws. It could be.................but there is no reason that it needs to be. If you can measure the same error on the inside (gripping) face of the same jaw, then you have found the problem, and you could shim the other two jaws at 3 thou between the job and the jaw, or take 3 thou of that jaw. If the error is linear all the way as you close the chuck, in theory it should cure it!
Phil
 
Right, I have had another think, and now I am mistaken!! if you use the rubber band method you would have to use three rubber bands pulling the jaws outwards ( looped round those three chuck keys you keep specifically for this purpose ;-) ) so that the threads on the back of the jaws were touching the faces they would touch as the chuck is tightened! It is getting harder all the time!
Phil
 
Back
Top