Harbor Freight band saw modifications

It would probably be OK to leave the cylinder attached all the time.

Remember - the cylinder is just there to control the RATE at which the saw lowers itself. It won't affect downward blade pressure, assuming that some point in the fluid circuit is open to air.

If you're cutting thick metal, the saw's downward motion will be limited by its ability to cut. The cylinder's flow valve shouldn't slow things down any further, unless you have it closed way down.

Yea, that makes sense. As long as the fall rate of speed is greater than the cutting rate, the cylinder will have no effect. Thanks, I missed that in my thinking.

Mark Frazier
 
Wow, You amaze me Mark !

The cylinder looks great.
 
Wow, You amaze me Mark !

The cylinder looks great.
:thanks:

Thanks for that, but it is really simple. Just general machining practices. All done on the lathe and drill press ( and the saw I made it for). My point to it is: A hydraulic cylinder $250 or air cylinder about $50 and valves another $50 plus all the fittings. It will easily cost a guy $100 or more to do this upgrade to their saw. I wanted to show you can do it for a more reasonable amount. This cylinder cost me $15 for fittings. THAT'S IT. everything else was gathered from scraps from other jobs or just small pieces lying around. My goal as I have said many times is to show other budget strapped machinists it doesn't take a lot of money to have good tooling and accessories for your shop.

I don't throw anything away. For example, when I made the thread dial, I scrapped three gears before I figured out how to do it. Those gear blanks were a piece of good quality aluminum about 1.4" OD and about an inch long. They had messed up teeth cut on them and were useless. One of those gear blanks was machined to make the packing gland on top of this cylinder. Most guys I know would have thrown them out. I try to use even the small scraps.

Mark Frazier
 
I am the same with defects or error items .

I must have 4 trays of small pieces , all separated brass, alu, steel, stainless. It's my go to spot for projects

I didnt see a blade brush on your saw yet. any ideas on that ?

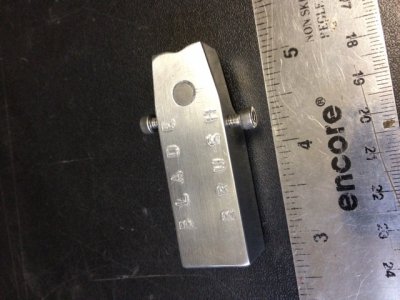
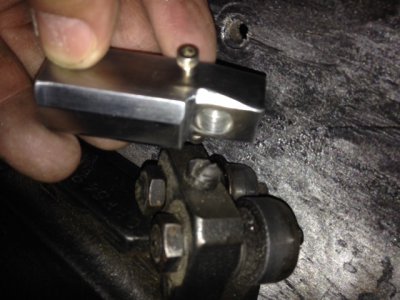
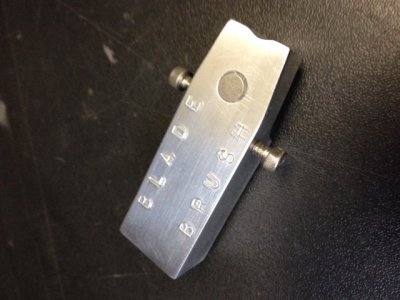
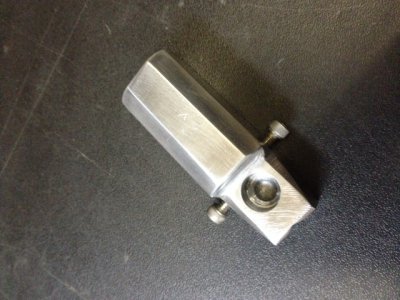
Here is the one I made from a scrap of aluminum (no milling machine). I need to change the magnet to a pair of 3/8" neo's for more holding power.

The bushes will be bolted to the sides (used tooth brushes).

IMG_1571.JPG IMG_1573.JPG IMG_1569.JPG IMG_1570.JPG
 
I am the same with defects or error items .

I must have 4 trays of small pieces , all separated brass, alu, steel, stainless. It's my go to spot for projects

I didnt see a blade brush on your saw yet. any ideas on that ?

Here is the one I made from a scrap of aluminum (no milling machine). I need to change the magnet to a pair of 3/8" neo's for more holding power.

The bushes will be bolted to the sides (used tooth brushes).

Yes , I am building one. You will like it. I built one that used tooth brushes similar to yours, and though it worked I found a better design. my new one uses a rotating brass brush 1" to 1 1/2" diameter on a 1/4" shaft supported by small ball bearings in a small 1"by 1" aluminum block. It mounts to existing bolt holes on the saw frame. Watch for it soon.

Mark Frazier


Here is the first part of the blade brush for the band saw. This is a rotating brush driven by running against the saw blade. It will be mounted close enough to just brush the blade teeth with little to almost no pressure and clean the chips off.

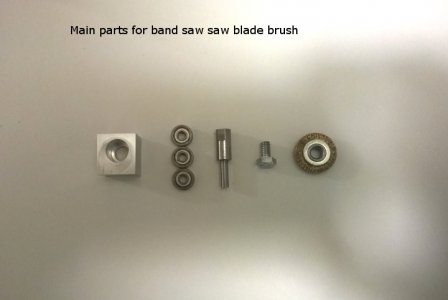
blade brush parts.jpg These are the main parts. the 1" x 1" x 3/4" block of aluminum is drilled and bored to accept the shaft and 3 little bearings. The bearings are some high speed ball bearings I got off eBay some time ago. I got twenty of these bearings for $6. The 1" O.D. brush came from Northern Tool Co. off eBay. I got 4 brushes four $4 and free delivery. The shaft is a piece of 3/8" steel round , 1 1/2 inches long, turned on one end for the bearings and drilled and tapped on the other end for a 1/4" bolt to hold the brush on. I cut wrench flats on the shaft behind the brush to fit an 11/32" wrench.

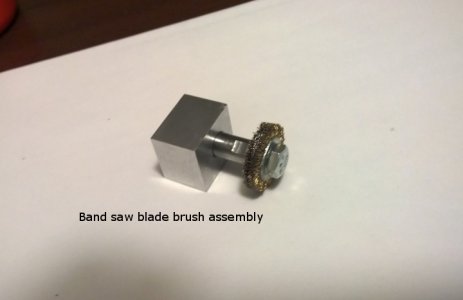
band saw blade brush assembly.jpg This is the brush assembly. There are three ball bearings stacked on the shaft to support the brush. This thing doesn't turn fast and there is little to no pressure on the brush. It just touches the blade teeth to remove the chips and keep them from building up in the saw. Tomorrow I will make the little bracket to hold it on the saw.

When finished and mounted , I will post the photos and the print so anyone else may have it.


Mark Frazier

blade brush parts.jpg band saw blade brush assembly.jpg
 
Here is the first part of the blade brush for the band saw. This is a rotating brush driven by running against the saw blade. It will be mounted close enough to just brush the blade teeth with little to almost no pressure and clean the chips off.

View attachment 89773 These are the main parts. the 1" x 1" x 3/4" block of aluminum is drilled and bored to accept the shaft and 3 little bearings. The bearings are some high speed ball bearings I got off eBay some time ago. I got twenty of these bearings for $6. The 1" O.D. brush came from Northern Tool Co. off eBay. I got 4 brushes four $4 and free delivery. The shaft is a piece of 3/8" steel round , 1 1/2 inches long, turned on one end for the bearings and drilled and tapped on the other end for a 1/4" bolt to hold the brush on. I cut wrench flats on the shaft behind the brush to fit an 11/32" wrench.

View attachment 89774 This is the brush assembly. There are three ball bearings stacked on the shaft to support the brush. This thing doesn't turn fast and there is little to no pressure on the brush. It just touches the blade teeth to remove the chips and keep them from building up in the saw. Tomorrow I will make the little bracket to hold it on the saw.

When finished and mounted , I will post the photos and the print so anyone else may have it.


Mark Frazier

Ok... the chip brush is finished.

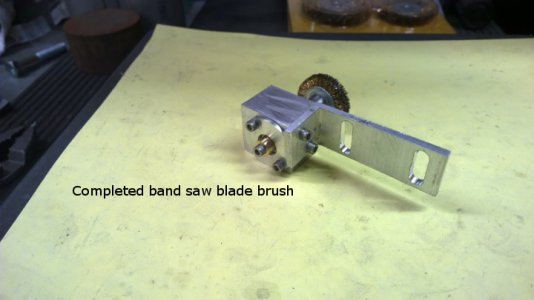
completed band saw blade brush.jpg I made a collar for the back of the shaft from a small piece of brass. It holds the bearings on the shaft. I also made an aluminum plate to cover the back of the housing an hold the bearings in. These are all fastened with 4-40 SHCS.
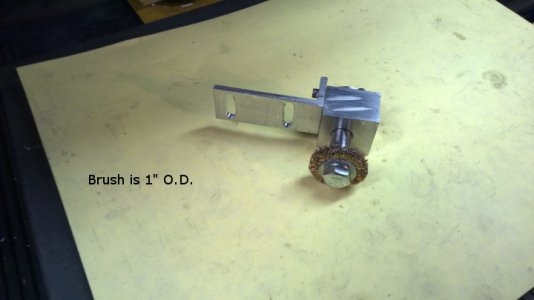
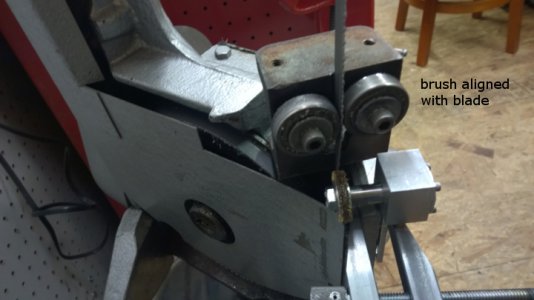
completed blade brush.jpg A piece of aluminum angle is mounted to the housing to mount the assembly to the saw. Slots in the angle allow for adjustment. The brush only has to lightly touch the blade to knock all the chips off.
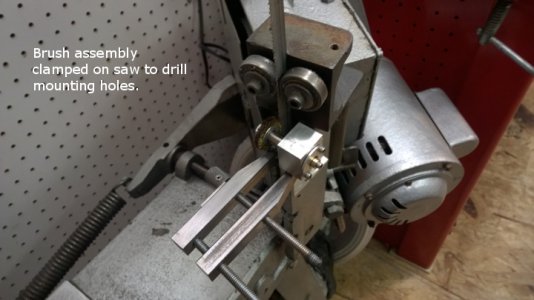
mouted brush.jpg I have the assembly clamped to the saw to drill the mounting holes.
blade brush.jpg This turned out really well . It may be a little over the top in construction and effort , but is actually simple to make and I wanted something of quality. ( I did the tooth brush blade claeaner. I just wanted something a little classier).

Mark Frazier

This pretty much brings this thread to a close. Now on to something else. :rubbinghands:

completed band saw blade brush.jpg completed blade brush.jpg mouted brush.jpg blade brush.jpg
 
Back
Top